Redis 7 Internals: Client Connects to Redis by TCP
I’m continuing the Redis 7 internals series. First off, this article is much shorter than the previous one, where I delved into an implementation of Redis server startup. If you’re not one of the six percent of people who managed to read that article to the end (assuming the Medium stats page is correct, and I’m confident it is), don’t worry. I’ll provide enough context so you won’t have to finish that big boy.
Short Recap of Redis Server Start-Up
Here, I’ll walk through the concepts that the client connection process relies on.
Epoll instance
An epoll instance is a data structure in the Linux kernel that contains an interest list and a ready list. When a file descriptor is added to the interest list, also known as an epoll set, the epoll instance monitors it asynchronously for events. Events are changes in a file descriptor state. There are mainly two such changes. The first one is when a file descriptor has data available for reading. In other words, it becomes readable: its state has changed from not-ready to ready for reading. The second occurs when a file descriptor’s buffer has available space for writing. In this case, such file descriptors are usually referred to as writable. As soon as any of those events occurs, the epoll instance adds the file descriptor to the ready list:
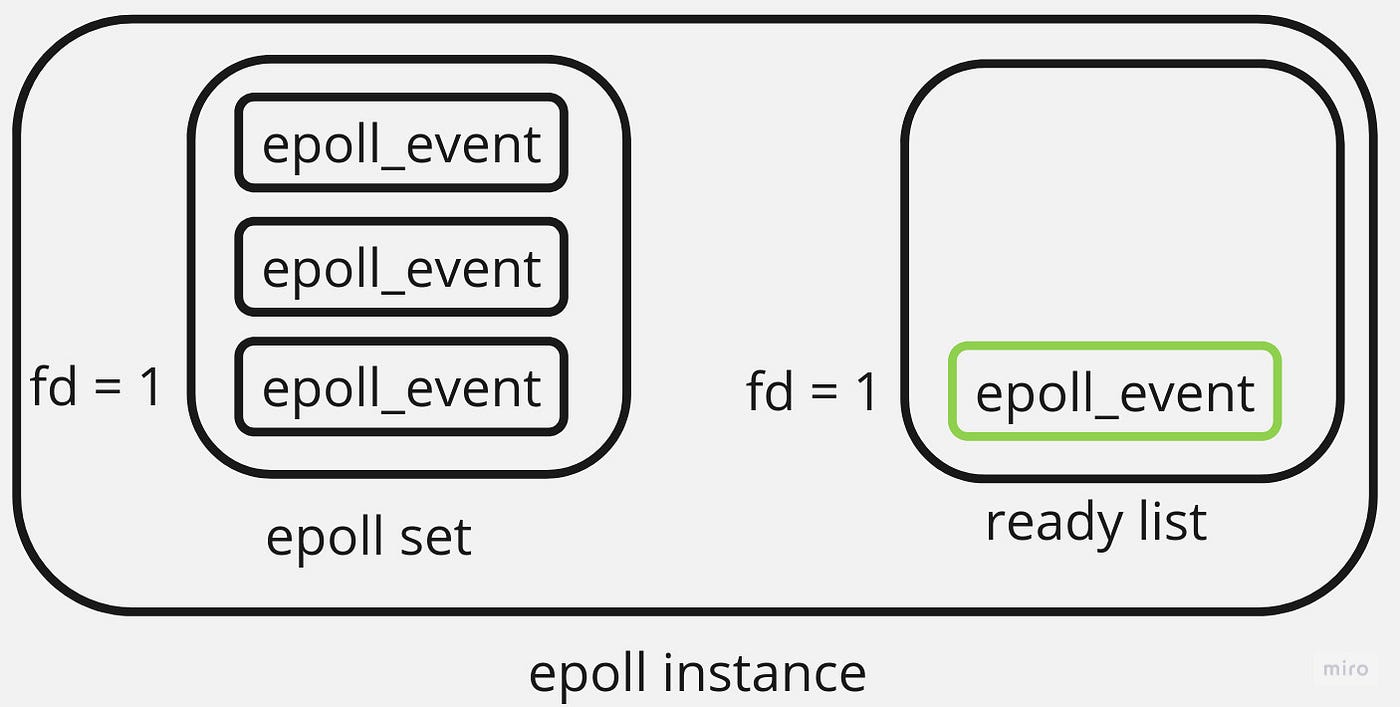
To retrieve the file descriptors that are ready for I/O operations, you can call the epoll_wait() procedure.
Epoll is one of several so-called multiplexing mechanisms that allow tracking file descriptors’ state asynchronously. It’s used in Redis when it’s built on Linux. Other systems use other implementations of the same concept.
Here is a bit more detailed version.
Event loop
Event loop is a programming construct built on top of a system’s multiplexing mechanism. Essentially, it boils down to obtaining file descriptors whose state has changed in an infinite loop. That is, those file descriptors are ready either for writes or reads.
It works by following a set of basic steps:
- First, you register interest in I/O events for each file descriptor using the appropriate system call. This is often referred to as subscribing to an event, which, as I’ve already mentioned, represents a change in the state of a file descriptor. For example, when a client connects to a listening socket, the state of the socket changes: it has a connection request waiting to be read and accepted by an application.
- Next, you wait for I/O events on the registered file descriptors by blocking the system call that depends on your multiplexing mechanism. For an epoll mechanism, this is an
epoll_wait()procedure. This can be either an indefinite wait until at least one event happens or a timeout can be specified. - Once a blocking system call from the previous step returns, you receive the events that have happened.
- Then, you determine the type of event that occurred (e.g., read, write) and handle it appropriately by executing the associated callback function.
- Finally, you repeat these steps to keep tracking the state of file descriptors asynchronously.
For event loop implementation details in Redis, you can refer to this section.
Listening sockets: user’s perspective
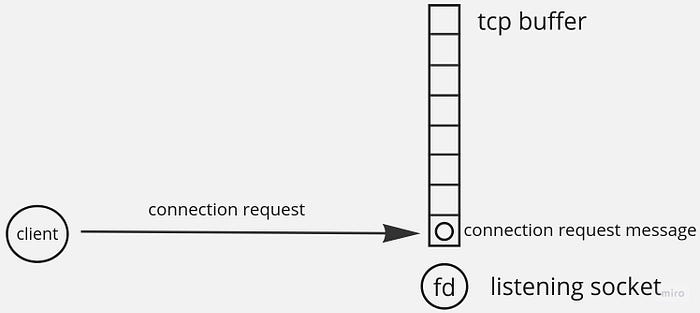
When Redis starts up, it creates listening sockets. They handle incoming connection requests. Redis can create TCP sockets when it’s connected to with TCP, and Unix Domain Sockets when it’s connected to locally. Each socket has an associated memory allocated by a Linux kernel. This memory is often referred to generally as a buffer. This is an umbrella term for all kinds of data structures used to store a TCP request until it’s processed. Typically, they all exhibit a queue-like behaviour. In case of connection requests, they are accepted from an accept queue:
When Redis accepts a connection request, another socket is created. It’s usually referred to as a connection socket:

From now on, it serves all client requests. I’m describing this in more detail in the main part of this post.
When listening sockets are created, Redis puts them in an epoll set for read events:
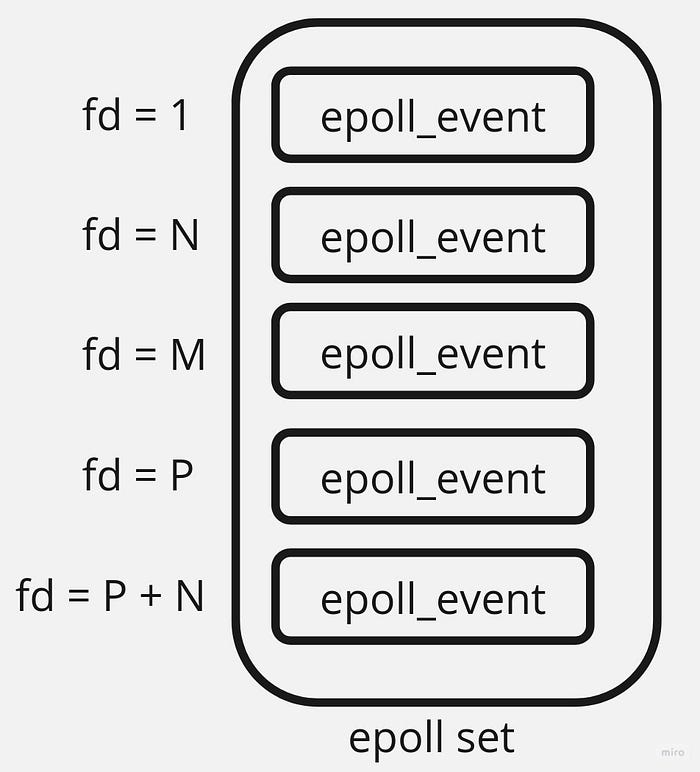
Thus, Redis checks whether there are new connection requests on each event loop iteration. If there are, Redis runs a specific procedure which I’ll consider soon.
Here you can find more details about overall connection lifecycle, reusable addresses, non-blocking sockets, and more. And here is a detailed description of what happens in the Linux TCP stack when a connection is established.
Redis Accepts a Connection Request
After a connection request is in a listening socket’s accept queue, it’s ready to be accepted by Redis.
On the next event loop iteration, Redis checks whether any of listening sockets are readable. If there are, then Redis executes a corresponding procedure. For reading listening sockets, that is, accepting a connection request, it’s a connSocketAcceptHandler(). First, it creates a connected socket, then it creates a connection and a client data structures associated with this socket, and puts a socket in an epoll set for read events. This procedure accepts up to 1000 connection requests from an accept queue in each event loop iteration. Here is what’s going on there on a higher level.
Now, let’s consider it in more detail.
Connection request accepting on a network level
This logic is implemented by the anetTcpAccept() procedure from an anet module. On Linux systems, a specific system call used for connection accepting is accept4(). It is similar to accept(), but with an additional flag argument that allows for various options to be set. Redis uses it to set an accepted socket as non-blocking automatically.
Briefly, here is what happens in the kernel. An entry point for connection request accepting is inet_accept procedure. All the heavy lifting is done in a protocol-specific accept() procedure, which in the case of TCP IPv4 proxies to inet_csk_accept(). It dequeues a head of an accept queue and returns it.
Connection data structure creation
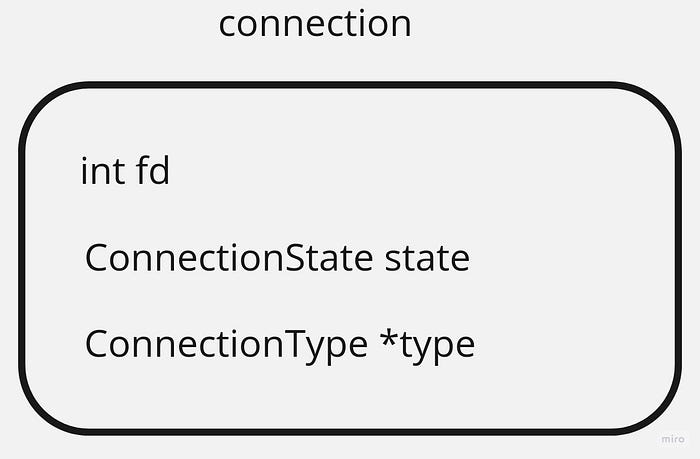
That’s what connCreateAcceptedSocket() does. It sets a connection type to CT_Socket. It’s one of the implementations of the ConnectionType type which contains many connection-related procedures. Besides, the newly created connection structure has a connected socket descriptor and a CONN_STATE_ACCEPTING state:
Why is it still accepting? Despite a connected being accepted on a network level, it’s not yet ready to serve client requests because its connected socket is not yet registered in an epoll instance. I’m describing it in the next section.
Client structure creation
If the total number of connections doesn’t exceed a maxclients setting, a client structure is created. Besides initializing all of its fields, there are some operations carried out with a connected socket.
Let’s take a look at TCP protocol again.
The Nagle’s algorithm
When sending data over TCP, each packet has a certain amount of overhead, including metadata such as the TCP header, IP header, and likely Ethernet header. This metadata is necessary for the packet to be properly routed and processed by the receiving end.
For example, if the payload is just one byte, the total size of the packet will be much larger than one byte due to the overhead. Assuming an Ethernet header size of 14 bytes, an IP header size of 20 bytes, and a TCP header size of 20 bytes (that’s the minimum possible size; it can reach up to 60 bytes though), the total packet size would be 55 bytes. This means that sending many small packets can result in a significant amount of overhead, leading to decreased network performance. To mitigate this, the Nagle algorithm can be used.
It works like the following. Before sending a new TCP segment, the TCP stack checks if there is unacknowledged data. If there is any, the TCP stack waits until one of the following conditions is met:
1. It has accumulated enough data to fill a TCP segment. The maximum amount of data that can be sent in a single TCP segment is called Maximum Segment Size, or MSS for short:

2. Or, there is no unacknowledged data remaining. This means that all previously sent data has been acknowledged by the receiver.
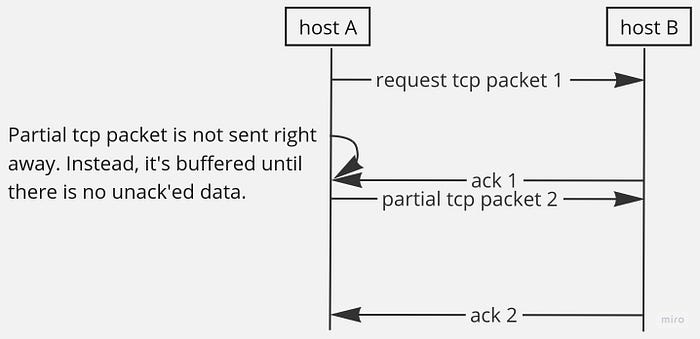
In other words, Nagle’s algorithm causes delays in the transmission of small packets when there is unacknowledged in-flight data. This way, it can reduce the overall number of packets being transmitted, which, in turn, can reduce network congestion and improve performance. When a connection is first established, the algorithm is enabled by default.
Just to clarify, when an application sends a tcp request and there is no unacknowledged data, tcp packets are sent right away, even if their payload is just one byte:
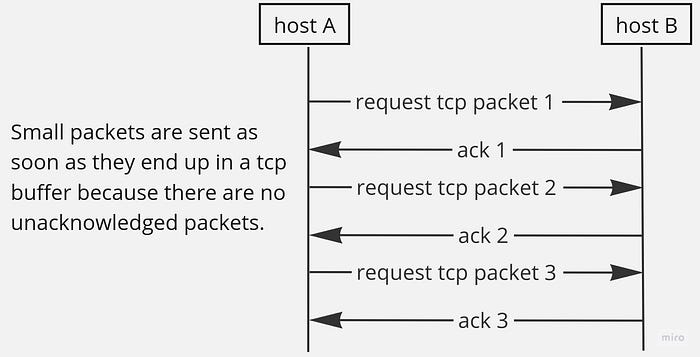
The same way, if each tcp segment is filled to its maximum size, sending side doesn’t wait for an ack of previously sent data:

In some cases, however, the Nagle algorithm can be detrimental to performance. For example, in situations with a need for real-time or low-latency communication, the buffering and delay caused by the Nagle algorithm can be unacceptable. In such cases, disabling the Nagle algorithm and, hence, “synchronous” awaiting of packet acknowledgments in some scenarios, may be necessary to achieve optimal performance.
Delayed acknowledgment mechanism
Delayed acknowledgment is a feature in TCP that allows a receiver to delay sending acknowledgment packets for received data. Instead of sending an immediate ACK for each individual packet, the receiver can wait for one of the following outcomes:
1. Combining ACKs: The receiving host may wait to accumulate multiple ACKs before sending them together in a single packet:

This helps reduce the overhead of sending frequent small ACK packets and improves network efficiency.
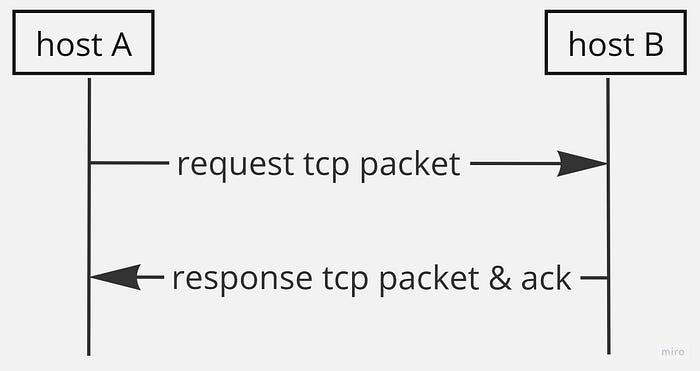
2. Response-piggybacking ACK: the host may delay sending the ACK until it generates a response packet. The ACK can be included in the response packet, reducing the number of separate ACK packets:
3. Timeout: If no other packet or application response triggers the ACK, the host may eventually send an ACK after a certain timeout period. This timeout is typically around 200–500 milliseconds. It ensures that the sender eventually receives an ACK even if there is no immediate data or response to trigger it.
The purpose of delayed acknowledgment is to minimize network overhead and improve efficiency. By delaying the transmission of ACKs, the receiver can reduce the number of small control packets being sent, leading to better network utilization and reduced congestion. This can be beneficial in scenarios where a high volume of small data packets is exchanged, such as interactive applications. Although, John Nagle denies the benefits that this feature provides.
As I wrote earlier, Nagle’s algorithm may wait for an acknowledgment of a previously sent packet before sending the next one — for instance, in cases when data flow is not very intensive and packets can stay underfilled for quite some time. From the other hand, delayed acknowledgment mechanism delays acknowledgment sending which a sending host awaits. Hence, if a sending host has Nagle’s algorithm enabled (which is so by default in TCP), and a receiving host has the delayed acks feature enabled (which is also a default), two hosts may wait for each other. This situation is effectively a deadlock, which can be resolved only with a timeout. For example, consider this scenario:

That’s the reason why they don’t always play well together.
How Redis deals with it
Redis disables the Nagle algorithm by setting the TCP_NODELAY option on a connected socket using the setsockopt() system call. In other words, Redis instructs the operating system to send a response to a client as soon as it is available, no matter its size, and without waiting for an acknowledgment of previously sent response packets.
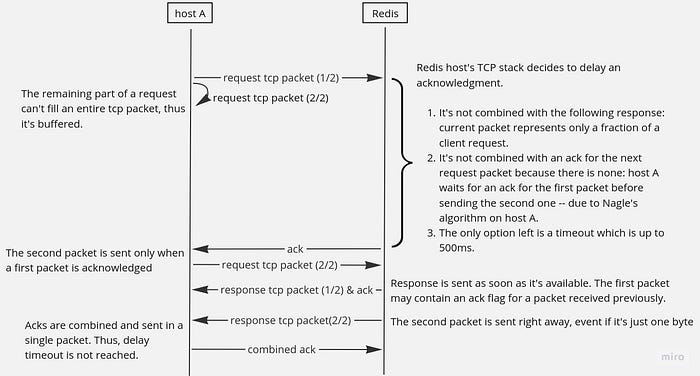
But Redis keeps the default delayed TCP acknowledgment feature. When a request sent to Redis doesn’t quite fit in a single TCP segment, the response can be delayed dramatically:
This can be eliminated by a TCP_QUICKACK option, but Redis doesn’t use it. But Camellia, Redis proxy by NetEase, supports this option.
Note that disabling Nagle’s algorithm on the Redis side does not affect a client's behaviour. Generally, when TCP_NODELAY is set only on a server side, clients will continue to buffer requests or wait for acknowledgment of previous packets. That’s why you should consider setting this option on the client side as well. For instance, that’s how the previous case looks like when Nagle’s algorithm is disabled on a sending side:

TCP keepalive
If a tcp-keepalive is specified, keepalive mechanism is enabled by Redis. TCP uses it to detect whether the other end of a connection is still alive and reachable. It does this by periodically sending small packets, or keepalive messages, to the other end and waiting for a response. The idea is to detect whether a connection has become idle or lost due to a network failure or an endpoint crash. In this case, OS closes a corresponding socket.
To enable keepalives, the SO_KEEPALIVE socket option must be set on a socket. This option tells the TCP stack to send keepalive messages on the socket periodically.
The frequency and number of keepalive messages sent are controlled by three TCP socket options: TCP_KEEPIDLE, TCP_KEEPINTVL, and TCP_KEEPCNT. TCP_KEEPIDLE specifies the time in seconds the connection must be idle before keepalive messages are sent. TCP_KEEPINTVL specifies the interval in seconds between subsequent keepalive messages. TCP_KEEPCNT specifies the number of keepalive messages that can be sent before the connection is considered broken.
For example, if TCP_KEEPIDLE is set to 60, TCP_KEEPINTVL is set to 10, and TCP_KEEPCNT is set to 5, then after 60 seconds of inactivity, the first keepalive message is sent. If no response is received within 10 seconds, a second message is sent, and so on, until 5 messages have been sent. If no response is received to these messages, the connection is considered broken, and the operational system closes a socket.
Connected socket registration in an epoll instance
Finally, a connected socket is registered for read events in an epoll instance. As any functionality related to connection, the procedure implementing this logic is defined in a ConnectionType. For a TCP connection, it’s connSocketSetReadHandler(). It adds a connection socket in an epoll set to monitor for read events and sets a procedure to be executed when new data arrives to readQueryFromClient(). It will be invoked with a single argument which is a current connection structure.
Finally, that’s what a client structure looks like:

Connection is accepted on the Redis level
Finally, connection is accepted on Redis land. This boils down to invoking a ConnectionType’s accept procedure, which in the case of TCP is resolved to connSocketAccept. There, connection state is set to CONN_STATE_CONNECTED. Now, a client can start sending commands and receive responses. As I’ve written at the end of the previous section, an entry point for all commands sent to Redis is a readQueryFromClient() procedure, which I’ll write about in the next article.
As usual, you can get a higher-level view here.
In closing
As promised, this is a much lighter article than the first one. It wasn’t such for me personally, though: while writing it, I published an article about TCP connection establishment internals and a retrospection about implementing a Radix tree for HTTP routing. I did my best to ensure this article didn’t lose its integrity, and I’m quite happy with where I landed. All in all, stay tuned. I’ll describe how Redis executes user commands in the next article.

