How To Protect Your Microservices
Use auth service to verify the JWT token and protect your other microservices (Lab01 — part 1)

Before Starting
When I started learning about microservices I wondered how I could protect the services and be sure the user was authorized to use the APIs.
I was pretty confident about how to structure an authentication system and secure the routes when we want to use a monolithic architecture, but with microservices, the paradigm is different, and consequently the approach.
In this microservices lab01, I try to clear my doubts, and I will show you how to configure a basic to-do application (wow, super original I know. I think to-do apps are the Hello World! of web development these days), configure a microservices architecture where a user logs in and add to-do in their list, and looks at their tasks, etc. But only if authorized!
We fully agree that this application can be managed in a monolithic architecture because of its simplicity. In fact, the beauty of simple things is that we can complicate them more and more.
You can clone the code from my GitHub repository, I will create several lab experiments where I will try to solve some problems or add advanced features like CI/CD, testing, and automation.
I will skip the part where I created the frontend service because it’s out of scope now.
The articles will be organized as follow:
Part 1:
- The big picture
- Auth service
Part 2:
- To-do service
- Run all services with docker-compose
So follow along, and let’s dive in.
The Big Picture
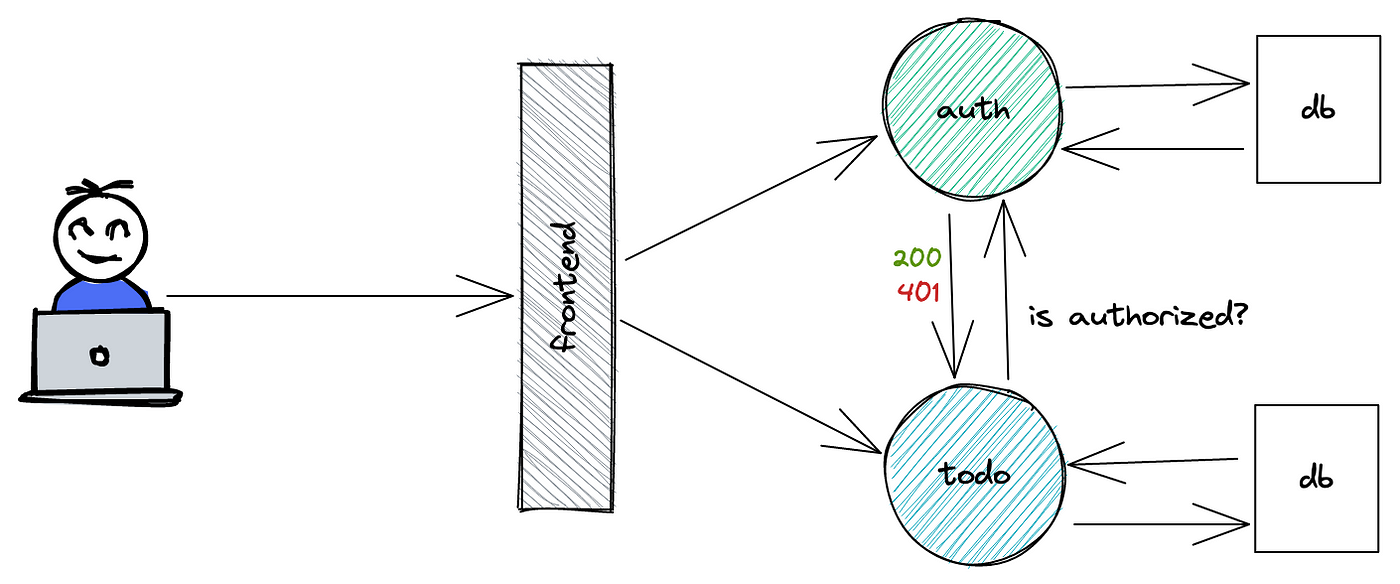
As explained above, the web app will allow the users to log in, create tasks on their to-do list, view their current tasks, and perform other actions.
To do so, I created a frontend service in Vue3. The auth service is written in Django and is responsible for verifying the users and protecting the services. And at the end, the to-do service was developed with Flask in charge of handling the core actions of the web app.
As a best practice — and for the nature of the decoupled microservice architecture — each backend service has its database, in my case a PostgreSQL.
Auth and to-do services are REST applications and they will communicate with the frontend and with each other using REST APIs.
Additionally, for each service, I created a Dockerfile and I connected them using docker-compose. If you clone the repository you will see some utility bash script or Makefile I used to speed up repetitive tasks and set up docker in the building phase.
Auth Service
Now, let’s have a look at the structure of the project. If you are interested to know what every file in Django project is responsible for, I suggest reading here or the Official Django Documentation.

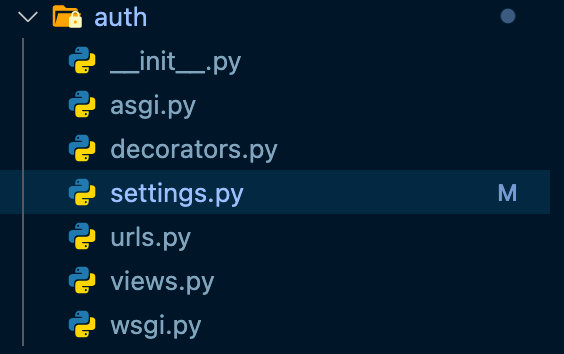
Auth folder
It’s the folder that is created when you type django-admin startproject <your-project-name>. Inside it, there are the most important files like settings.py (it is used for adding all the applications and middleware applications. It’s the main setting file) and urls.py (it contains all the endpoints of our website).
As previously discussed, auth is a REST application, and to achieve this, there is an amazing module called django-rest-framework.
It will help you to resolve a lot of headaches, giving you easy-to-understand instructions. Combined with djangorestframework-simplejwt, you can get a fully functioning jwt-token manager. It will allow you to generate an access token when a user logged in, verify if the token passed is valid and/or expired, and refresh the token system.
All with zero effort, as you can see from the code below.
urls.py
views.py
As you can notice, I created a custom endpoint inside views.py called TokenDecode. Its goal is to decode the jwt token passed as a POST request and return the user_id associated. If a not valid token is sent to the auth service it will raise an AuthenticationFailed error.
decorators.py
I am fairly new to using decorators in Python, but since I started using them I have been quite impressed.
Decorators are a very powerful and useful tool in Python since it allows programmers to modify the behaviour of function or class. Decorators allow us to wrap another function in order to extend the behaviour of the wrapped function, without permanently modifying it.
When you look at the code and above the function definition you see something as @decorator_name. It’s probably because there is a decorator that gets the function as an argument and extends his behavior called it inside a wrapper function.
In our case, we have @jwt_required decorator that has to check if Authorization is inside the header of the request. If not an AuthenticationFailed error will be raised.
With this approach, we can be sure that only users with a jwt token can call our APIs. In addition, Django will check if the token is valid and prevent not authorized users to access our views.
Users folder
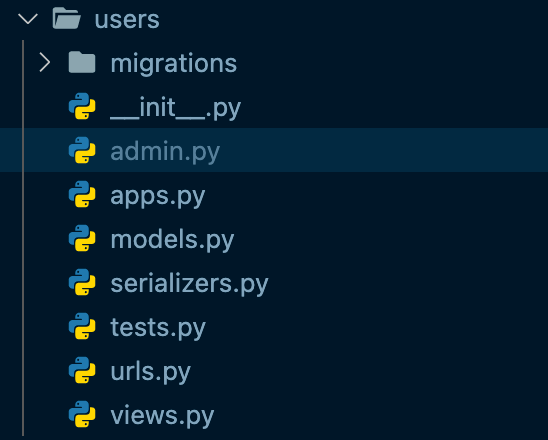
Here, we can find how the user is defined inside the database (models.py) and how people can interact with this interface (views.py).
models.py
As an experimental project, I want to keep this part easy. Therefore, we will define our user only with an email and a password.
views.py + serializers.py
Here, I defined the APIViews and how people can interact with the app. In our case, users can register into the app, get the list of all users registered inside the app, and maybe in the future I could protect this route additionally letting only admin users or special roles interact with it.
They can also get the details of one user by user_id.
As you can see all APIs, except the RegisterView, are protected with @jwt_required decorator.
urls.py
Each view needs an endpoint in order to be called. So, let’s see which routes I defined for the APIViews.
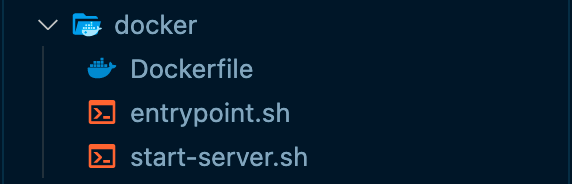
Docker folder
Let’s have a look at what is inside the docker folder.
Dockerfile
“Docker can build images automatically by reading the instructions from a
Dockerfile. ADockerfileis a text document that contains all the commands a user could call on the command line to assemble an image. Usingdocker buildusers can create an automated build that executes several command-line instructions in succession.”
Here’s how I defined the Dockerfile:
My inspiration comes from this article written by Mariano Martinez Grasso.
It is well written, and it provides good tips and best practices for your next Django app.
The base image takes as an entry point the script entrypoint.sh that is executed first. When you start the docker container, it will check that the connection with PostgreSQL DB is established before moving on with other instructions.
In my case, this check is done only if POSTGRES_ENABLED=1 Otherwise, the container will run using the default database db.sqlite3.
The base docker image will be used to create the dev image (that’s what is called multi-stage builds). When you run the container through the command docker run the bash script start-server.sh will be launched by executing the basic instructions that you would use when starting the server locally.
Starting the Service
Now, it’s time to launch the service! I prepared a Makefile to automate the boring stuff. If you have downloaded the code you can simply type the command make <target> and enjoy!
docker-build: it will create a docker image with the namemsalab01/auth:v1docker-run: it will start the docker container namedlab01_auth. If you need to use a different port, you have to specify it in the make command with the variable PORT, otherwise,8000will be usedlocal-build: It will launchbootstrap.shthat will automate all the initial setup, like creating a virtual environment and installing dependencieslocal-run: it will launchstart_local_server.sh, a bash script that executes all basic instructions to run the server locally. (NB: It will be used db.sqlite3 as the default DB)
Conclusion
You did it! Now that everything is up, you can enjoy the view, test the routes, experiments and make improvements
Don’t forget to let me know! I love to discuss and learn new stuff.
I hope to see you in part 2, where I will show you how I created the to-do service and protected it with auth service.
Finally, we will conclude lab01 with all microservices running together with docker-compose!
See ya!
Useful links
Django project structure layout: https://techvidvan.com/tutorials/django-project-structure-layout/

