Dockerize Your Django Apps
From local development to production

Dockerizing your Django apps won’t only help to standardize environments, but it will also make scaling in the cloud very easy.
Why Docker Containers?
Using Docker both during development and in production has several benefits:
In development
- Environment Standardization across multiple platforms: You define your development environment once and share it with your team. Then everyone can use the same environment regardless of their local setup. For example, someone may be using macOS, another one Ubuntu, someone else might even use Windows in their development workstation. As long as they can run Docker, they will be able to get the same development environment up and running.
- Minimal setup time for new developers: With a few commands the new developer has a complete environment up and running including databases, queues or any other services as needed, in minutes.
- Keep your local workstation clean: As your environment runs as a set of isolated containers, nothing gets installed on your local except Docker or docker-compose. As a bonus, you can have different environments installed on your workstation and manage them easily. For example, let’s say you are working in one project with Python 3.8 Django 3.3 and PostgreSQL 12, and then you start working on a new project with Python 3.10, Django 4.0, and PostgreSQL 13. No problem, you can spin up one environment or the other when you need it.
In production
- Isolation: As your app runs in an isolated container, nothing can break it’s environment. If you had your app running on a server or VM it wouldn’t require much effort to accidentally break the environment (i.e., installing or updating some packages which can break some dependencies, editing or deleting some config file, etc.).
- Reproducibility: Once the environment is defined it can be recreated any time.
- Resiliency: Docker makes it very easy to add or remove instances of your system components or services. If, for any reason, your container gets into an unhealthy state (i.e., it’s not responding to requests anymore) it can be easily stopped and a new fresh instance can be started to replace it.
- Scalability: If you need to support a bigger workload, you can just add more instances. Once the workload decreases you can remove some instances.
- Performance: Docker containers can be started and stopped much faster than regular servers or virtual machines. It takes seconds or a few minutes instead of several minutes or hours.
- Resources Optimization: Containers are lighter that VMs so they require less CPU and/or RAM to run.
Docker vs Virtualenv
You may be wondering why you need Docker if you already have an isolated Python virtual environment using virtualenv. While virtualenv isolates your Python dependencies, Docker goes further and isolates your OS and OS-level packages too. A typical example is when you are using a PostgreSQL database with Django.
You would install psycopg2 (a Python adapter) on your virtualenv, but then you also need to install OS-level packages like a PostgreSQL client in the host environment. Docker allows you to package your app together with the OS and all the packages needed. Actually, using virtualenv is no longer required when using Docker, even though there may be some use cases for it.
Docker basics
- The Dockerfile: It’s a text file with a recipe to build an image of your app. Here you will add all the dependencies, from the OS and OS-level packages to Python packages, and also the application source code and anything else needed to run it.
- Image: The Dockerfile is used to build an image with everything needed packed inside. Images sizes can vary from a few megabytes to several gigabytes and it’s recommended to keep them small, adding only what is needed. Images can also start from other base images so you don’t need to start from zero.
- Registry: It’s a repository of docker images. DockerHub is a public registry where you can find official images for most of the OSs and programming languages.
- Layers: Instructions from the Dockerfile are executed from top to bottom and each line adds a layer to the image. Layers are cached so they are reused in the next build if not modified. But the instructions order is important. If you modify a line in the dockerfile, that layer and all the layers bellow will be rebuild. So you should add the layers that you expect to change less frequently first and add the ones that can change more often later to optimize build times.
- Stages: With multistage builds, it is possible to build more than one artifact from a single Dockerfile. Also, the code and/or any generated artifacts of a stage can be reused in another stage reducing duplication and making docker files more maintainable.
- Container: It’s a running instance of an image. You can spin up several containers from a same image or from different images.
- Bind Mounts: They allow to mount part of the host filesystem in the container to share files. You can think of them as shared folders. They are useful during development, and in some use cases, but you should avoid them in production because they break the container isolation.
- Volumes: They are like virtual hard drives for the containers. They use some directory in the host filesystem to persist data, but the data can be only accessed from within docker containers.
Hands On: Dockerizing the Django App
Prerequisites
Install docker and docker-compose:
Check how to install docker in the official docs.
Check how to install docker-compose in the official docs.
The code
You can find the full code of this sample project in GitHub.
Defining the system components
The first step to start dockerizing the system is to identify the system components or services to be containerized. A typical architecture of a Django app in development looks like this:
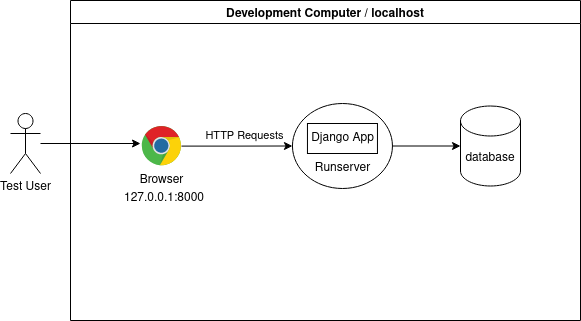
So we can identify two main components in the diagram:
- The Django app: Usually served by runserver, which is the development server packaged with Django.
- The database: Django support multiple databases, for example PostgreSQL, MySQL and SQLite.
Docker Compose as your local orchestrator
Docker compose is a tool for defining and running multi-container Docker applications, and we will use it locally to define and run our development environment.
The project structure
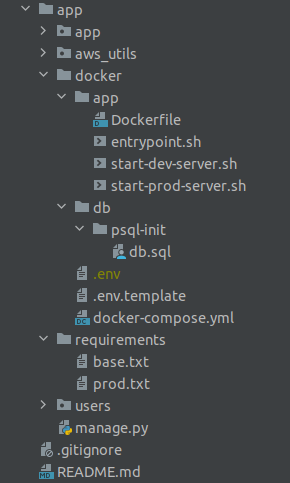
The Django project on this sample is called app. We will create a docker/ directory at the root level for all the docker-related files. The first file we will place inside is a YAML file called docker-compose.yml . Within the docker-compose file we will define two services. Each service will need some bootstrap and configuration files, so let’s namespace these files by creating subdirectories in the docker/ directory called app/ and db/.
docker-compose.yml
Now we will define our two services:
db: Contains the PostgreSQL database server.
image: In this case, we set image to tell docker-compose to use a prebuilt image from docker-hub which includes PostgreSQL server version 13. Postgres maintains official images which are ready to use so there is no need to define a Dockerfile nor to do a manual build in this case.restart: The container will be automatically restarted whenever it is stopped (For example, if the container gets out of memory and exits)ports: We expose the database port to the host machine just in case we want to connect to the database later through some local psql client app. This is optional and we do it only for the development as it can be useful for inspecting the DB.environment: Here we pass environment variables (aka env vars) to the database container. As we don’t want to commit sensitive data such as database credentials in our repo, in addition we take the values from the host environment variables. We need to set those env vars locally before spinning up the containers as we will see later.volumes: The first line adds a bind mount which is used to copy the script db.sql into the container, at a specific file path that is checked by the database server when the container is started. This is a feature of this Postgres image that we use to create the database if it doesn’t exist. The database name, username and password are taken from the env vars. The second line adds a persistent volume that is used to save the database data in the host filesystem.
app: Contains our Django app.
build: In this case, we tell docker-compose to build the image from our custom Dockerfile. As we are using multistage builds, we also need set target to tell docker compose what image to build. We will chose dev to build our development image here.restart: The container will be automatically restarted whenever it stopped. For example, if there is an unhandled exception in the application the container will stop, and it’ll be started again by docker-compose.depends_on: The Django app requires the database to be running, so here we tell docker-compose that thedbcontainer needs to be started first before starting this container.environment: We set the env vars required by our Django app during local development.volumes: We use a bind mount to share the source code between the host and the container. This way every time we edit some source code it’ll get copied into the container. This will also trigger runserver auto-reloading so we don’t need to rebuild the container after every code change during development.ports: We expose the port where our app is running to the host so we can use the browser or other apps on the host to interact with our web app.volumes: Notice there is a second volumes section, at the root level of the YAML file, referencing the volume namedpostgres_data. The volume declaration ensures the data for the database container persists to the host’s file system if the container is stopped.
db files explained:
docker/db/psql-init/db.sql
This file creates the database and a dedicated Postgres user account for our Django application to use for database transactions. It’s executed during the db container initialization, but only if the database doesn’t exist. The database name, username and password are read from env vars. The same env vars are used in the Django app settings later.
Notice: The permission to create other databases is needed to create test databases while running Django unit tests.
app files explained
docker/app/Dockerfile
This is the Dockerfile used to build our Django app images. We will build two sightly different images for development and production. Both will share the same base OS and some common packages, but as we will see there will be differences about how the app is served and how the source code is copied into the container. As they share a common base, we use docker multistage builds and docker buildkit to keep a single Dockerfile to avoid repetition.
Base stage
FROM python:3.10 as base: We base it off the official Python image on docker hub, and we select version 3.10 . This image will be pulled from docker hub on build time, and it’s basically based on Debian, including Python 3.10 and other common OS-level packages such as apt which will allow us to install extra packages like the postgress client. We name this stage as “base” to reuse it later.
ENV PYTHONDONTWRITEBYTECODE / PYTHONUNBUFFERED: The ENV directive is used to set environment variables during the build. In this case, we are disabling the generation of bytecode and ensuring that stdout and stderr are sent straight the container logs so we can see our application logs in real time.
RUN addgroup .. && adduser ..: Most of the base docker images use the root user by default, but running your web apps as root has some security risks. For example, if someone hacks into the container using some exploit, they’ll get root access. So, it’s a good practice to use a non-root user.
RUN apt-get update && apt-get install: The RUN directive allows executing commands in a shell. Here we use the debian package manager apt which comes with the base image to install other OS-level packages as needed. We install some Python build utils and the Postgres database client which is a dependency of psycopg2.
USER web: Switch to our non-root user. We will use the root user only when it is required.
WORKDIR /home/web/code/: This directive sets the working path, and creates the code/ sub-directory. After this directive, we can use relative paths in other directives such as COPY and RUN.
COPY --chown=web:web ./requirements/base.txt requirements/base.txt: We copy the requirements file from our local filesystem into the working directory, inside a requirements/ sub-directory. We have a requirements/directory with two requirement files: base.txt and prod.txt. The base.txt file lists the common Python packages needed to run our app both in a development or production environment, for example Django and psycopg2, while prod.txt lists some extra packages which are needed in production only.
As we are building our local base environment then we only need the base requirements. The --chownoption sets our non-root user called web as the owner of the file. If not added, the COPY directive sets the owner as root by default.
USER root: We switch to the root user to install Python packages at system level.
RUN pip install — no-cache-dir -r ./requirements/base.txt: We install all the Python packages required for our development environment now. Notice that we don’t need to use virtualenv because the whole OS and the filesystem are isolated, so the packages can be installed at OS-level.
COPY --chown=web:web ./docker/app/entrypoint.sh /usr/local/bin/entrypoint.sh: We copy an entrypoint script which will check that the db is ready before any other command can be executed in the container. We copy the script in a known path that is suitable to place user-level executables in debian.
RUN chmod +x /usr/local/bin/entrypoint.sh: Grant execution permissions.
USER web: Switch back to our non-root user.
ENTRYPOINT [“entrypoint.sh”]: We state that this script will be executed first before any other CMD defined later.
docker/app/entrypoint.sh
We basically try to open a connection using psycopg2. If it fails, we keep retrying every one second. If it succeeds, we execute the command received as argument.
The development image explained:
FROM base as dev: We define an image for development, named dev, which inherits the base OS and common packages from the base stage.
COPY --chown=web:web ./docker/app/start-dev-server.sh /usr/local/bin/start-dev-server.sh: We copy the script which will run the development server.
USER root: We switch to the root user to grant execution permission on the previous script.
RUN chmod +x /usr/local/bin/start-dev-server.sh: We grant execution permissions.
USER web: Switch back to our non-root user.
CMD [“start-dev-server.sh”]: The development server will start by default when the container is started. Notice that this runs as a non-root user.
Also notice that the application code isn’t copied into the container here. We use the bind mount, which we added earlier in docker compose, to sync the code between the host machine and the container.
docker/app/start-dev-server.sh
We make sure that migrations are applied, and then we start the development server using the built-in Django command runserver.
runserver supports auto-reloading after detecting any changes in the source files. This combined with the volume allows us see any change in the source code reflected in the app running inside the container without needing to rebuild the image. We will do this in the development only as using volumes this way also breaks the container isolation, and we don’t want to do that in production.
Running the development environment with docker compose
First, set your env vars in a .env file (docker compose will take them from there). You can copy .env.template and set your values. Then, all services can be initiated with a single command: docker-compose up, as seen below:
$ COMPOSE_DOCKER_CLI_BUILD=1 DOCKER_BUILDKIT=1 docker-compose up
Creating network "docker_default" with the default driver
Creating volume "docker_postgres_data" with default driver
Pulling db (postgres:13)...
13: Pulling from library/postgres
5eb5b503b376: Pull complete
...
Building app
[+] Building 206.5s (17/17) FINISHED
 => [internal] load build definition from Dockerfile                                                                 ...
 => [base 1/9] FROM docker.io/library
...
 => exporting to image                                                                                               ...
Successfully built
...
Creating docker_db_1 ... done
Creating docker_app_1 ... done
Attaching to docker_db_1, docker_app_1
db_1   | The files belonging to this database system will be owned by user "postgres".
db_1   | This user must also own the server process.
...
db_1   | 2022-02-17 13:29:11.276 UTC [1] LOG:  database system is ready to accept connections
app_1  | Trying to connect to database 'db_dev' on host 'db'..
app_1  | Postgres is up - continuing...
app_1  | Running migrations..
app_1  | Operations to perform:
app_1  |   Apply all migrations: admin, auth, contenttypes, sessions, users
app_1  | Running migrations:
app_1  |   Applying contenttypes.0001_initial... OK
...
app_1  | Performing system checks...
app_1  |
app_1  | System check identified no issues (0 silenced).
app_1  | February 17, 2022 - 13:29:16
app_1  | Django version 4.0.2, using settings 'app.settings.local'
app_1  | Starting development server at http://0.0.0.0:8000/
app_1  | Quit the server with CONTROL-C.
Notice we set some env vars on the fly COMPOSE_DOCKER_CLI_BUILD=1 DOCKER_BUILDKIT=1. This enable the usage of docker BuildKit (this may be enabled by default if you are using the latest docker engine version). This will make the build faster, and it’ll also allow to build specific targets, for example building the dev image without building the prod image. The base image will be automatically built in both cases since it’s a dependency.
The first time it will take more time because the images need to get built and the base images need to be pulled from the registry. Then the images are cached so the next time it’ll be faster.
After a successful start you will see:
- The backend is available at
http://127.0.0.1:8000(Port exposed at docker-compose) - Django admin panel is available at
http://127.0.0.1:8000/admin/
How to rebuild images during compose up
Since we are using bind mounts to share the source code on the host with the container we don't need to rebuild the application image on code changes. But if you add some Python dependencies, or you make any changes in the Dockerfile, you will need to rebuild the image to see the changes in the container. You can tell docker-compose to rebuild images adding the --build flag.
$ COMPOSE_DOCKER_CLI_BUILD=1 DOCKER_BUILDKIT=1 docker-compose up --build The images that are already up to date won’t be rebuilt, so you can safely add this flag always if you want.
View the logs
The docker-compose up command aggregates the output of each container. When the command exits, all containers are stopped. Running docker-compose up -d starts the containers in the background and leaves them running. So to see the logs of a single service you can run: docker-compose logs [-f] <service>
$ docker-compose logs -f appAttaching to docker_app_1
app_1  | Trying to connect to database 'db_dev' on host 'db'..
app_1  | could not connect to server: Connection refused
app_1  |  Is the server running on host "db" (172.19.0.2) and accepting
app_1  |  TCP/IP connections on port 5432?
app_1  |
app_1  | Postgres is unavailable - sleeping
app_1  | Trying to connect to database 'db_dev' on host 'db'..
app_1  | Postgres is up - continuing...
app_1  | Running migrations..
app_1  | Operations to perform:
app_1  |   Apply all migrations: admin, auth, contenttypes, sessions, users
app_1  | Running migrations:
app_1  |   Applying contenttypes.0001_initial... OK
app_1  |   Applying contenttypes.0002_remove_content_type_name... OK
...
app_1  |   Applying sessions.0001_initial... OK
app_1  | Starting server..
app_1  | Watching for file changes with StatReloader
app_1  | Watching for file changes with StatReloader
app_1  | Performing system checks...
app_1  |
app_1  | System check identified no issues (0 silenced).
app_1  | February 17, 2022 - 18:02:46
app_1  | Django version 4.0.2, using settings 'app.settings.local'
app_1  | Starting development server at http://0.0.0.0:8000/
app_1  | Quit the server with CONTROL-C.
How to run a command in a running container
Using docker-compose: docker-compose exec <service> <command>
This will run your command in the already running container, inside a new terminal.
# Apply migrations
$ docker-compose exec app python manage.py migrate# Open a bash shell inside the container
$ docker-compose exec app bash# Create an admin user
$ docker-compose exec app python manage.py createsuperuser
Username: admin
Email address: admin@myapp.com
Password:
Password (again):
Superuser created successfully.
$
How to run commands which require file write permissions in the container:
When you execute a command inside the container, it will run with the non-root user web that we defined previously. But as we are using a bind mount to get the source code into the container, then those files are actually owned by your user on the host. If you try to run any command which tries to write files, like startapp or makemigrations , you will get a permissions error:
$ docker-compose exec app python manage.py startapp books
CommandError: [Errno 13] Permission denied: ‘/home/web/code/books’
To solve the issue, we need to tell docker compose to run these commands using our host user who owns the files and directories. We do this by passing the user id and group id, which can be get using the id command.
# Open a bash shell inside the container
$ docker-compose exec -u $(id -u):$(id -g) app python manage.py startapp books
Some other useful commands
Check the status of each service:
$ docker-compose ps
Name                  Command                State             Ports
---------------------------------------------------------------------------------
docker_app_1   /entrypoint.sh /start-dev- ...   Exit 137
docker_db_1    docker-entrypoint.sh postgres    Up 0.0.0.0:5432->5432/tcp
Stop all the services:
$ docker-compose down
Stopping docker_app_1 ... done
Stopping docker_db_1  ... done
Removing docker_app_1 ... done
Removing docker_db_1  ... done
Removing network docker_default
Stop a single service:
$ docker-compose stop app
Stopping docker_app_1 ... done
Reset the database:
$ docker-compose down --volumes
Stopping docker_db_1 ... done
Removing docker_app_1 ... done
Removing docker_db_1  ... done
Removing network docker_default
Removing volume docker_postgres_data
$ docker-compose up
The production image explained
FROM base as prod: We define now an image for production, named “prod,” which inherits the base OS and common packages from the base stage. When this image is built, the base image will be automatically built first.
COPY --chown=web:web ./requirements/prod.txt requirements/prod.txt: We may have extra dependencies for production, so we copy the production requirements file into the container.
USER root: We switch to the root user to install Python packages at system level.
RUN pip install — no-cache-dir -r requirements/prod.txt: We install the production dependencies.
USER web: Switch back to our non-root user.
COPY --chown=web:web ./docker/app/start-prod-server.sh /usr/local/bin/start-prod-server.sh: We copy the script which will serve our application in production.
USER root: We switch to the root user to grant execution permission on the previous script.
RUN chmod +x /usr/local/bin/start-prod-server.sh: We grant execution permissions.
USER web: Switch back to our non-root user.
COPY --chown=web:web . ./: We copy the source code from the host into the working directory of the image. We use the — chown option again to make our non-root to be owner of these files. Notice we are not using volumes in production. We want to keep the production environment isolated and stateless. The next time you want to release a new version with code changes you will need to rebuild the image and redeploy it. We will see how to do this without downtime in a next chapter.
CMD [“start-prod-server.sh”]: The production application server will start by default when the container is started. Notice that this runs as a non-root user.
Using a production-ready application server: Gunicorn
While runserver is great for local development and quick testing, it’s not suitable for production. To serve our Django app in production we will use gunicorn.
docker/app/start-prod-server.sh
python manage.py migrate: Ensure that any new migrations are applied first.
python manage.py collectstatic — noinput: Copy static files into the final destination from which they will be served in production. Serving static files such as images, css, js consumes processing time and resources. So, in production, it’s recommended to serve them from a CDN or from a dedicated server.
gunicorn app.wsgi — bind 0.0.0.0:8000 — timeout 60 — access-logfile — — error-logfile -: Gunicorn is a production-ready application server for Python applications. It uses a pre-fork worker model to serve several instances of the application in parallel, and also being able to handle a big number of concurrent requests efficiently. Gunicorn requires that the Python application implements the WSGI interface so it can receive HTTP requests.
Django is designed to work with WSGI out of the box so when you create a project Django automatically creates a config file called <projectname>.wsgi with a minimal default WSGI configuration. We need to pass the path of the wsgi config file to gunicorn as the first argument. Then we also set --bind to tell gunicorn to serve the app on port 8000.
Once we get the app deployed in production, we will also add a load balancer which will receive HTTP/S requests and will forward them to our app instance on port 8000, as we will see in the next chapter. We also set --timeout to 60 so if a worker is unresponsive or some request takes more than that, the worker will be killed and restarted to be able to continue processing other requests.
We also set --access-logfile and --error-logfile to - to tell gunicorn to send all the logs to stdout instead of writing log files. As we don’t want to use volumes and we want to keep our container stateless, then we don’t want to write any files. But we will be able to visualize the logs in AWS later, as we will see in a next chapter.
Testing the production image
We are not going to use docker-compose for production, but we can use plain docker commands to run a test build of our production image.
$ DOCKER_BUILDKIT=1 docker build -t app_prod:latest --target prod -f ./docker/app/Dockerfile .Notice we use docker BuildKit here again setting the target to prod. This will tell docker to build the production image only, and the development image will be skipped.
Adding Queues and Workers
If you are using queues and workers to run async tasks you may want to replicate your architecture locally to do integration tests or end-to-end tests in an environment as similar as possible to the production environment.
For this example, we will use Celery with Amazon SQS as the broker.
Prerequisites: Add celery to your Django project.
Updating the project structure
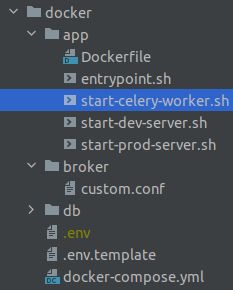
First, we add a script to start a celery worker called start-celery-worker.sh. We place it inside the app/ directory because the celery workers will share the same docker image with the application.
Also, since our broker container will need some configuration files, we create a new subdirectoy in the docker/ directory called broker/.
Updating the docker-compose configuration
We add two new services, one for the broker and one for the worker.
broker: It’s the container running the SQS instance.
image: I chose to use the softwaremill/elasticmq-native image from DockerHub. There are other images such as roribio16/alpine-sqs and localstack/localstack (localstack allows to run sqs and also other aws services locally), but at the time of writing this article, the one from softwaremill is the only one working without issues for me. It has a good performance, a descent documentation on GitHub, a simple but nice UI for monitoring, and it’s being actively maintained.ports: We expose ports9324and9325for testing / debugging purposes but this is optional. We expose the SQS API on port9324just in case we want to connect from our host machine. And we expose the UI in port9325to be able to monitor queues and messages.volumes: We use a bind mount to copy the configuration file into the container.
worker-default
build: The worker will use the same image as the Django app.image: We just rename the image as worker-default for this servicecommand: We overwrite the command to start a celery worker which will process messages in thedefaultqueue.depends_on: Before starting the worker we need the broker to be running so the worker can read messages from the queue. Also, we need the database to be running in case we want to make any queries to retrieve context data or to save results.environment: The worker container will have the same env vars as the app as it’s using the same image.volumes: We also use the same bind mount as the app to copy the application code into the container.
The worker
docker/app/start-celery-worker.sh
This script starts a celery worker to process messages from a queue. The queue name is passed as the first argument, the -A option sets the name of the module containing the celery application object, and the -l option sets the log level.
Updating the Dockerfile
We only need to add two likes in the base image to copy the script which will run the celery worker, and to grant execution permissions:
COPY --chown=web:web ./docker/app/start-celery-worker.sh /usr/local/bin/start-celery-worker.sh
RUN chmod +x /usr/local/bin/start-celery-worker.sh
The updated Dockerfile
The broker configuration
The SQS image requires a configuration file so we will add a custom.conf file inside the broker/ directory that we created previously.
docker/broker/custom.conf
The first group of settings in the node-address section defines the SQS endpoint URL and port. This needs to match with the celery settings defined in the Django app. For example, if the port is 9324and the service is named brokerin the docker network (defined in docker-compose settings), then the CELERY_BROKER_URL should be sqs://broker:9324/
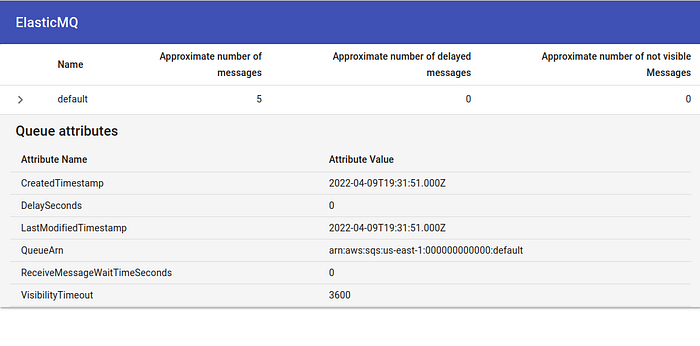
Then, in the queues section, we create a queue named default which will be used as the celery default queue (defined in the Django app settings). It’s also important to set the defaultVisibilityTimeout properly to avoid issues with celery tasks ETAs.
Other settings in the awssection don’t need to be real but they are used to build some URLs. For example, the the accountId is used in queue URLs so the final URL of the default queue with this settings will be: http://broker:9324/000000000000/default
For more details about these settings, please check the official documentation.
Monitoring
Just open open your browser and navigate to http://127.0.0.1:9325
What’s Next?
It’s time to scale! Check how to design an auto-scalable architecture for your Django app in AWS.
Thanks for reading!

