How to Call Any API From a Solidity Smart Contract, Part I
Deploying an Airnode to get off-chain data in your Smart Contract
As we all know that it is not possible by a Smart Contract to directly access external APIs outside of a blockchain. Interacting with off-chain data while working with Smart Contracts is a real problem for a lot of dApps.
The Ethereum blockchain was designed to be entirely deterministic while the Internet was not. Calling an API directly sounds easy but on a blockchain, it would require all the nodes to call the same endpoint at the same time and expect to get the same data in order to come to a consensus. Plus, the core concept of a blockchain is its security, that is derived from a decentralized network of independent validators that purposefully limit their connection to the outside world.
However, with API3, you can have first-party oracles that are directly operated by the API Providers, called Airnodes that provides data to any on-chain dApp. As a result, you can easily make any REST API accessible to a Smart Contract.
Say Hello to ChainAPI
ChainAPI is a platform that enables you to integrate and deploy the open-source Airnode with its step-by-step integration and deployment tools.
To get started, go to ChainAPI and log in by connecting your MetaMask.
You will be prompted to confirm and sign the transaction through your MetaMask extension.
Make sure you’re using a new MetaMask Wallet with a fresh mnemonic. Your mnemonic will later be used to deploy the Airnode. You need to keep it extremely safe as this will serve as the “private key” of your deployed Airnode.
Each time you return to ChainAPI you will connect again, using MetaMask, to identify yourself by signing a message for the same account.

Complete the signup process and name your workspace.
Workspaces provides you with a way to invite other users to help or collaborate with integrations and deployments. This makes it easy to manage your Airnodes as a team or to outsource the process while still maintaining control over your integrations and deployments.
To change the name of your workspace in the future, click on name on the top-left of the dashboard
Within ChainAPI you will be able to create and manage your integrations or Airnode deployments by navigating to the “Integrations” or “Deploy” dashboards on the left hand navigation panel.
Integrating your Airnode
For this tutorial, I am going to use dxFeed’s public REST API endpoints to retrieve stock data.
To get started select the “Integrate API” option in the top right hand of the dashboard.
Enter the details about the API you want to Integrate.
You need to enter the base URL of your API along with all the endpoints that you want to integrate. If your API requires any security scheme (API Key, Basic HTTP Auth) you have the option to add that too.
As it’s a public API, it doesn’t have any security schemes.
You can now start by adding all your endpoints.
Here, the dxFeed REST API has one GET endpoint /events.json with some query parameters. You can add all the parameters that your API requires.
The parameters that are required by dxFeed’s API are:
events— Query Parameter — Takes in the market event. It will be user defined.symbols— Query Parameter — Takes in the stock ticker symbol. It will be user defined.
For more information about dxFeed’s API and how it works, click here to test out their API.
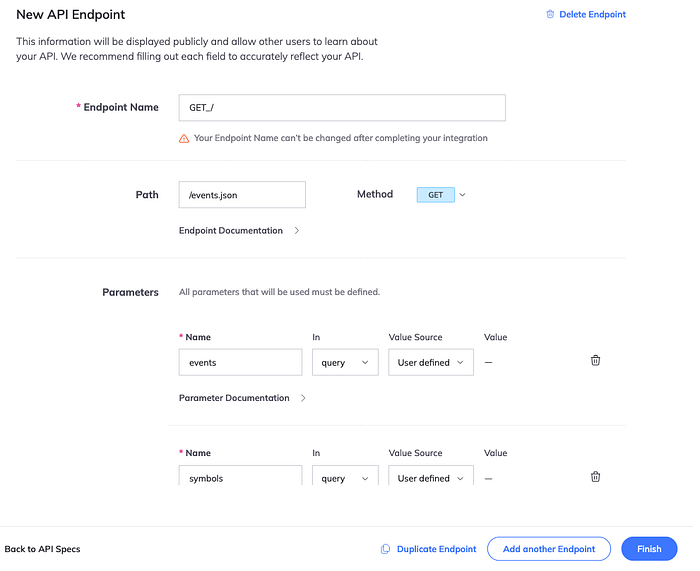
Now you need to add all the parameters and define where they go (query/header/path/cookie). You can also decide if you want their values fixed or not.
Here, the dxFeed REST API has one GET endpoint /events.json with some query parameters. You can add all the parameters that your API requires.
Reserved parameters define what part of the response is to be picked and encoded before fulfillment. It can be defined by the requester but we can also hardcode it in the Airnode configuration.
You can also add pre and post-processing snippets for your Airnode. Although we won’t be using this feature with this integration.
- Pre-processing snippets are executed before making the request to the Airnode.
- Post-processing snippets are executed after receiving the response from the Airnode.
After adding all the required endpoints, you can now press finish and get ready to deploy your Airnode.
Deploying your Airnode
To deploy the Airnode, go to the deploy section on the menu. Name your deployment and select the integration that you want to use with it.
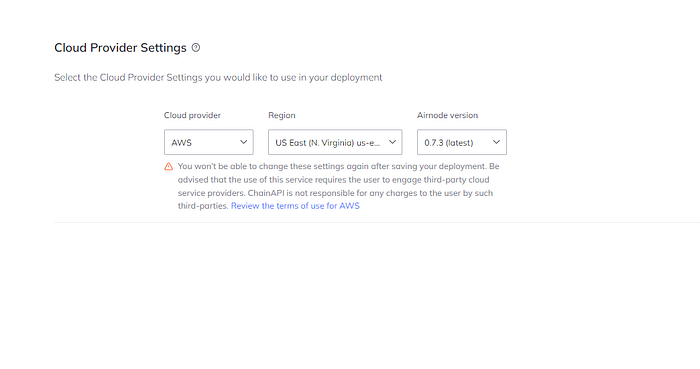
Select your Cloud Provider where you want your Airnode to be deployed.
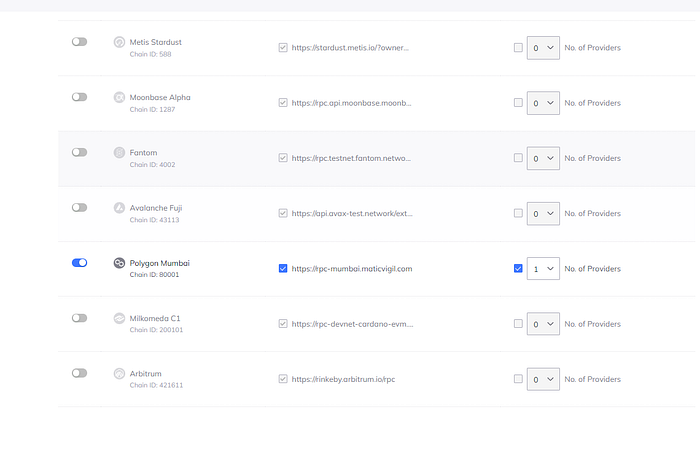
Now select the Chains for your deployment. You can also select multiple networks and providers if you want it on multiple Chains.
Here, we are going to have our Airnode on the Polygon Mumbai Testnet.
Authorizer contracts allow you to specify which smart contracts can make requests to your Airnode’s endpoints. For this tutorial, we are just going to set it as Public.
When an Airnode receives a request, it can use on-chain authorizer contracts to verify if a response is warranted. This allows the Airnode to implement a wide variety of policies and to authorize requester contract access to its underlying API.
- Public Authorizers will allow any smart contract to make requests to your Airnode.
- Restricted Authorizers will only allow smart contract addresses that have been granted access to make requests to your Airnode.
Click here to learn more about Authorizations.
Review your configuration for one final time. If everything seems correct, click on next.
Download all the Airnode configuration files and extract them.
This is what your Airnode config directory should look like:
config contains config.json and secrets.env.
- The
config.jsonfile is used during the deployment/redeployment of an Airnode to configure its behavior and to provide mappings of API operations. - The
secrets.envfile holds values for config.json that must be kept secret.
The output directory will have the receipt.json that will be generated after you successfully deploy the Airnode.
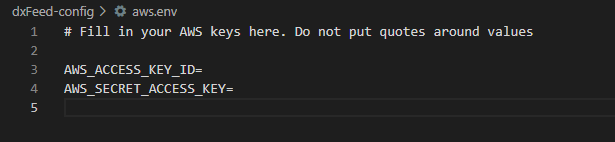
The aws.env file holds AWS credentials for deployments targeted to AWS.
As we are using AWS as our cloud provider, we need to add our AWS IAM Access Keys with the Administrator Access policy. You can refer to this video if you are not sure how to obtain them.
The README.md contains all the steps to deploy the Airnode provided in a markdown format.
Open aws.env and add your AWS_ACCESS_KEY_ID and AWS_SECRET_ACCESS_KEY that you just created.
Open config/secrets.env and add your wallet mnemonic. Make sure you keep it extremely safe as this will serve as the “private key” of your deployed Airnode. From the mnemonic phrase, Airnode is able to assign wallet addresses to both the Airnode instance and its users.

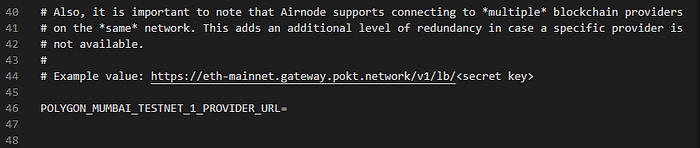
You also need to add your Blockchain Provider URL. Here, we are going to use Alchemy for a free Polygon Mumbai Testnet Provider URL. You can use any blockchain provider that supports your network.
You can also set-up your HttpGateway credentials. It’s an optional service that allows authenticated users to make HTTP requests to your deployed Airnode instance for testing. ChainAPI has already generated these keys for you but you can change them if you want.

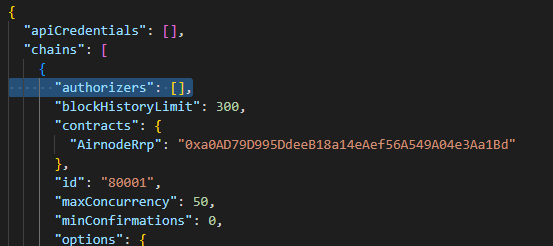
One final step before deploying your Airnode is to set Authorizers in the config.json file.
When an Airnode receives a request, it can use on-chain authorizer contracts to verify if a response is warranted. This allows the Airnode to implement a wide variety of policies and to authorize requester contract access to its underlying API.
For the scope of this tutorial, we can set the authorizer array empty in config.json so that any requester contract can access the Airnode.
Now you’re ready to deploy your Airnode. Make sure you have Docker installed on your system.
Copy and paste the commands below to your terminal at the root directory of your deployment package.
Windows
docker run -it --rm ^
      --env-file aws.env ^
      -v "%cd%/config:/app/config" ^
      -v "%cd%/output:/app/output" ^
      api3/airnode-deployer:0.7.3 deploy
OSX
docker run -it --rm \
      --env-file aws.env \
      -e USER_ID=$(id -u) -e GROUP_ID=$(id -g) \
      -v "$(pwd)/config:/app/config" \
      -v "$(pwd)/output:/app/output" \
      api3/airnode-deployer:0.7.3 deploy
Linux
docker run -it --rm \
      --env-file aws.env \
      -e USER_ID=$(id -u) -e GROUP_ID=$(id -g) \
      -v "$(pwd)/config:/app/config" \
      -v "$(pwd)/output:/app/output" \
      api3/airnode-deployer:0.7.3 deploy
Your Airnode should now be deployed. You can check its status in the deployment section.
Check out the GitHub Repo for this guide here.
In the part 2, we will show you how to code a Requester contract to call and read the data from the Airnode.

