Deploy Your Django Apps in AWS With CDK (v2)
Managing your infrastructure as code

What Is Infrastructure As Code?
Infrastructure as code (IaC) means provisioning and managing your infrastructure through “code” instead of doing it manually. A great advantage of this code is that now you can manage it as you do with your software code. You can commit it to some repository, you can compare and review changes, you can do rollbacks, and you can reuse the code in other projects.
But this “code” typically means writing YAML or JSON configuration files in their own language, and these languages are often not as developer-friendly as you may expect.
For example, let's check the code of this CloudFormation Template (An IaC config file in AWS) used to create a load-balanced Fargate service running a minimal flask app:
The language is mostly declarative; the syntax and structure are complex, and you have to deal with a lot of low-level configurations related to networking and permissions. Also, as the architecture complexity grows, the number of lines of code grows fast. All this makes maintaining these files painful.
Infrastructure Is Code With CDK
The Cloud Development Kit (CDK) brings IaC to the next level by supporting popular programming languages like Python, TypeScript, and JavaScript. This allows you to model your infrastructure by doing Object-Oriented Programming (OOP) by writing classes and instantiating objects. At the same time, the CDK libraries offer higher-level abstractions which can encapsulate details related to networking and permissions choosing good (but editable) defaults.
For example, let’s see the code required to create a load-balanced Fargate service with CDK in Python:
We can see that it’s just OOP in Python, and the number of lines of code was drastically reduced. Now you can maintain your infrastructure code just like you maintain your application code. You can apply best practices and even add unit tests for it!
CDK Basics
How does CDK work?
CDK is built on top of CloudFormation. It takes the Python code and synthesizes CloudFormation templates from it. It comes with a toolkit that allows creating a new CDK project, synthesizing the code, and deploying it using a chosen account and region.
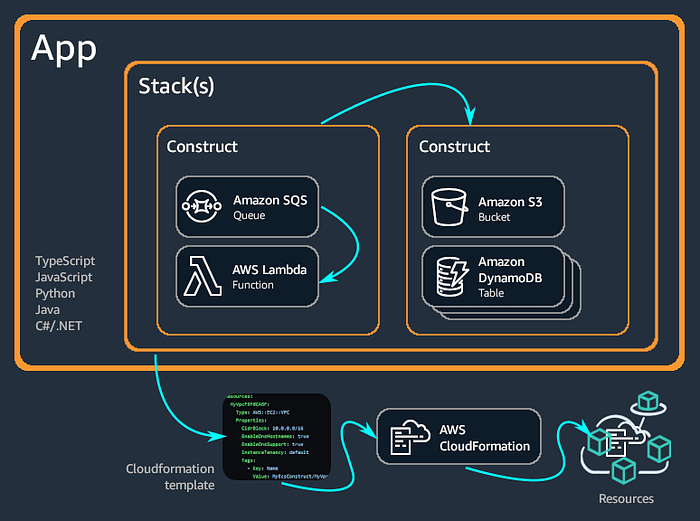
CDK basics
- Constructs: A construct represents a cloud resource in AWS, e.g., an S3 bucket, a load balancer, or an RDS database. You typically use them as lower-level building blocks of your architecture.
- Solution Constructs: A solution construct is a construct with a higher level of abstraction that implements common architecture patterns, e.g., a load-balanced ECS+Fargate service.
- Stacks: A stack groups resources that are meant to be deployed together, e.g., an S3 bucket plus a CloudFront distribution that are used together to serve some static files, a load-balanced Fargate service plus autoscaling policies that are used to serve your Django app.
- Stage: A stage can group stacks to model a single instance of the whole system. A stage can be instantiated multiple times to deploy your application in multiple environments such as testing, staging, or production.
- App: The app is the root construct that represents the scope of your whole CDK project. A single app is instantiated per a CDK project and stacks or stages are added as child nodes.
- AWS Environment: An Environment is a combination of an account and a region where a stack is going to be deployed. We will set the AWS environment when we instantiate a
Stack.
Hands-on
Prerequisites
This is what you need to start CDK:
- Install Python 3.6 or later including
pipandvirtualenv - Install CDKv2 pre-requisites (node, the AWS client...)
- Install the AWS CDK Toolkit.
Also, Dockerize your Django App. The chosen architecture requires a containerized application
The code
You can find the full code of this sample project on GitHub.
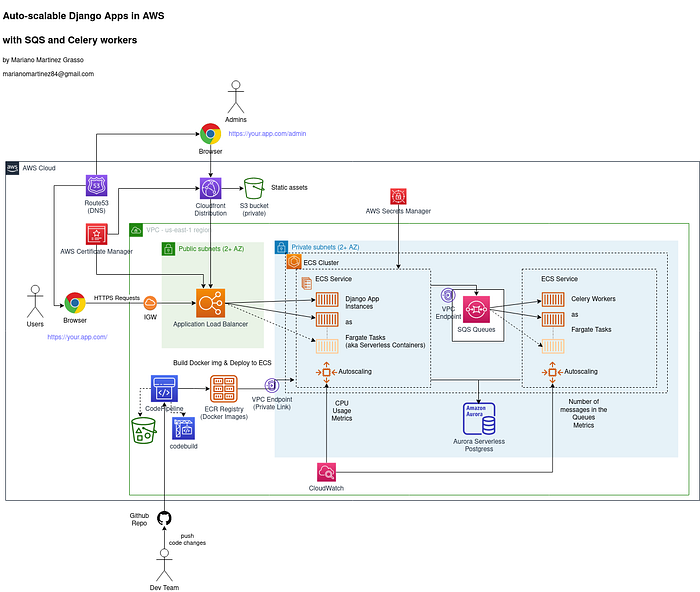
Our architecture in the cloud
We will run our Django app as Serverless Containers using ECS and Fargate. And we will also add queues and workers using SQS and Celery to enable the execution of long-running tasks in the background. If you want to know more about the features of this specific architecture please read this previous article: Design an auto-scalable Architecture for your Django Apps in AWS.
Defining the stacks
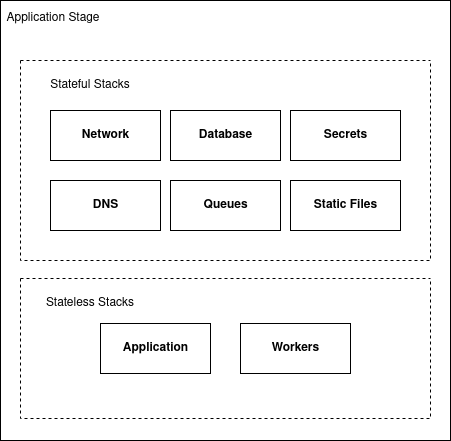
It’s a good practice to define separate stacks for components having different life cycles, and especially to keep stateful and stateless components apart. For example, an ECS+Fargate service running the Django app is stateless and you will probably update, destroy or recreate these resources more often (e.g., with new releases or on scaling events).
But a database is stateful. You probably don’t want to destroy it or replace it. In general, its life cycle will be decoupled from the application life cycle.
So, we will divide our infrastructure code into the following stacks:
Starting with CDK
Let’s start with the fun part!
The first step is to make a directory and then use the CDK client to initialize a template project. We choose the Python language. The directory name will be used as the project name, which will be my-django-app this time.
$ mkdir my-django-app
$ cd my-django-app/
$ cdk init app --language python
Applying project template app for python...Initializing a new git repository...
Please run 'python3 -m venv .venv'!
Executing Creating virtualenv...
✅ All done!
Let’s see the project structure:
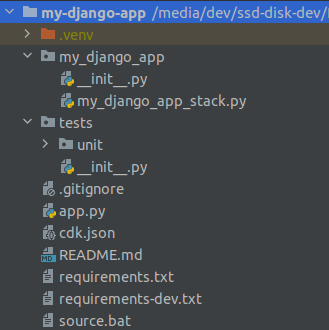
- venv: CDK creates a base project and a virtualenv for you. Notice that this virtual environment is only meant to be used while working in the infrastructure code and it must not be used as your application virtual env. Avoid installing application dependencies here.
app.py: This is the entry point for the CDK project where the root app construct and your main stacks are instantiated.requirements.txt: These are the core Python dependencies required to work with CDK, including the CDK core library itself. You can also add third-party packages containing extra constructs or solution constructs here.requirements-dev.txt: These are other dependencies required during development, for example, to run unit tests on CDK stacks.my_django_app/my_django_app_stack.py: CDK creates a folder for your stacks and one stack for your app by default. We will add all our stacks inside this directory.
Now we will activate the virtualenv and install dependencies:
$ source .venv/bin/activate
(.venv) $ pip install -r requirements.txt
(.venv) $ pip install -r requirements-dev.txt
Bootstrapping
As we are going to generate assets like docker images during the deployment, CDK requires bootstrapping. First, make sure you have configured the AWS client previously or review the Prerequisites section. Now all you need to do is run the bootstrap command with your account id and region name:
$ cdk bootstrap aws://123456789123/us-east-2
 ⏳  Bootstrapping environment aws://123456789123/us-east-2...
...
 ✅  Environment aws://123456789123/us-east-2 bootstrapped
Creating our Stacks
For each stack, we will add a new file in the stacks directory my_django_app/, and we will define a new Stack subclass.
The Network Stack
We will start creating our Virtual Private Cloud (VPC), some VPC endpoints, and an ECS Cluster for our services. Our goal is to create these resources once and to share them with other Stacks to support our architecture, so we group them in an independent Stack.
my_django_app/network_stack.py
The NetworkStack class inherits from the CDK Stack class. Then we define our resources in the __init__ method. First, we use the construct Vpc to create the virtual private network.
All the constructs receive two first mandatory arguments: scopeand id . scopeis a reference to a parent construct, and id is an identification string that must be unique within the scope. In our stack, we have renamed the id argument to construct_id because id is a reserved word in Python.
Then, continuing with the VPC parameters, we choose to have two Availability Zones (AZ), as that’s the minimum required to get high availability and zero NAT gateways to reduce costs. This will generate one public and one private isolated subnet per AZ.
We also need to enable the DNS support and DNS hostnames as it’s required to use VPC endpoints. We also create a cluster in the Amazon Elastic Container Service (ECS). An ECS cluster is a logical grouping for ECS services where the Django app and the workers will be placed.
Then we add the VPC endpoints for all the managed services being used in our design, which otherwise would require internet outgoing traffic (and then NAT gateways):
- S3
- ECR
- CloudWatch Logs
- Secrets Manager
- SQS
Finally, as CDK generates random names during the creation of the resources, it is useful to save some parameters to find them or reference them later. In this case, we will save the VPC id and the subnets ids as parameters in the System Manager (SSM) Parameter Store. We will use a naming convention for all the parameters and secrets with the following form:
/StageName/ParameterName
So, for example, the full name of the VPC id parameter for the staging environment will be: /MyDjangoAppStaging/VpcId.
The Database Stack
my_django_app/database_stack.py
To create the database, we use the ServerlessCluster construct which supports different database engines. In this case, we choose the Aurora PostgreSQL engine with PostgreSQL version 10 (which is the latest supported version at the time of writing this article).
We also set subnets and permissions to make the database accessible only from private subnets (where our Django app will live).
Also, this time we will add some extra parameters in the __init__ method so we can customize some settings of this stack when instantiating it for different environments:
- VPC: It’s the VPC where the database will live. This will be the VPC that we created earlier in the network stack.
database_name: This parameter allows us to set the name of the default database, which will be used by our Django app later. TheServerlessClusterconstruct creates a default database with the name given in thedefault_database_nameparameter.min_capacityandmax_capacity: These parameters define scaling limits for the cluster. The computing power is measured in “Aurora Capacity Units” (ACUs) which are a combination of CPU/Memory/Network capacity. The minimum is two ACUs, and the maximum is 384. Then the database will auto-scale based on a combination of metrics on CPU utilization, connections, and available memory, but always within the defined limits.auto_pause_minutes: This will allow us to shut down the computing power of the database when it’s IDLE for a certain amount of minutes, meaning scaling down to zero capacity. This is something you may want to do in a testing / staging environment to save costs. The database capacity will be restored the next time a new connection is detected. You should know that there is a warm-up time which can be around one minute.backup_retention_days: Database backups are automatically deleted after this number of days. Aurora does automatic backups once a day and retaining backups for one day is free.
After the database is created by CDK, a new secret is added in Secrets Manager containing the database cluster URL, the database name, and the database credentials. As we will need to find this secret later, we will save the name of the secret in the SSM Parameter store.
The static files stack
We are going to store the static files in an S3 bucket, and we will serve them through a CloudFront Distribution.
my_django_app/static_files_stack.py
First, we create a private bucket. For security reasons, we don’t want the bucket to be public, so we block any traffic coming from the internet. As the static files can be re-generated anytime, we allow CDK to destroy the bucket and its objects as needed.
Then we create an Origin Access Identity (OAI) to allow our CloudFront distribution to access the files in the bucket.
Also if cors_allowed_origins is provided, we add a CORS Policy to allow requests coming from those domain/subdomains only. Else all the origins are allowed.
Finally, this time we will save the s3 bucket name and the CloudFront distribution URL in the SSM Parameter Store.
The external secrets stack
There are some parameters that we can’t set upfront. For example, we don’t want to commit the Django SECRET_KEY value in our repository, and we can’t know the database host URL until after the database is deployed.
But fortunately, there is a way to make these parameter values be injected on runtime. The parameters which contain sensitive information, such as the Django secret key or database secrets are stored encrypted in the AWS Secrets Manager, while others like the TLS certificate can be stored as text in the AWS SSM Parameter Store.
This stack groups these type of parameters and allows us to pass them later to both the application stack and to the workers' stack.
my_django_app/external_parameters_stack.py
The app_secrets dictionary groups the environment variables required by the Django app which contain sensitive information. So instead of hard-coding the values, we create ecs.Secret objects. This makes the value to be injected into env vars in runtime when the containers start.
The ecs.Secret can retrieve the value from a secret stored in the secrets manager or from a parameter stored in the SSM Parameter Store. Also, the secrets in secrets manager can be stored (encrypted) as text or as JSON.
The Django secret key is a string stored in the secrets manager, so we use secretsmanager.Secret.from_secret_name_v2 to build the secret object from the secret name. Notice you need to create this secret manually in the AWS console, and the name should match the convention mentioned earlier to work with this sample code.
The database secret is also stored in the secrets manager. But it is automatically created during the creation of the database, and its content is a JSON map with the database host URL, database name, username, password, etc. So, we use the secret object created by the database stack, and we specify the JSON field from which we want to extract each value.
The AWS API keys are stored in the secrets manager as text, and they are retrieved the same way as the Django secret key. (These AWS keys are used by django-storages to store static files in S3).
The App Stack
You will see that CDK has automatically created an empty stack class called MyDjangoAppStack.
my_django_app/my_django_app_stack.py
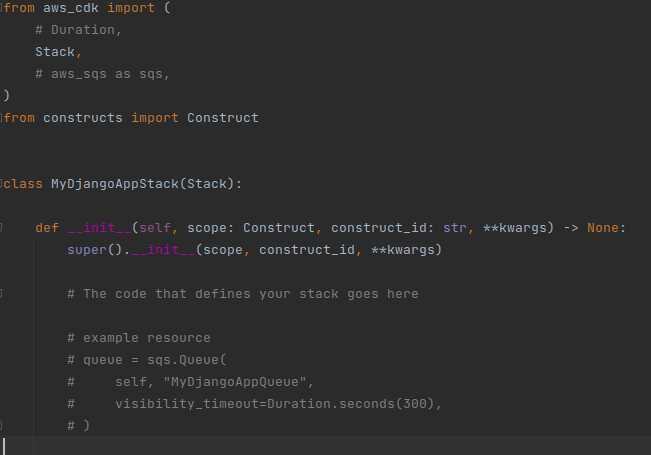
We will use this stack to create the infrastructure required to run our Django app, as shown below:
In this case, we want to run our Django app as an ECS Service, with a fronting load balancer so we can scale horizontally. As this is a well-known architecture pattern, there is a solution construct called ApplicationLoadBalancedFargateService that we can use for this. We will also enable health checks and auto-scaling.
First, as we want our app to run over HTTPS in our own domain, then we need a TLS certificate. As certificate creation and verification can take some time, we won’t create it using CDK, but we will import it.
You can create the certificate from the AWS Console using the AWS Certificate Manager (ACM). Once created, we saved the certificate ARN as a parameter in SSM Parameter Store and import it here. Later, we instantiate a Certificate object using acm.Certificate.from_certificate_arn. Then we will pass the certificate object in the certificate parameter, while setting the protocol to HTTPS and setting redirect_http=True to force HTTP requests to be redirected to HTTPS.
Finally, setting public_load_balancer=True will make the load balancer to be placed in our public subnets so it's exposed to the internet.
Then, we set the cluster where the service will live. We get it from the cluster parameter, and here we will pass in the cluster that we created previously in the network stack. And we set task_subnets using a ec2.SubnetSelection to make the Fargate tasks to run in our private isolated subnets; they are accessible through the load balancer only, and they are not exposed to the internet.
Next, we set CPU and memory limits, and a desired count for Fargate tasks. We have parametrized these settings in the stack so we can specify more or less capacity and more or less redundant instances while instantiating the stack for different environments (staging, production) later.
We also need to define the container image options in task_image_options. We want the image to be built from the source code, so we use ecs.ContainerImage.from_asset and set the relative path to the Dockerfile in our repo, and the target to build (prod, in this case, to build the production image).
We specify the port on which the app is listening so the load balancer forwards requests to it. Finally, we pass in the environment variables and secrets that we defined previously.
For health checks, we have added a status endpoint in our app at /status/ which returns status 200 Ok on GETs, so we set that URL in the configuration. We also set thresholds so an instance (container) will be marked as healthy after three successful health checks, and it will be marked as unhealthy after two failed health checks.
This way unhealthy instances will be automatically detected and replaced.
For auto-scaling, Amazon supports different scaling policies: Target Tracking Scaling, Step Scaling, and Scheduled scaling. In this case, as we know the CPU usage is correlated to the number of requests being processed by our app, then we will use a target tracking policy based on CPU usage metrics.
When the average CPU utilization rises above 75%, a scale-out alarm will trigger Service Auto Scaling to add another task (increasing the desired tasks count) to help out with the increased load. Conversely, when the average CPU utilization drops below 75% for a sustained period of time, a scale-in alarm will trigger a decrease in the service’s desired count to free up resources and reduce costs.
We also set a minimum and a maximum task count, and again these settings are parameters so we can adjust them for the different environments later. For example, we may want a minimum of two tasks in production to guarantee high availability, but one task may be enough for a testing/staging environment.
Finally, we save some parameters related to the tasks in the SSM, which will be useful to run one-off tasks later (for example, to run Django commands in ECS).
The DNS routes
my_django_app/dns_route_to_alb_stack.py
Registering a domain and creating hosted zones require some validation steps and can take time so we won’t automate that with CDK. But we can do the first steps in the AWS console and then import what we need.
So we will look for the hosted zone by domain name. Then we will set some DNS records to make our domains point to our load balancer. As we are using CDK, if the load balancer is replaced and the DNS changes, then the DNS record will be updated too.
The queues
We will use Amazon Simple Queue Service (SQS) to create our queues. SQS is a managed service so we don’t need to provision or manage any servers, resources, or capacity.
It’s highly available and supports storing an infinite number of messages. This makes it ideal to be used as a broker with Celery. Forget about having to monitor if the queues are up or if storage is getting full with the chance of losing messages.
my_django_app/queues_stack.py
We use the sqs.Queue construct to create a queue. We will use SQS as the broker for Celery, and this will be the default queue. We save the URL of the queue in SSM so we can reference it later in celery settings.
The workers
The workers will read messages from the SQS queue and will execute celery tasks. We add another stack for the workers so they can scale independently.
my_django_app/backend_workers_stack.py
Once again, this is a well-known pattern so we can use an existent solution construct: QueueProcessingFargateService. Most of the parameters are very similar to the ones in the ApplicationLoadBalancedFargateService, so I will explain the ones which are different.
For auto-scaling, this time we use a step scaling policy based on the number of messages in the queue. The steps are specified as a dictionary in scaling_steps. For each step, we define a lower or upper threshold for the number of messages in the queue metric, and an action to take expressed as an increment or decrement in the number of workers.
We allow this policy to be changed from a parameter during the stack instantiation, but we also set some reasonable defaults.
The docker image is the same used in the Django app service, but we overwrite the command executed in the container to run the script that starts the Celery worker, instead of starting gunicorn.
The deployment stage
Now that we have defined stacks for all the system components, we will group them in a Stage.
my_django_app/deployment_stage.py
This stage represents an instance of the whole system, and this will make it easier to create multiple environments for testing/staging or production later. So, here we instantiate all the stacks that we created previously. We also
Adding CI/CD with CDK pipelines
CDK pipelines allow not only deploying new versions of your app when your application code changes, but they also can update your infrastructure (and the pipeline itself!) when your infrastructure code changes.
You can model your pipeline(s) as it best suits your needs and according to the branching model that you are using. For example, if you are following the GitHub Flow, you may want to have a single pipeline triggered when PRs are merged into the master branch.
This pipeline deploys to a staging environment where you can run more manual or automated tests (end-to-end, integration, UI tests, etc.), and deploys to the production environment after automatic or manual approval.
Instead, if you are following GitFlow, you may want to have two pipelines: one triggered by commits in the development branch that will deploy to your staging environment, and the other one triggered by commits in the master branch that will deploy to your production environment.
For this example, we will choose the GitHub Flow having two environments, staging and production, with a manual approval step before moving to production. Then our pipeline will have the following steps:
- Source: This stage fetches the source code from your GitHub repo and triggers the pipeline every time you push new commits to it. The repository includes now both your application code and your infrastructure code. This works using webhooks through an AWS CodeStar connection app that you need to create previously.
- Build: This stage performs a
cdk synth. The output of that step is a cloud assembly, which is used to perform all actions in the rest of the pipeline. - UpdatePipeline: This stage makes the pipeline update itself as needed. For example, if you update your infrastructure code to add a new deployment stage to the pipeline, the pipeline is automatically updated to reflect the changes you made. This also means that we need to deploy the pipeline manually only the first time, and after that, we can just modify the pipeline code and push changes to the repository.
- PublishAssets: This stage builds and publishes the Docker images for the app, workers, etc.. to Amazon Elastic Container Registry (Amazon ECR), so they can be used during the subsequent deployments.
- Staging: The staging environment is created or updated as needed Here the ECS services are created or updated with the last docker images. We use this environment to do some more QA (e.g., integration tests, end-to-end tests, UI tests).
- Production: After manual approval, the image is deployed to the production stage. The new image is deployed updating the app in ECS. Rolling updates can be used to avoid downtimes.
Let's define our pipeline then:
my_django_app/pipeline_stack.py
The stack pipeline is like any other stack, but it’ll contain the pipeline plus the stages of our system for the different environments in which we want to deploy.
We create the pipeline using the CodePipeline construct. Then we add a ShellStep where we specify the source repository and the commands needed to install CDK, install dependencies, and synthesize the infrastructure code.
We also provide dockerhub credentials to use a standard dockerhub account with a higher limit on image pulls. You may use a free account, but you may hit the pull limit if you deploy several times a day. The ShellStep will generate the first four stages of our pipeline: source, build, updatepipeline, and publishassets.
Then, we use our Stage class MyDjangoAppPipelineStage to instantiate two stages: one for staging called MyDjangoAppStaging, and one for production called MyDjangoAppProduction. Each one will have different settings. For example, for staging, we use a database with minimal capacity, enable the database auto-pause feature, and limit the number of tasks in ECS to reduce costs. But in production, we keep the database always running, and we set higher scaling limits.
We use the add_stage method to add each stage to the pipeline in the order we want the app to be deployed. So the staging stage first and then the production stage. We also set the pre parameter while adding the production stage to block the pipeline until manual approval is given.
Now that the pipeline stack is defined we need to instantiate it in the entry point, app.py:
Deploying
All we need to do now is deploy the pipeline using the CDK client:
$ cdk deploy MyDjangoAppPipeline(You can see the deploy command in action in this video).
First, CDK with synthesized the CloudFormation Stacks, and if there is a syntax error or other issues you will see it in stdout. Then CDK will ask for confirmation before creating roles, policies, and security groups. Enter ‘y’ for yes, and the deployment process will start. You will see the deployment progress in your shell and once finished you will see the pipeline in the CodePipeline panel at the AWS Console.
After the pipeline is deployed, it will be triggered and all the stacks will be created. You can monitor the stacks’ creation in the CloudFormation panel at the AWS Console.
This is the only time you need to run the deploy command. The next time you commit any changes in the infrastructure code, or the app code, the pipeline will update the infrastructure and will update the ECS services as needed.
Running Commands
When using Django is common to run shell commands or scripts for things like creating a superuser for the back office, running a custom data migration, or just running any custom command or script needed for any reason.
But as the app runs inside isolated stateless containers, we can’t ssh into one of them to get a shell and execute our commands (it’s not a bug; it’s a feature!). But we can start a one-off Fargate task in ECS, in the same cluster and subnets, to run the command inside a new container.
As this task is ephemeral, once the command exits the task stops and the container is destroyed. We can trigger the task by calling the RunTask API, either using the AWS CLI or the AWS SDK. As I prefer writing Python code to shell scripts, I’ll use the Python SDK (boto3), and I’ll write a Python script to run any commands in ECS this way.
You will find this helper script at /scripts/run_cmd.py.
The script will take a command and a deployment environment name (the name that we gave to our staging or production stage), and it will start a task to execute the command in that environment.
How? Remember the parameters that we stored in SSM in the different Stacks? This script will read those SSM parameters, and it will build the configuration needed to run the task in the right cluster and with the same settings as the Django app.
The docker image will be the same image used for the Django app, but the docker command will be overwritten. This way, we can run Django commands and, as the task has access to the database, we can use the Django ORM or anything we need.
Usage
First, we need to set some env vars with the AWS config needed by the script to call the AWS API:
AWS_ACCOUNT_ID=123456789123
AWS_REGION_NAME=us-east-1
AWS_ACCESS_KEY_ID=SOME4P1KEYID
AWS_SECRET_ACCESS_KEY=sOmeSecretACcesKey
You can set these env vars in your shell, or you can set them in a .env file and then load them into your shell. If you are using Linux, you may use the helper script located at /scripts/set_env_vars.sh:
$ . ./scripts/set_env_vars.shThen, you can execute the run_cmd script. You can run it with the -h option to see the usage help:
(.venv) $ python ./scripts/run_cmd.py -h
usage: run_cmd.py [-h] --env ENV_NAME [--env-var ENV_VARS] commandRun a command as a fargate task in ecs, using the same container and settings used by the Apppositional arguments:
  commandoptional arguments:
  -h, --help          show this help message and exit
  --env ENV_NAME      The environment where the command will be run: MyDjangoAppStaging or MyDjangoAppProduction.
  --env-var ENV_VARS  Set extra env vars as --env-var NAME1=VALUE1 --env-var NAME2=VALUE2
Now, for example, let's create a superuser for our back office in staging:
(.venv) $ python ./scripts/run_cmd.py "python manage.py createsuperuser --noinput --username admin --email=admin@your-domain.com" --env MyDjangoAppStaging --env-var DJANGO_SUPERUSER_PASSWORD=MyPassWord123
Building execution config for MyDjangoAppStaging
Config loaded:
...
AWS Response:
...
The final configuration and the AWS API response are printed to stdout so you can catch any errors. If you see no error, that means that the task has been started. You can monitor the task status in the ECS Panel at the AWS Console, and you can watch the logs at CloudWatch.
Thanks for reading!

