Why and How You Should Sign All Your Git Commits
Secure your repositories
If you’ve spent some time on public online repositories, such as GitLab or GitHub, you might have noticed the green “Verified” badge on the commits of the contributors.

Aside from being aesthetically pleasing, they do serve a real purpose. Git by itself does not track and validate user action on commits. Meaning you can easily impersonate someone else and issue commits in their name.
Let me illustrate this with an example.
Here I created a new repository called “Oops” in my GitLab profile:

Then I cloned the repository and set my identity to the same name and email address as one of my friends, who also has a GitLab account.

After that, I can just make some changes, then commit and push them to the central repository. As you can see git did no additional verification to make sure I’m actually the user I claim to be.
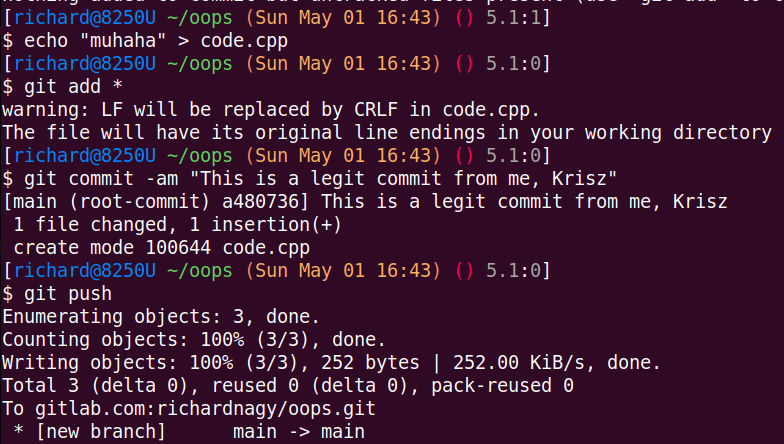
After that, I go back to the web UI to my repository, and here is my commit.

As you can see GitLab (or any other repository for that matter) even did the additional courtesy of including the other account’s profile image, making the commit seem more legitimate.
This causes two serious problems:
- Users can issue commits “anonymously”, making it near impossible to track who actually submitted that (sometimes malicious) change.
- It gives users plausible deniability over their work. They might claim that it was not them who made that commit, and who is to say they did?
This is a serious problem, especially if the repository has multiple people working on it.
That said, how can we sign our commits and what does that mean exactly?
Without getting into the mathematics of public-key cryptography, when you issue a commit, you save the changes along with a short description of what changed exactly. you can then calculate a hash for each of these messages and encrypt them with your secret key. If someone sees your encrypted signature and decrypts it with your public key and the hash matches, then either two things are possible:
- The commit was issued by the person they claim to be,
- the private key of the user was stolen.
Obviously, we still cannot be sure it’s not the second option, but just stealing someone’s key from their computer is not an easy task, especially if you want a specific person’s key.
In short, if it’s signed with a valid signature, we can be sure it was issued by the person they claim to be.
Now that we established why you should always set a policy for everyone to sign their commits, let’s see how you can do just that.
We will be using GPG, the free GNU Privacy Guard which is often used to encrypt, decrypt and sign messages and is considered to be the industry standard for such tasks.
Tools you’ll need:
- A locally installed Git client
- A terminal software you are comfortable with (bash, Windows Terminal)
- A remote repository account (eg: GitLab, GihHub, …)
- A package manager (apt/winget for Linux or Windows)
With that out of the way, follow these steps to set up your GPG and git environment.
1. Install GPG on your system
Linux : sudo apt install -y gnupg
Windows:
winget install GnuPG.Gpg4Win
2. Generate a key pair
gpg --full-generate-keyGPG will then ask you several questions about the properties of the key. I will not go through all the steps, but I recommend (in 2022) using an RSA key with 4096 bits, no expiration, and a strong passphrase. Also, make sure your real name and email address values match the ones you use on your remote repository exactly.
3. Get your key ID
gpg --list-secret-keys --keyid-format=longThis command should produce an output similar to the following: (it won’t be the same of course, since your key is different from mine):
gpg: checking the trustdb
gpg: marginals needed: 3  completes needed: 1  trust model: pgp
gpg: depth: 0  valid:   1  signed:   0  trust: 0-, 0q, 0n, 0m, 0f, 1u
/home/richard/.gnupg/pubring.kbx
------------------------------
sec   rsa4096/9CA6B5740A261A53 2022-04-27 [SC]
      F84FEAA74A29DE3A029275529C66B1749A561A22
uid                 [ultimate] Richard Antal Nagy (gitlab.com/richard-nagy) <nagy.richard.antal@gmail.com>
ssb   rsa4096/9238CFF755296971 2022-04-27 [E]
Now take a note of your key ID found in the line starting with sec and excluding the type of key you generated. In my case, it’s: 9CA6B5740A261A53
4. Export the public key
gpg --armor --export KEY_IDReplace the KEY_ID part with your key ID and copy the output including the dashes. Head into your repository profile and add this GPG key in account settings. In GitLab, you can access it with the following link: https://gitlab.com/-/profile/gpg_keys
If you added an expiration date to your key, it’s useful to set that on your profile as well.
Now that you’ve added your public key, it’s publicly visible to anyone to verify your signatures. My public key is on the following link:
https://gitlab.com/richard-nagy.gpg
This is the intended behavior, hence the name: “public key”. It’s out there for anyone to see.
5. Setup git signing
Finally, we need to tell our local git client we want to sign all commits. Issue the following commands, but remember to replace KEY_ID again.
git config --global user.signingkey KEY_ID
git config --global commit.gpgsign true
If you’re using a Windows system, sometimes git does not find the gpg utility. If you get an error after a commit saying that there was no private key found, you need to set the executable path explicitly in PowerShell:
git config --global gpg.program "C:\Program Files (x86)\GnuPG\bin\gpg.exe"Make sure to replace the path if you did not use the default install directory.
At this point, you are done! I recommend setting up a quick test repository and trying to issue a signed commit to check everything works fine.
If you added a passphrase to your private key, you might find it tedious to have to write your key so often. To give some time buffer to yourself, just add the following lines to ~/.gnupg/gpg-agent.conf
default-cache-ttl 86400
max-cache-ttl 86400
This will set a time window of 1 day (in seconds) where your gpg remembers your password. If the given file does not exist, just create it yourself.
If the timeout seems to not work you can restart your system or restart just the GPG service:
gpgconf --kill gpg-agentThank you for reading the article, I hope you found it useful!
If you did, please consider buying me a coffee, ☕ cheers!
Questions and Answers
Can I transport the keys when I’d like to move to a new system?
Yes, but make sure not to upload the private keys to any online site or service. Use an encrypted pen drive or a secure communications channel.
Export : gpg --export-secret-keys KEY_ID > private.gpg
Import: gpg --import private.gpg
Can I install this on systems I do not trust?
No. Never let any system gain access to your private key that you do not manage and trust.
Why is this secure?
RSA utilizes the prime integer factorization problem, which means that the private key cannot be calculated using the encrypted data and the public key (even if we know the original message) if the numbers are big enough in a reasonable time using non-quantum methods. And the numbers are pretty big. You usually work with 32 or 64-bit integers while developing, your key will use 4096 bits.

