Visual Web Testing With Robot Framework, Selenium and WatchUI
Visual testing can help save a lot of time and effort validating your web application

In this article, I’ll explain the theory and practice of visual testing using robotframework and WatchUI library.
What is visual testing?
Simply as the name applies, visual testing is when we test our GUI application with visual instruments.
In the automation realm, this means that we are testing our GUI application using computer vision techniques.
The common theme of visual testing is taking a snapshot of our application prior to the test execution, this snapshot will be the benchmark, and then with each test execution the GUI will be compared with this benchmark using image difference calculations.
This usually involves techniques like Optic Characters Recognition (OCR) and image segmentation.
Why should I perform visual testing?
Testing HTML documents only with text comparison might be tedious and time consuming.
If the pages on your application has dozens of text elements, this means that the corresponding test case should have dozens of text assertion statements.
The maintenance of this might be overwhelming and test code readability will suffer.
Text assertion is not always sufficient, for example if the text content in your website is correct but the elements are out of alignment, your test case will run successfully with a pass result, but the who page is a mess with highly adverse effects on user experience.
By taking a screenshot and compare against it with computer vision, you are matching all the possible changes with a single assertion.
This doesn’t mean that text based aspersions will be completely abandoned, but these can be significantly reduced.
Remember the pyramid
Always remember that GUI testing is at the top of the testing pyramid and it should take second place to unit testing, integration testing and api testing.

Visual testing is part of GUI testing and the goal of GUI testing is to make sure the data renders properly for the user.
Most of the validation will take part on the API level and not on the UI.
Introducing robotfrmaework
I talked about robotframework in a previous article. Robotframework is a python based open-source framework for software acceptance testing.
With its keyword-driven approach and tabular syntax, it can be used to generate acceptance tests quickly and it offers great readability both on the test code and the final reports.
It offers a reach eco-system with many tools easily available for multiple testing goals from web testing to API testing to the database, mobile or IoT.
Introducing WatchUI
WatchUI is a visual testing library for a robot framework developed by Tesena.
Powered by Tesseract-ocr, its keywords allow the automation developer to take a screenshot of the application and then to diff it against an image with the assertion imposes a bottom threshold for acceptable difference.
It can easily integrate with your existing robotframework scripts running selenium or playwright and you can promote these test to be visual tests with only 2 lines of code :)
For more about browser testing tools read my article here.
Hands-on
First, lets install all of our dependencies from pip:
pip install
robotframework==4.1.3
selenium==4.1.0
robotframework-seleniumlibrary==6.0.0
WatchUI==1.0.12
Having our dependencies installed, now we need to install tesseract on our operating system.
You can read about installing tesseract from watch ui official document here.
Let’s start by writing a basic web test case with selenium and store it as test.robot:
To demonstrate how well visual testing can help us, I chose the epoch converter web site (for a reason, you’ll see :)).
The test uses selenium to navigate the browser to the epoch converter main page, it waits until 3 elements are ready:
- A div container.
- The epoch time text box
- The epoch to human time conversion button.
Having all 3 of them enabled, the inner text from the button is collected and then we assert that the text is equal to “Timestamp to Human date”.
Note — all the xpaths were extracted from the website with ease using SelectorHub, go check it out!
Let’s run this:
robot -d results test.robotAnd look at the robotframework report

Nice, the test passed.
Passed is not enough
Let's take a look at the epoch converter main page:

As you can see there are many controllers and widgets, about 20 different controllers and all of them can be tested.
Writing explicit assertions for each controller will be extremely time-consuming, difficult to maintain, and create a lot of confusion in the test code.
So we’ve reached to point where we can upgrade our test to become a visual test using tesseract-ocr and watch UI :)
Visual testing promotion
As promised, we can promote this test to be a visual test by adding only 2 lines of code :)
First, we need to take a baseline image for our website.
I took an image and stored it in the images folder as epoch.png
We need to import WatchUI library in the ***Settings*** section, this requires a full path to tesseract-ocr executable.
Library WatchUI tesseract_path=C:/Program Files/Tesseract-OCR/tesseract.exeNow let’s add Compare Screen keyword from the WatchUI library to diff the screen from the baseline image.
Compare Screen ./images/epoch.png save_folder=${EXECDIR}/outputs ssim=0.99We are comparing the images and allowing a difference no greater than 1% (or, we expect at least 99% similarity).
This is the final script:
Now let’s run this test:
robot -d results test.robotAnd look at the report:

The test passed, let's see the outputs of Compare Screen keyword:

As you can see, the OCR mechanism detected all the differences between baseline image and current screen.
This test passed because the difference was lower than 1% (or the similarity was higher than 99%).
Let's run this test again, but this time around asserting a 100% similarity.
This is easily done by changing ssim option in the Compare Screen keyword:
Compare Screen ./images/epoch.png save_folder=${EXECDIR}/outputs ssim=1.0Run:
robot -d results tests.robotAnd look at the report
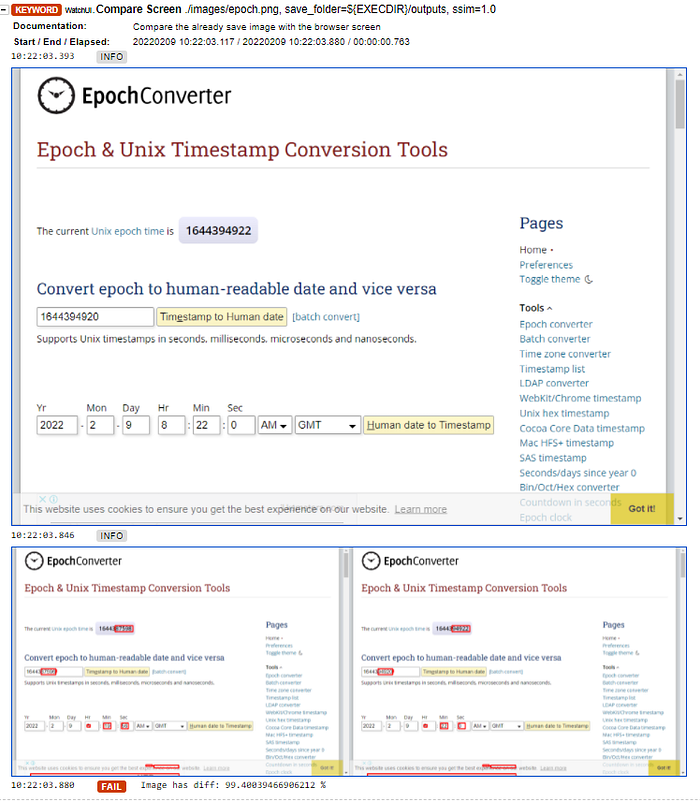
So we can see that the test failed, and the diff resulted with ~99.4% similarity or ~0.6 difference.
Visual testing limitations
The first limitation is timing, the test can fail if comparison is conducted to early while the page is loading.
It can be overcome with implicit waits and sometimes even fixed delays, but fixed delays are generally regarded as test smells.
Another limitation is that images have to be in the same dimensions in order to be compared.
Threshold setting is not always intuitive, especially when fields like dates are evolved.
Setting the threshold too high might cause flakiness, while too low leads to pseudo test cases.
Scrollable pages can also be problematic as it can generate further artificial differences between baseline and current screen.
Storage could be another issue as the number of your test cases proliferate.
Storing images (and any other binary files) in a git repository is a bad practice as git is optimized to analyze text files and all git operations such as merge, rebase, cherrypick, etc are based on textual analysis.
Conclusion
Visual testing is awesome for adding robustness to your GUI tests.
Remember that GUI tests should be regarded as lowest in priority and visual tests are part of that.
Due to some of the limitations around visual testing, the assessment of which tests are appropriate for visual diffing should be done with caution.

