Using Augmented Reality to Bring Dinosaurs Skeletons to Life — a Tutorial
Hi. I’m Florent Germain, a French engineer working with Industrial Augmented Reality during the day, and printing dinosaurs skeletons at night.
I’ve recently entertained the idea to combine my day job with my 3D printing hobby, in order to build a small AR-powered museum for my daughters and I.
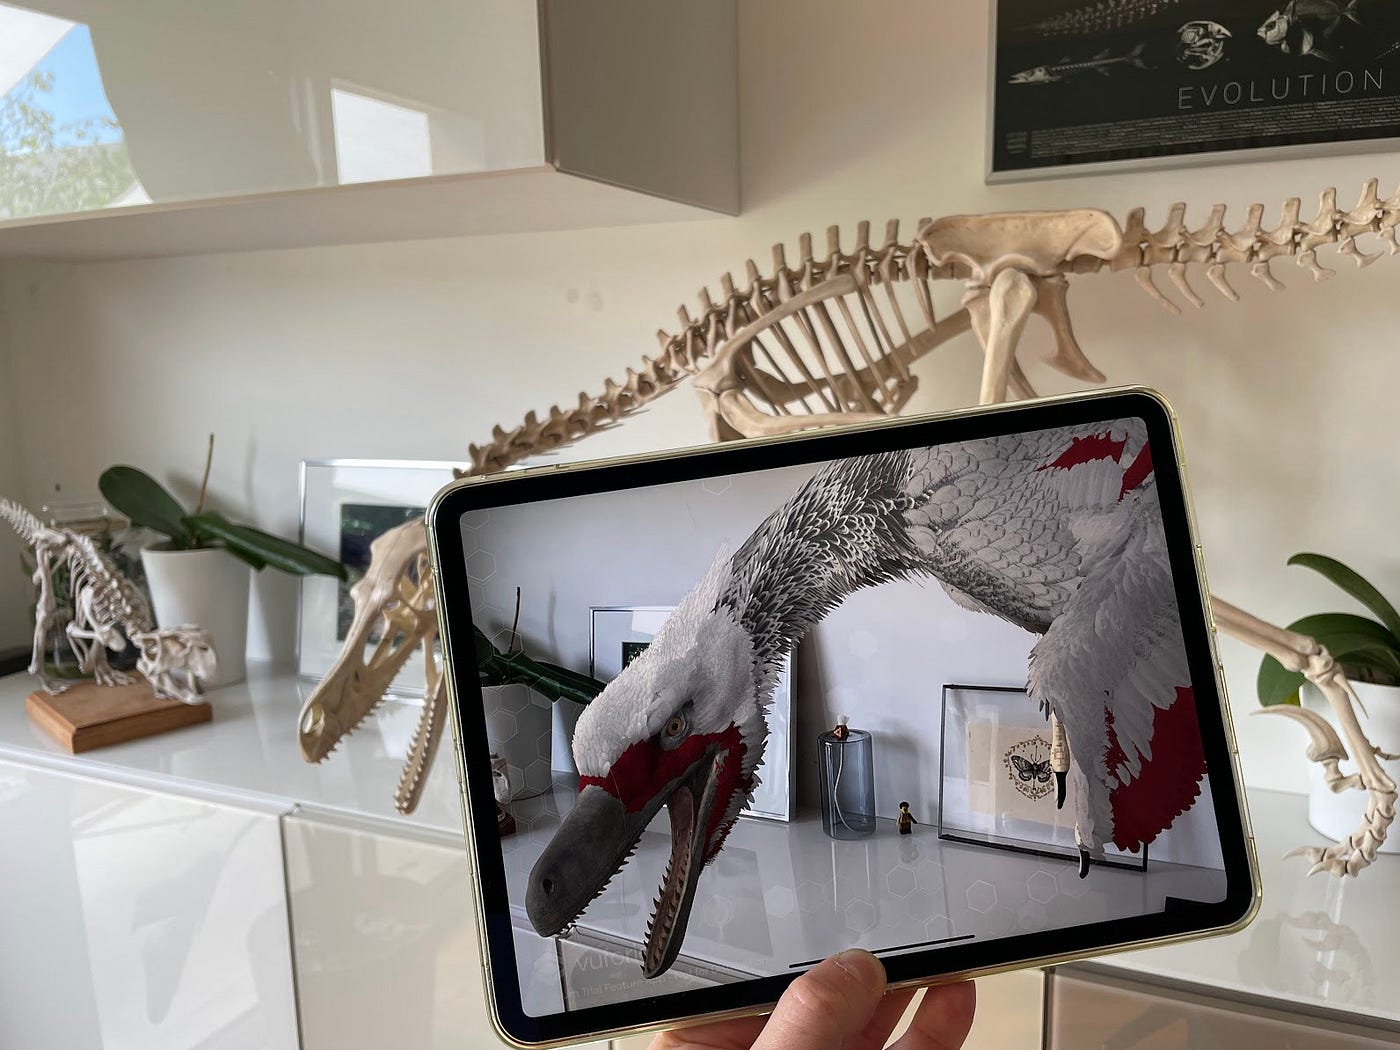
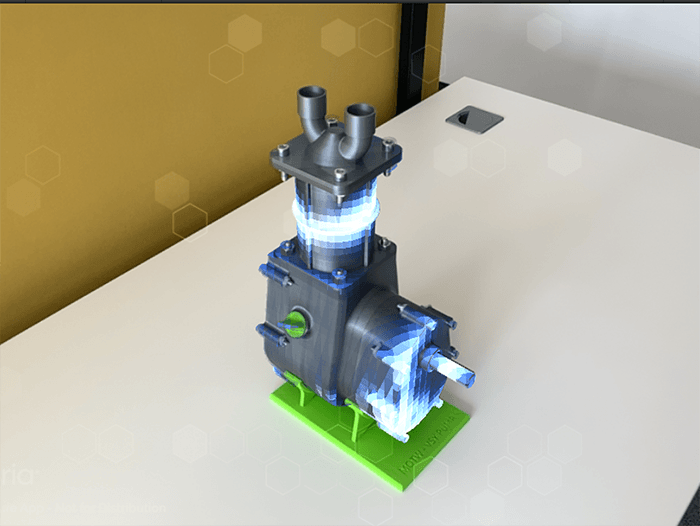
The base idea is quite simple: 3D print, assemble and paint a skeleton; use computer vision technology to recognize and track it in space; overlay a 3D design of the fleshed-out animal on top of it. Here is what it looks like:
In this short how-to guide, I’m detailing the process in order to allow anyone to reproduce this project.
Building the skeleton
This step is quite straightforward but probably the most time-consuming, especially if you’re looking to paint it realistically and hide the fact it’s a 3D print.
Pick a design. Print it with your printer of choice. If you use resin, be sure to fully cure your prints and wear PPE. Paint and assemble (not necessarily in that order) your skeleton.
Make sure the assembly is solid and secured: 3D printed skeletons are brittle and even a small fall would result in broken pieces. It can be easily fixed but reassembly would put you back to square one, even later-on in the process as there would be slight discrepancy with the original assembly (been there, done that…).
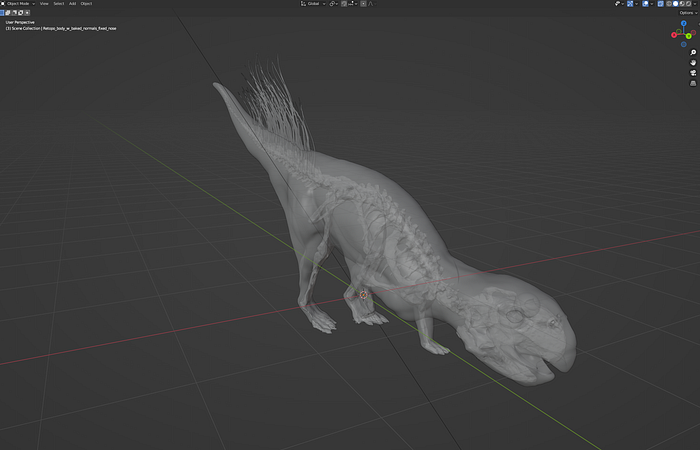
At this stage, you should have something like this:
If you don’t feel like designing your own skeleton, head-over to Cults3D or other 3D print databases. I was personally more than happy with designs from Inhuman_Species and Think3DPrint. It’s also possible to source 3D-printed skeletons and skulls directly, as I did with the Microraptor Gui skull you’ll see below. The rest of the body still needs to be printed, but I uploaded the design for free.
3D scan your print
The next step requires you to 3D scan your 3D printed skeleton because the computer vision tool we’ll use to recognize, track and augment the dinosaur needs a 3D model as input.
“Why not just use the 3D printing STL file then?” I hear you asking. Well, you could… if your printed assembly and original STL file were fully 1:1 in every aspect. In all my attempts, it never proved true though: arms where a bit more angled inward, the tail was not at the exact same angle, the skull was more tilted forward… It doesn’t seem much, but it matters a lot in the next steps when you want your AR overlay to perfectly line up with your physical print.
When it comes to 3D scanning, many options exist. The good news is that you don’t need an extremely detailed scan to move forward: it just needs to be accurate enough in dimensions and details. It’s tied to the size of the skeleton/object you are trying to scan, as well as the scanning technology you’ll use. The rule of thumb is that your 3D scan can be as rough as possible as long it’s not missing bones.
Larger skeletons (a 1:1 Triceratops for example) can probably be scanned with enough accuracy with your iPhone LIDAR. In that regard, any app able to output a 3D model from a LIDAR scan can work (Polycam, Metascan to name a few). But sourcing or printing a skeleton large enough is where the real challenge is in this case…
For smaller ones with minute bones and teeth, 50 cm to 1.5 m (2–5 feet) in length, you’ll need to do some photogrammetry as a minimum to get enough details in your scan. My go-to application for this is Polycam and its photo mode. It’s not free but worth the price if you have to scan things regularly, as it’s easy to use and provides an output of sufficient quality in most cases if you take the pictures properly. Many other applications, like Metascan or Qlone, now offer a similar photogrammetry pipeline straight into the app.
If this doesn’t cut it in terms of details (missing fingers or the end of the tail), my next option is Epic Games’ Reality Capture. This is a bit more manual work, but I get full control of the quality of reconstruction and thus more details. But keep in mind this adds at least an extra step to your workflow, as you’ll have to simplify the output from the multi-million polygons model you’ll get. Some alternatives to Reality Capture are Agisoft’s Metashape or the open-source Meshroom.
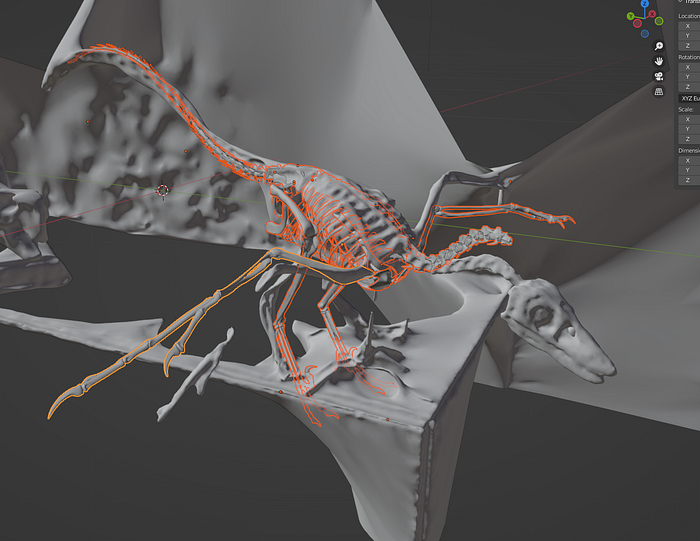
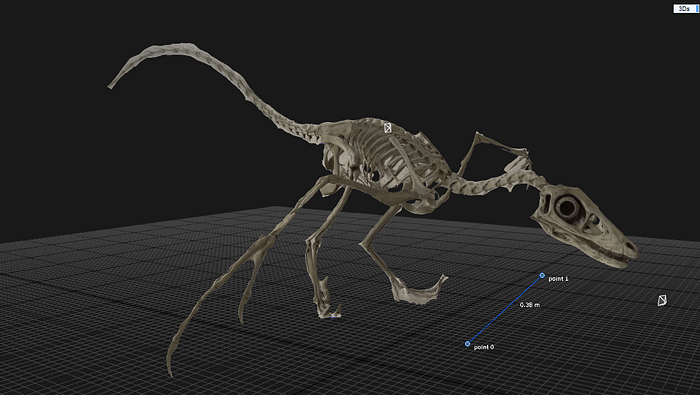
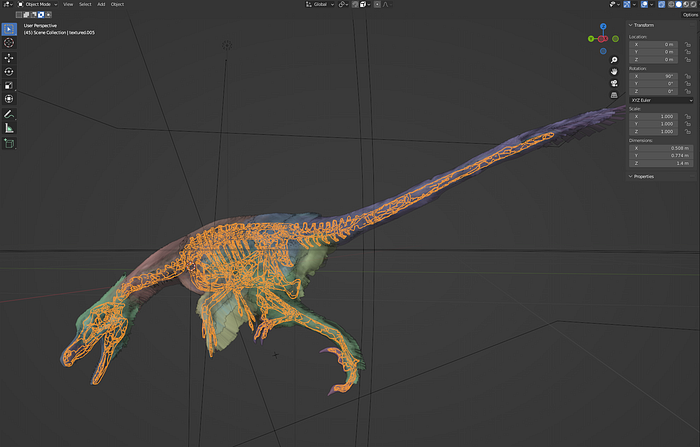
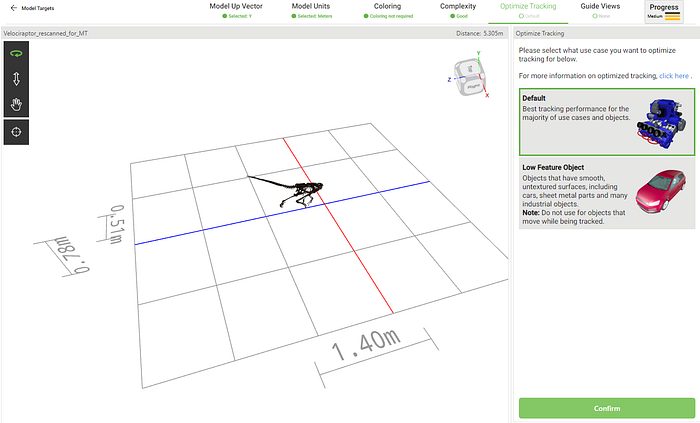
Here are some examples of good enough scans, from the very small Microraptor Gui and the larger, 1.40m long Velociraptor Mongoliensis:
This 3D scanned model will serve 3 purposes:
- as an input for the computer vision algorithm, which will be trained to recognize it from the camera feed and track its location in space.
- as an overlay, we will use later-on for some nice animated shaders and/or occlusion.
- As a guide to sculpt/pose your fleshed-out dinosaur
This last point will be critical for the next step, as we need another 3D model to augment this skeleton: the fleshed out dinosaur.
Fleshing out your skeleton
Here, it’s all about overlaying your skeleton with some meat, feathers and keratin. It will probably require some sculpting, unless you have access to some 3D models matching your printed skeleton. And even in this case, they probably won’t match the exact same pose as your print, nor be at the right scale or with discrepancies here and there in the general anatomy. So assume you’ll need to do some 3D work anyway, to pose and adapt the model to perfectly match your print. So for the rest of this section, I assume you start from scratch.
First option — is the “sculpture” track: you import the 3D scan in a sculpting software (Zbrush, Blender, Nomad Sculpt on Ipad…) and directly design your model on top of it. This is an interesting approach if you don’t care about animation and want to focus on the sculpt, the details of the pose and minimize the extra steps. It usually offers the best result visually because you can really focus on the details tied to the pose, like the behavior of the skin around the bended arm joint, or the wrinkles around the open mouth for example. Just keep in mind that you’ll need to bake all those details into a low-poly model as your phone or Hololens won’t handle nicely a 10M+ polygons sculpt at runtime.
The second option — the “rigging” track. For this, you need to sculpt your dinosaur in the “T” pose, rig it and pose it so it matches your 3D scan. This comes with extra steps and requires some knowledge about rigging a skeleton and painting vertex weights here and there… But that means your model can be animated and thus could “jump” from his skeleton, adding an extra layer to the experience. It also means your model can be reused for other realtime applications beyond this AR experience.

No matter the track your pick, you end-up with a 3D textured model of your dinosaur, matching your 3D printed scan. It’s now time to combine all those elements into an AR experience.
Creating the AR experience
This part is probably why you clicked the link in the first place, so I’ll dive into more details here. But I assume you have some minimal knowledge of Unity, know how to add packages, import asset store assets, and how to deploy an app to a mobile device.
As a disclaimer, I work for PTC Inc, which owns the AR SDK Vuforia Engine: this is what I use to build my AR experience, as I’m very familiar with it and has best-in-class tracking for 3D models. But you could use different SDKs to achieve this and I’d be very interested in hearing from your experience if you do!
From the software side, here is what you’ll need:
- Unity 2021.3.11f1
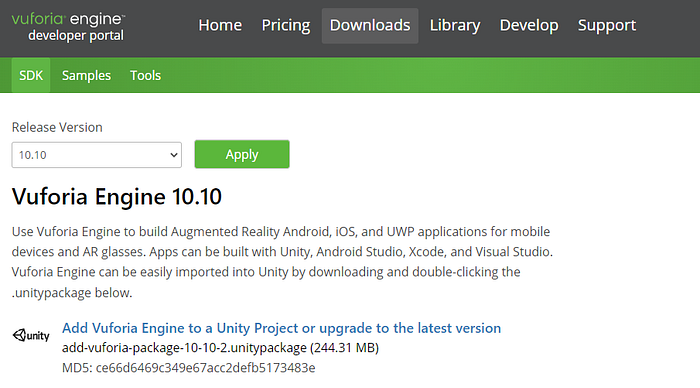
- Latest Vuforia Engine SDK
- Vuforia Model Target Generator
- Basic Vuforia Engine License
- Vuforia VFX Library Asset
- Advanced Dissolve Asset (optional)
Setting up the project
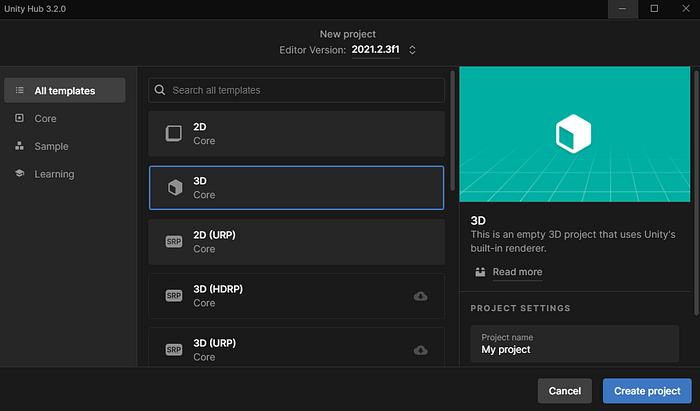
The first step is to get your project setup for Vuforia Engine. For that, you’ll have to create a new 3D project from the Hub. Let’s stick to the basics for now and go with the 3D Core template, without URP or any AR template.
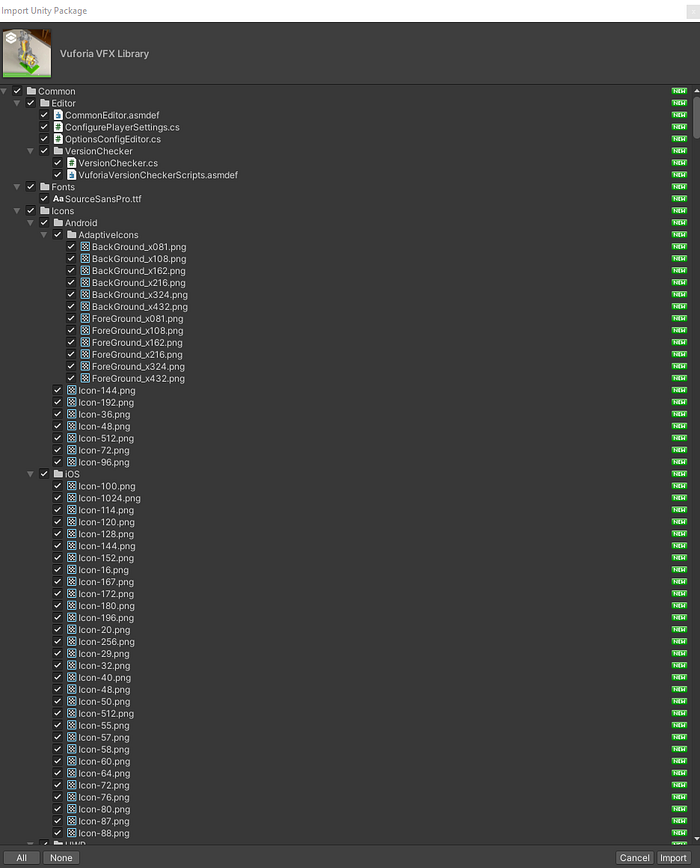
Once the project is loaded, drop the Vuforia Engine Unity Package you downloaded from dev.vuforia.com
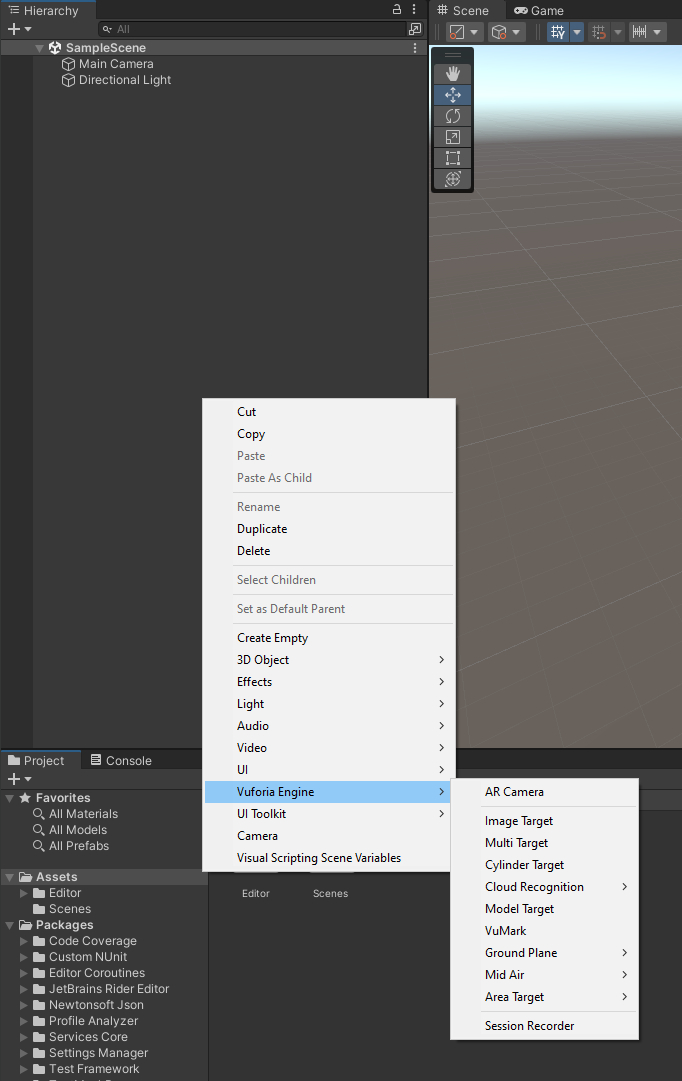
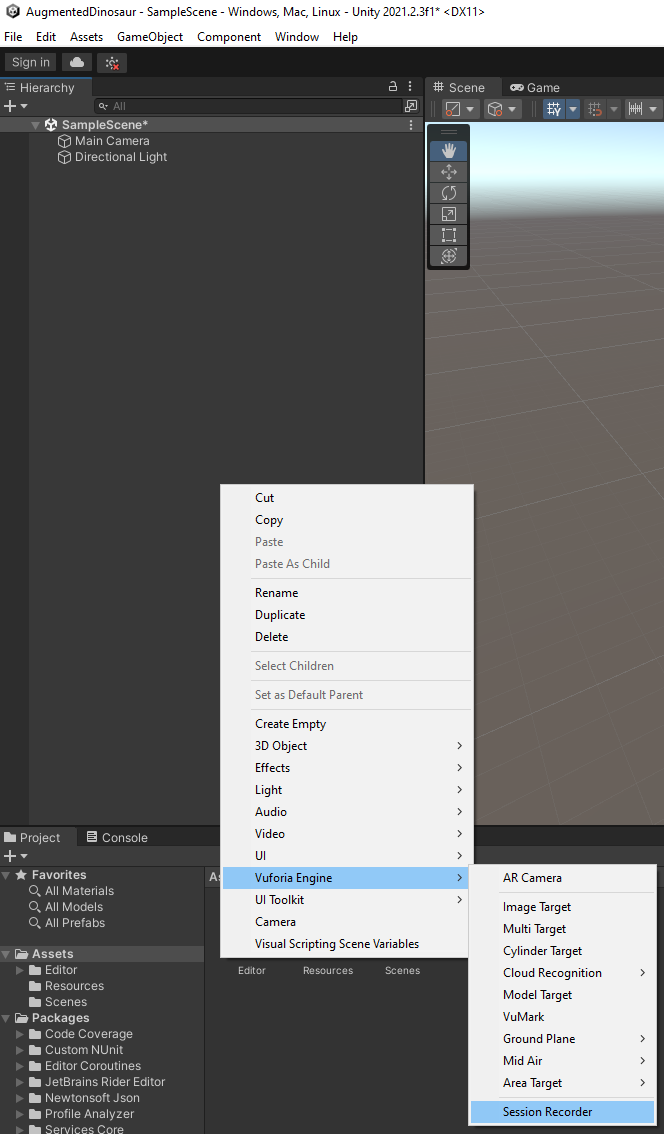
Import everything, and let Unity do its thing by compiling. Now, you should see the Vuforia Engine contextual menu when you right-click in your hierarchy.
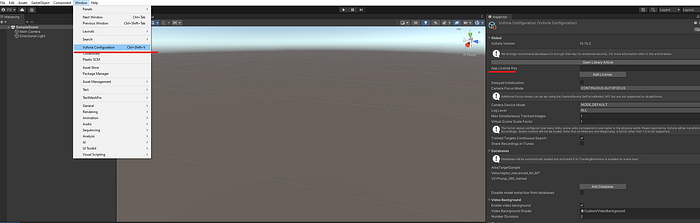
Now, you’ll need to input your license in the Vuforia configuration window. For that, you first need to accept the Vuforia Developer Agreements: go to Help/Vuforia Engine/Show Developer Agreement and accept. Then, you need to generate the Basic license from dev.vuforia.com if not already done. Copy it and paste it into the App License Key field. Your project is now Vuforia Engine ready.
Testing the deployment and creating a Sequence Recording app
At this stage, I would recommend to try to deploy a minimal app. To make that useful, let’s create a Sequence Recording app. This will allow you to record some videos that you’ll be able to play-back in Unity to test your app as-if you were testing on-device, speeding up development considerably. It will record not only the video but also the device’s location in space. Used as an input in Play Mode in Unity, it will provide you with the exact same tracking behavior as on device, allowing you to test every aspect of the app without deploying it constantly.
To do so, right click in the hierarchy, and in the Vuforia Engine context menu, select “Sequence Recorder”. Remove the Main Camera, right-click again and in the Vuforia Engine context, select “AR Camera”.
That’s it. You can now build and deploy your application. If all goes well with deployment, you’ll end up with an app with a camera feed and a recording button. You can learn how to use it and what’s the point with Sequence Recording here: https://youtu.be/RFU7y9YQSK4. Record a few videos while moving around your 3D printed skeleton with it. We’ll use those recordings later on.
Importing the Vuforia VFX Library
- Visit the Unity Asset Store and add the Vuforia VFX Library to your Assets.
- In the Unity project, open the Package Manager.
- Select My Assets in the dropdown menu and download and import the asset package into your Unity project.
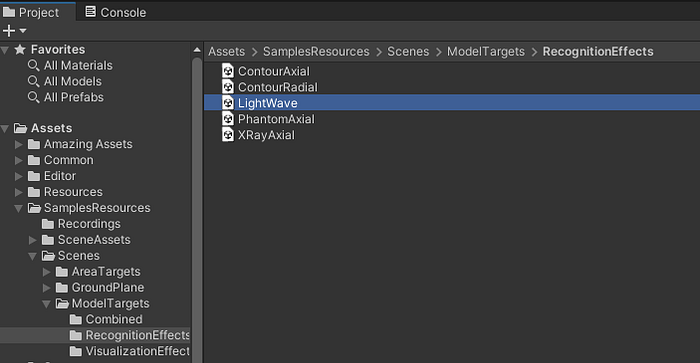
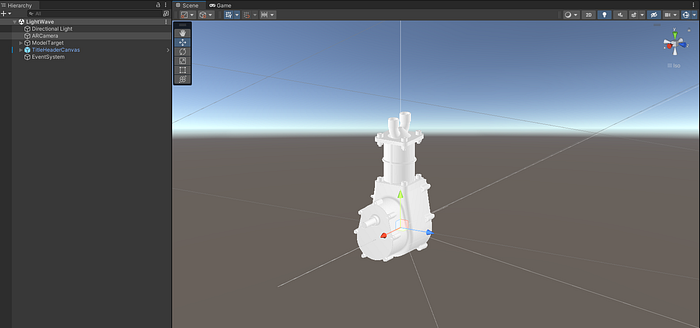
We’ll use one of the demo scenes in this asset to create the basic AR experience of augmenting your dinosaur skeleton! Open the LightWave scene in the Sample Ressources folder:
Your scene should look like this, with a white pump model:
Now, press the Play button. You’ll see a video of the 3D-printed pump, immediately scanned by some sort of blue lightwave.
Let’s explain what is going on here :
- the scene contains a recording (the video of the pump) that can be used by Unity to simulate looking at your target with an AR device by feeding Vuforia the video feed as well as the recorded device’s positional data.
- the scene also contains an advanced Model Target of the pump, which allows it to be recognized and tracked.
- the LightWave VFX is a shader animation that starts to play as soon as the pump model is detected and tracked, providing a cue to the user about the recognition and tracking.
If you were to deploy this scene to your device and own the 3D print of this pump, you’d be able to see this effect on your device: this is a “ready-to-use model tracking template app” we’ll now modify to detect the 3D scanned dinosaur skeleton instead of the pump.
Generating your own Model Target
We want to recognize and track the skeleton in space, from any angle. To achieve this, you need to turn the 3D scan you acquired previously into a Model Target.
You should have downloaded and installed the Model Target Generator tool from the Vuforia Developer Portal. At the first launch, you’ll need to authenticate with your Vuforia account. Then, click the “Create New Model Target” button.
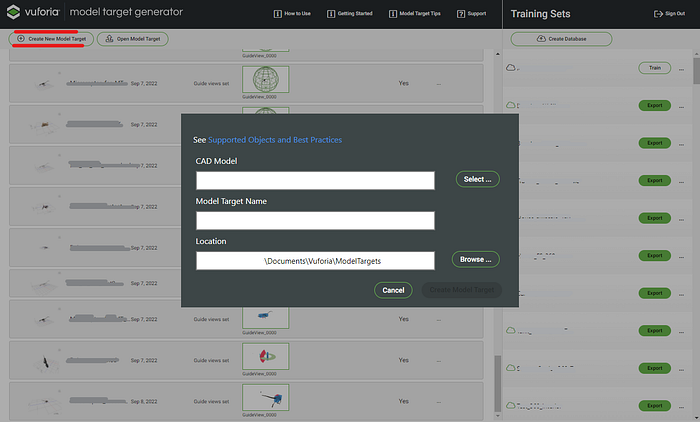
Select the 3D scan, give it a name, and create the model target. The next screen should display your 3D model and its orientation & size. It also should have the 3D scanned texture applied to it, despite it being darker than expected. Make sure the scale is good and matching your skeleton: objects too big or too small compared to their physical version will induce issues later on.

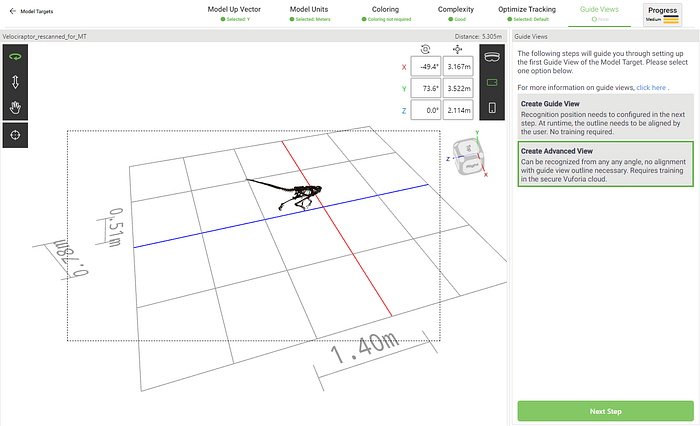
If orientation and scale are good, you can move forward. Coloring and Complexity steps are not important for this particular project, so just click Confirm. When asked about “Optimize tracking”, select “Default” and confirm.
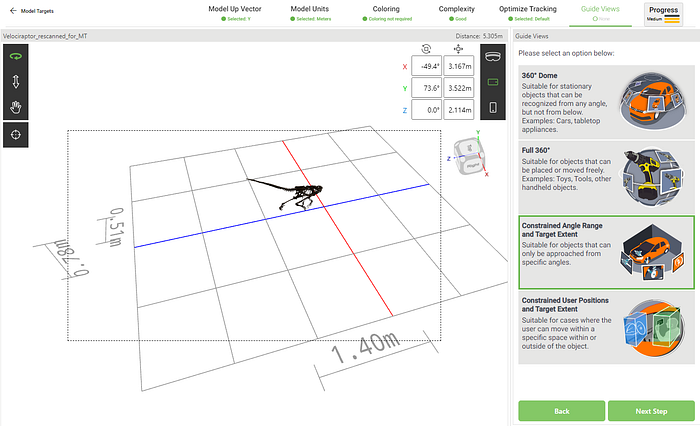
In the last step, select “Create Advanced View” and pick “Constrained Angle Range and Target Extent”. Usually, 360 Dome or Full 360 are fine, but with skeletons, fine structures with holes usually require some manual adjustment to the target extent.
Click “Next Step”. In the new view, click the blue box (the Target Extent) and adjust it to encompass only the rib cage and bassin. It’s not always necessary (on larger, more opaque models it doesn’t need to be adjusted) but help in this case with the skeleton’s fine structures.
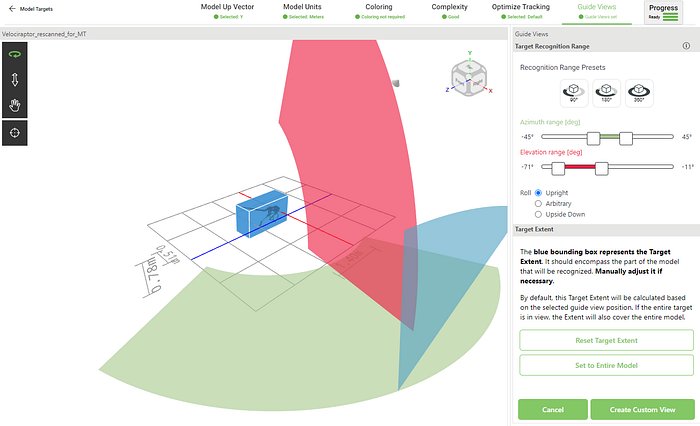
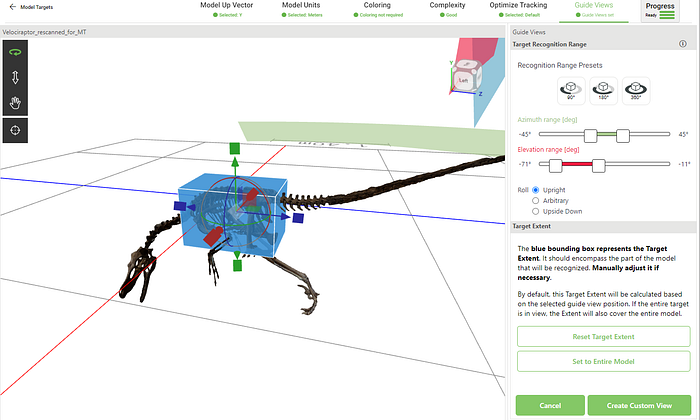
Finally, adjust the recognition range based on the visibility of your model, and click “Create Custom View”.

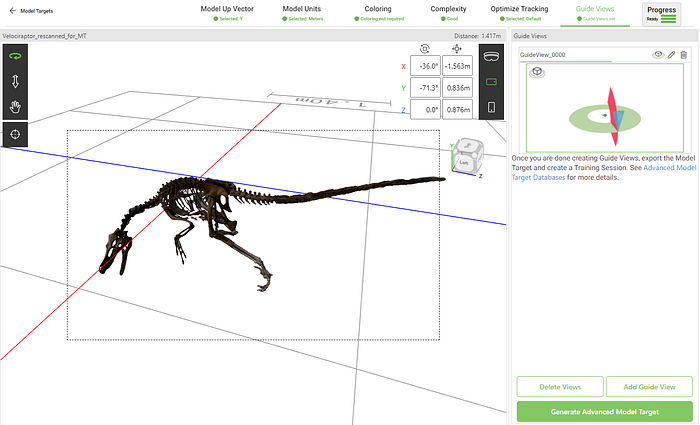
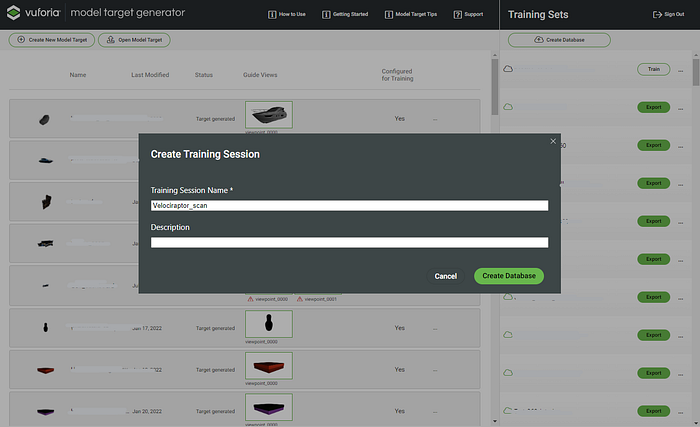
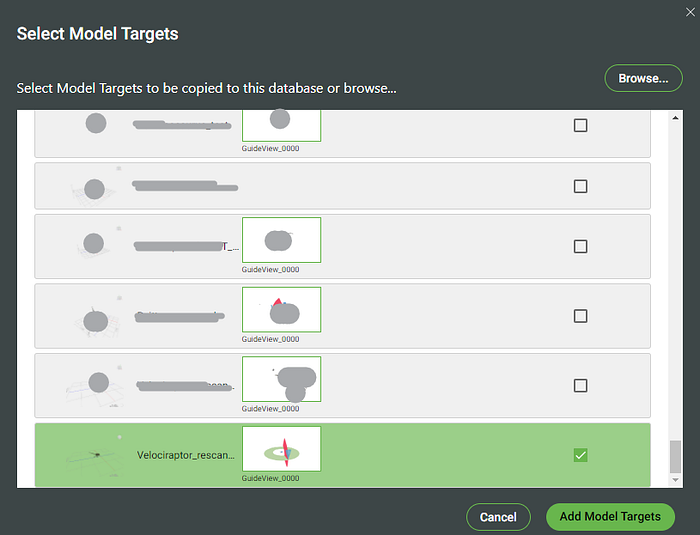
Your model target is almost done. Click “Generate Advanced Model Target” to finalize the database creation and trigger the training by clicking “Train” in front of the newly created database.
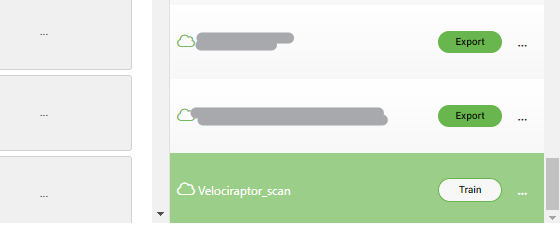
After a couple of hours, the “Train” button switch to “Export”, and will allow you to download a set of files, one of them being a Unity Package. Drag-n-drop this package into your Unity project to add your Model Target: you’re all set now to recognize and track your skeleton. Let’s do that in the next session.
PS: if you want to learn more about Model Target, how it works, best practices and do-n-don’t, head over to this Vuforia library article.
Configuring the sample scene to recognize the skeleton instead of the pump
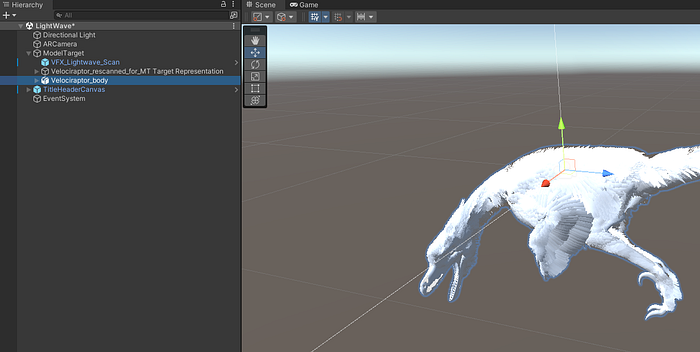
Once you’ve imported the Model Target unity package into your Unity project, the first step is to change the dataset in the ModelTarget gameobject:
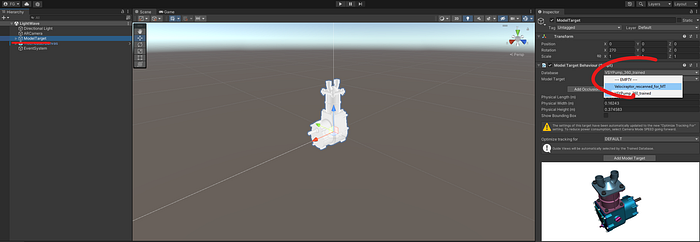
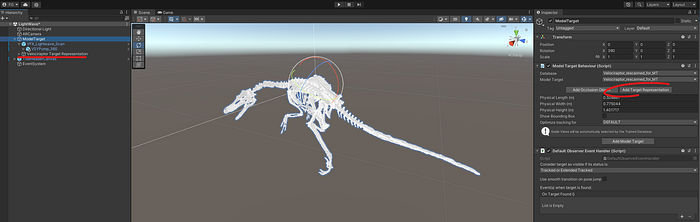
Then, click “Add Target Representation”. The 3D scan of your skeleton should now appear next to the pump. You can also see the corresponding Gameobject in the hierarchy:
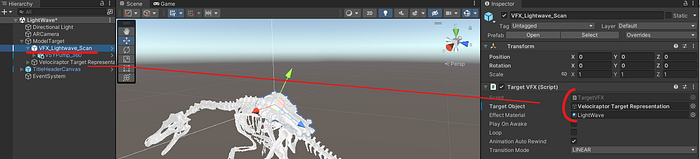
Next, replace the “TargetObject” in the VFX Lightwave Scan GameObject by the Velociraptor Target Representation:
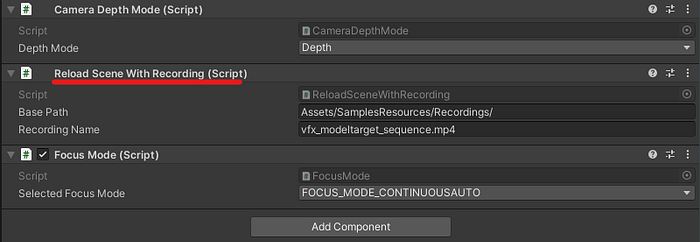
You can now remove the “VSYPump_360” GameObject. You should now be able to recognize your skeleton, and see a nice “scanning” effect alongside its bones. In order to test that right away, select the “ARCamera” component and right-click/remove the component on the script called “Reload Scene With Recording”.
Then, get ahold of the video recording you captured earlier with your first deployed application. Click Ctrl+Shift+V to open the Vuforia Configuration Panel. At the bottom, change the Play Mode Type to “Recording” and browse to locate the sequence (https://youtu.be/RFU7y9YQSK4).
Hit Play. If all went well, you should see this:
You are now able to recognize and track your skeleton in augmented reality! If you want, you can deploy the app and test it live. Be sure to tick the “Loop” parameter on the VFX_Lightwave_Scan effect so it constantly runs in that case.
With a tracked Skeleton, it’s now time to augment it with the 3D sculpted fleshy envelope you created for it.
Overlapping the skeleton with your fleshed-out model
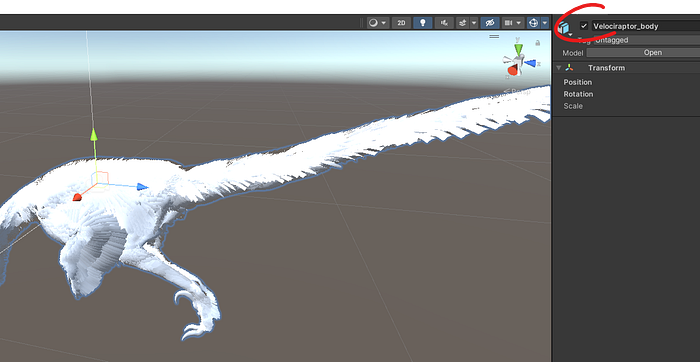
In order to see your skeleton covered by a virtual living dinosaur, you’ll need to import your 3D model into Unity and parent it to the Model Target GameObject.
If you sculpted it on top of your 3D scan, they should align perfectly out of the box.
If not, you can move/rotate the model to align with the skeleton at this stage as well.
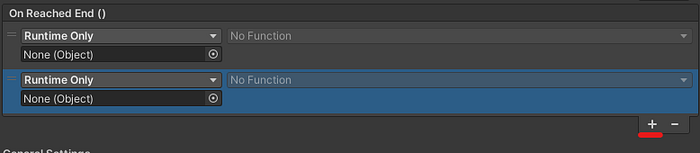
The last step is to make sure the augmentation (the flesh) will only show up once the scanning effect has run its course. There are multiple ways to tackle this, but here is an easy, no-code approach: in the VFX_Lightwave_Scan Gameobject, click the “+” button next to “On Reached End()”.
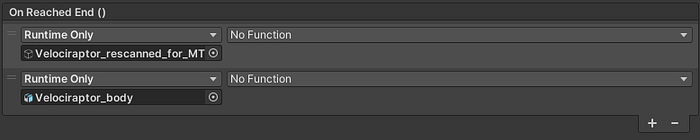
Drag the Target Representation in the first field, and the Augmentation in the second one.
For the first one, we will turn it “Off” once the scanning effect is finished. And we will turn the second one “On” at the same time.
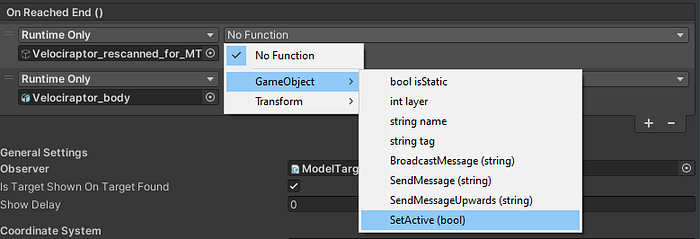
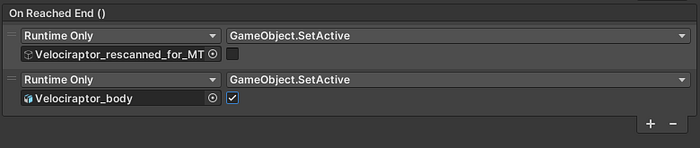
Finally, make the augmentation inactive by default by unticking the box:
Let’s play the recording once more to test the sequence of events. Here is how it should look like:
And here you are, with an AR experience for your 3D printed skeleton. Or anything else you may want to recognize, track and augment, really.
Obviously, this is 101 augmentation — there is a lot of room for improvements from here, be it in materials, lighting, transitions, interactions… So here are a few pointers and ideas:
- if your target won’t move, and if the ambient light is constant/stable, you can add light sources as child of your Model Target to light your augmentation in a more realistic fashion, aligning virtual and real light sources.
- if you want to track various skeletons or targets sequentially, you can create a Model Target database. Just add more Model Targets to your scene and repeat the process, and select the right target in the database for each. More info here.
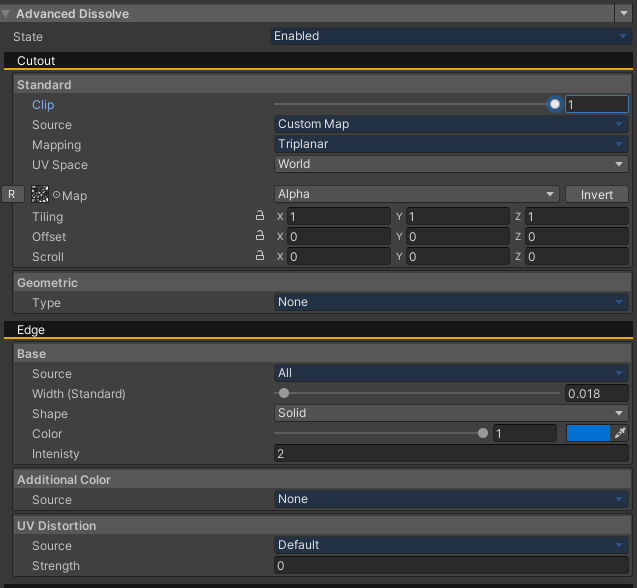
- if the apparition of your augmentation is too sudden, you can ease the apparition by animating the opacity of materials or using a dissolving shader like the Advanced Dissolve asset. Materials provided in this asset come with a configurable cutout effect, where you can control the edge, the shape of the cutout, it's mapping, etc… By animating the clip parameter (
_AdvancedDissolveCutoutStandardClip) from 1 to 0, it will make your augmentation appear progressively as if it were growing around your skeleton.
- The Vuforia VFX library comes with many effects (appearing effects, heat map, xray…) you can repurpose easily to bring your AR experience to the next level, adding layers of information and interactions.
- You can track an image and a Model Target simultaneously, which can lead to interesting combining possibilities.
- All this can also work on Magic Leap 2 or Hololens 2, if you have access to those!
I hope this provided some light on how to achieve your own augmented cabinet of curiosity. Send the results my way, I’d love to see them!

