The Progressive Web Apps Guide You’ve Been Looking For
Convert your old boring websites into PWAs
PWA, or Progressive Web Apps, is one of the hottest topics in web development these days. It promises users a native-app like experience and features, but still built with common HTML, CSS, and JavaScript (or you can go even further by using any JavaScript frameworks), how cool is that!
This tutorial assumes intermediate level knowledge of HTML, CSS, and JavaScript. If you’re totally new to frontend development, it might not be the best idea to jump right into progressive web apps as your first step — grasp the basics then come back!
Introduction
In this tutorial you will learn how to convert a traditional website into a progressive web app with a lot of cool features.
But first, let’s jump into some theories. According to developer.mozilla.org, progressive web apps are web apps that use emerging web browser APIs and features, along with traditional progressive enhancement strategy, to bring a native app-like user experience to cross-platform web applications.
In simpler words, progressive web apps are typical web apps, built using the same old HTML, CSS, and JavaScript but with additional capabilities such as offline mode, A2HC (add to home screen), background syncing, push notifications, etc. They look and feel like a native apps but they ain’t!
I guess you could say that progressive web apps are web apps on steroids.
Coding
Now with we already know what PWA is actually, we can start creating a progressive web app right away!
For the of simplicity, I will just cover some of PWA capabilities such as offline mode and A2HC. (Keep in mind that there are still a lot of PWA capabilities besides the ones mentioned above).
I’ve prepared a base project for this tutorial but if you have any websites that you want to convert into a progressive web app, feel free to do so.
Don’t forget to run npm install after you clone the base project.

The base project itself is a simple website where users can perform CRUD operations on tasks, built using the HTML, CSS, and Vanilla JS we all love so much.
I strongly suggest using Chrome for PWA development since PWA is not supported by many browsers yet.
In order to convert any web apps into a progressive one, there are three main requirements we have to satisfy.
1. HTTPS
Our web should run on HTTPS connection which means that everything our browser sends and receives from the web server is done with a strong encryption so that third-parties can’t easily eavesdrop on us and/or perform malicious activities.
Some of you may be asking yourselves, “we’re developing our app on localhost which is based on HTTP Protocol, how can we convert it into PWA locally since it requires HTTPS?” Well, that’s a good question. The answer is simply that even though localhost runs on HTTP, it actually behaves like HTTPS — that’s why some APIs that won’t work on a deployed HTTP site, will work on http://localhost.
2. Have app manifest
App Manifest is a JSON file that tells the browser about our progressive web app and how it should behave when installed on mobile or desktop. A typical app manifest contains our app’s information such as name, description, icons, and baseURL.
3. Have service worker
Service Worker is the core of all PWA functionalities. It is a JavaScript file that our browser runs in the background and keep running, even if the browser itself is closed.
There are a few things to note about service worker:
- It’s a JavaScript Worker, so it can’t access the DOM directly. Instead, a service worker can communicate with the pages it controls by responding to messages sent via the
postMessageinterface, and those pages can manipulate the DOM if needed. - Service worker uses a lot of promises, since it’s a script that runs in the background. What it mainly does is to listen to events that happen on the browser then provide a callback for each events we interested.
App Manifest
Let’s start our PWA journey by adding a manifest on our app, add a new file on the public directory named manifest.json, then write these JSON and adjust them to your own website properties (if you’re not using the base project).
Here is some explanation about the properties:
start_urlis the URL of the first page we wanted to show when the website starts. In this project I use“/”where it could automatically find anindex.html.scopeis the files on your project that you want to include in your progressive web app. For example, if you only want to include the files inside asrcfolder inside your project, you could just change it into something like“scope”: “/src”displayis the type of UI you want the app to use, where you can customize what browser UI is shown when your app is launched. For example, you can hide the address bar- I use
standaloneto make the web app look and feel like a standalone app. If you install the app on the desktop, it runs in its own window, separate from the browser, and hides standard browser UI elements like the URL bar. orientationdefines the orientation of the web app.dirdefines the base direction in which to display direction-capable members of the manifest. Together withlang, it helps to correctly display right-to-left languages.langmember is a string containing a single language tag. It specifies the primary language for the values of the manifest's directionality-capable members, and together withdirdetermines their directionality.
After we add our own app manifest, what we have to do next is to register it in our HTML file, hence add these line on index.html inside the <head> tag.
Then our index.html would look like this:
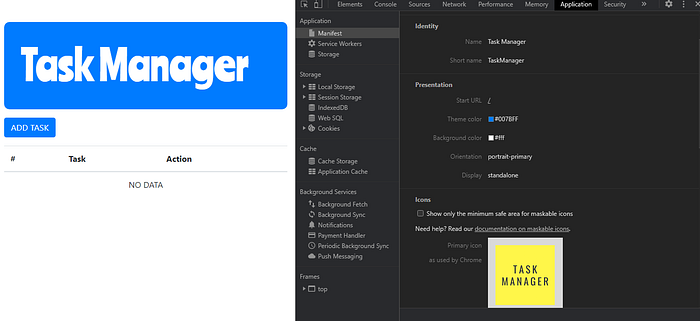
After we register the manifest, start the project by running npm start on the project terminal. Then open the developer console, go to the application tab and you will see that the properties we defined on the manifest are now shown on the browser as well!
Congratulations — you are one step closer to convert your app into a progressive web app!
Service Worker
Next is the most important part of progressive web apps: service worker.
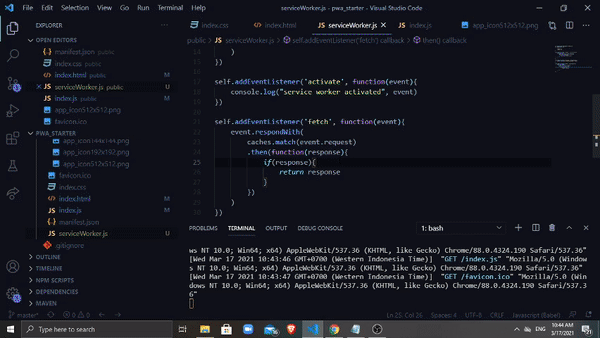
In the public folder, create a new file called serviceWorker.js, then navigate to index.js. To add a function to register the serviceWorker.js as the web’s service worker, add this code:
Don’t forget to call the function on init(), then our index.js would look like this:
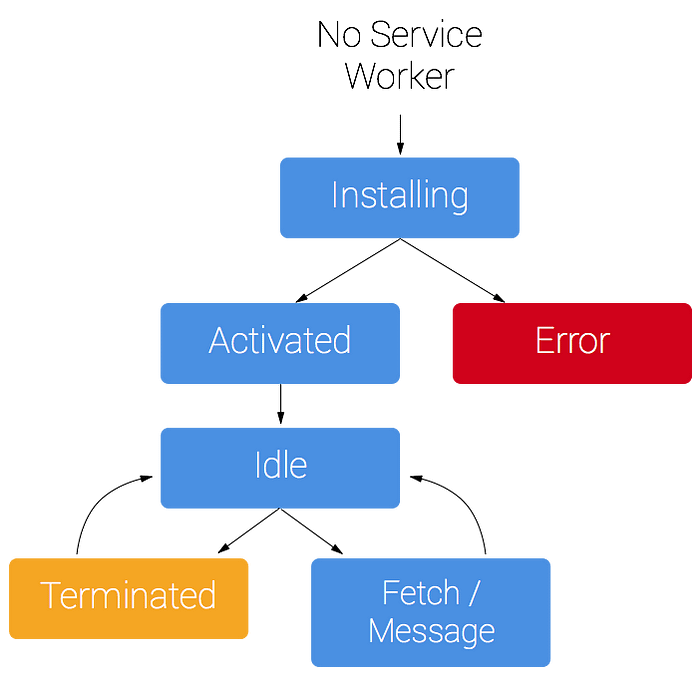
Before we started to code the service worker itself, we have to know about its lifecycle first, which can be detailed as follows
Explanation:
- Installing is the first event a service worker gets after it was registered and it only happens once. This is the best place to cache everything to prepare for offline mode.
- Once our service worker is ready to control clients and handle functional events like push and sync, we’ll get an activated event. This is the best place to clean up caches from old service workers to prevent weird stuff happen when the new service worker is ready.
- Idle means that the service worker is now ready to receive functional events such as push, sync, or fetch. Or we can just terminate the service worker if we don’t need it again or because we’re going to install a new one.
Based on the explanation above, one question might come to mind :
How do I know when to update my service worker with a new one?
The answer is, when something changes in your service worker code, we have to replace the existing one with a new one that reflects the newly added code.
Next, go to serviceWorker.js. Keep in mind that since service worker is a script that runs in background and cannot access the DOM, all we have to do there is to “listen” to events as stated above.
Inside serviceWorker.js, let’s listen to install and activate events:
Then, navigate to Chrome, open the application tab, chose“ storage” then “clear site data,” and press CTRL + SHIFT + R to hard reload and force the browser to install a new version of our service worker.

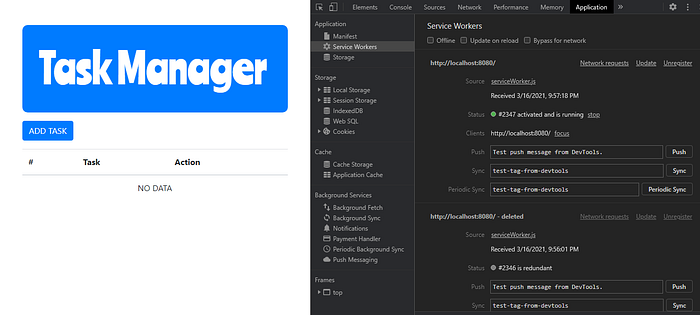
As we can see on the console tab, our service worker is up and running on the browser.
We ccan see our service worker on the application tab as well.
Congratulations! We’ve implemented our service worker and app manifest — our app has already satisfied the progressive web apps requirement!
Now, let’s make our app accessible when the user is offline.
Offline Mode
Traditional web apps could not be accessed when users are offline, they will only show this dinosaur whenever we try to do so.

Since progressive web apps are installable on desktop or mobile, whenever users try to use our app when they’re offline they don’t get a good user experience. This dinosaur shows up, hence we have to make our app available in offline mode with the help of an API we have heard about pretty much every day: caching.
As we learned before, the best time to cache everything we need on the website on the service worker lifecycle is in the “install” phase.
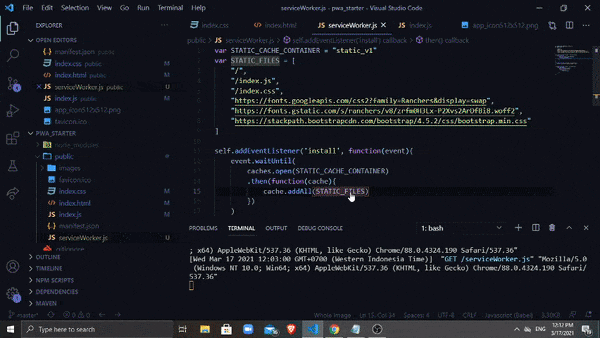
Hence, add this code on the serviceWorker.js file:
Here’s the explanation:
- I made a
STATIC_CACHE_CONTAINERvariable which is going to act as the cache’s name. - Then, I made a
STATIC_FILESarray that consists of the files I wanted to store in the cache. - On the install callback, I wrapped the caching process with event.waitUntil to tell the browser not to terminate the service worker until the promise passed to
waitUntilis either resolved or rejected. - Inside
waitUntil, I open a cache storage namedSTATIC_CACHE_CONTAINER(or create it if it does not exist). Then I add all the file paths I wanted to cache into the cache storage.
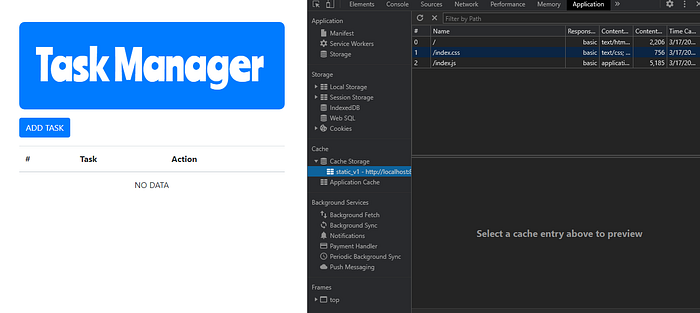
Now, go back to Chrome, navigate to the application tab, choose “storage” and “clear site data,” and press CTRL + SHIFT + R to force the browser to install our new service worker. Then when we go to the cache section, we can see the files we added to the cache storage previously.
But is this enough? The answer is still no. We have cached our files but we have not used the cached version when we’re offline. Next we will listen to the fetch event to help us deal with requests.
Add the code below to serviceWorker.js:
Explanation:
- I added a fetch event listener inside the service worker.
- Inside the event handling, I wrapped our promise with
respondWith(), which prevents the browser's default fetch handling and allows us to provide a promise for a response. - For the promise itself, we try to find whether
event.requestexists in our cache storage. If it exists we just return the cached one in the storage.
Do a reinstall of the service worker in the browser and voila our page is available offline!
But did you notice anything? Our gorgeous font and all our styling have gone! How can that be?
It’s because we did not cache — remember on serviceWorker.js, we only cached three files, the index.html, index.css, and index.js. But the font is from Google Font CDN, and the buttons and table styling are from Bootstrap CDN. The solution for this is quite simple: to cache them when the service worker is on its “install” phase.
I have seen some practices where people divide the caching container into two keys, one for static files and one for dynamic files. Since in this tutorial the website is full of static pages, I won’t go for dynamic caching, but I will add a further reference about them at the end of this tutorial.
The idea of dynamic caching is to cache every page that the user has already visited, not hardcoding them one by one like in
STATIC_FILES.However, best practice is to cache the project’s core assets such as fonts, stylings, helper libraries, static pages, and anything that does not change on the website, and leave the remaining page to be stored in dynamic caches.
Add those styling and font CDN to our STATIC_FILES, hence our serviceWorker.js would be:
If we try to reinstall the new service worker and go offline, our app would look just as it did when it was online!
Congratulations! You have made your web app available offline!
Now the only thing we have to do is make it installable and our app is finally going to feel like a native app.
A2HC (Add to Home Screen)
There are some requirements to make our app installable on both desktop or mobile:
- A web manifest with the correct fields filled in.
- The web site to be served from a secure (HTTPS) domain.
- An icon to represent the app on the device.
- A service worker registered, to allow the app to work offline (this is required only by Chrome for Android currently).
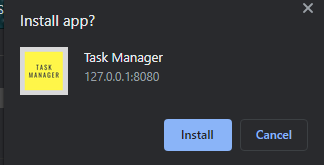
Surprise, surprise, we’ve already implemented all of them! That means our app is installable!
Navigate to Chrome and find this icon near the end of the search bar:

Click on the icon and it will prompt us to install the web app:
Click install and voila! Our app has its own window and is separated from the browser:
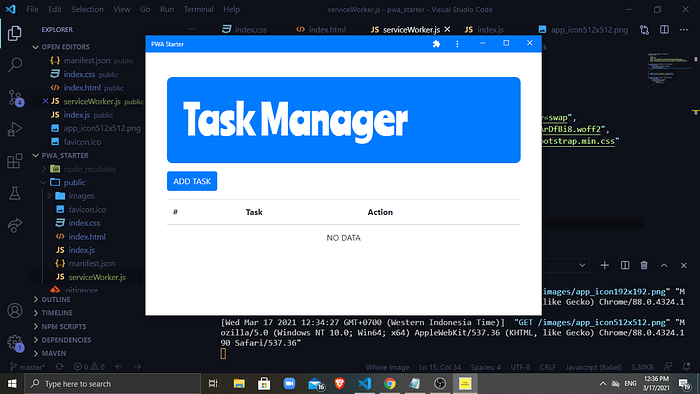
We also got a shortcut to our app on the desktop home screen:

Finally, we have implemented the A2HC feature on our web app, making it more feel like a native-app. You could also install the web on your mobile devices by first deploying the website to hosting services such as Netlify, Heroku, or Github pages — the choice is yours!
Conclusion
We have learned what a progressive web app is and how to convert a traditional web app into a progressive one with some cool features, like offline mode and A2HC.
Explore more about PWA capabilities here:
If you have any thoughts and ideas about this tutorial, leave a response below. If you want me to write about any other topics, please leave a message as well.

