The Component Lifecycle in Svelte
Build more robust applications by knowing exactly when Svelte is executing the various parts of the component lifecycle
Knowing exactly what happens in your application can mean the difference between feeling in full control or experiencing deep frustration. Personally, unknowns drive me crazy, which in turn often leads to all sorts of experiments and/or debug sessions. In this piece, I want to share one of these and shed some light on the component lifecycle in Svelte.
I will keep this piece rather short. The main goal is to provide a comprehensive overview of the various events and the correct order in which they fire. I am therefore assuming you are somewhat familiar with Svelte. We will first look at the relevant concepts, but you will also find all the relevant code as well as links to interactive Svelte environments further down in the piece.
The Component Lifecycle
Each component in Svelte undergoes a similar lifecycle: It is created on-demand, mounted, updated, and eventually destroyed when no longer needed. While Svelte handles this for you in the background, it can notify you when some of these things happen through events. As we will see, this can be particularly useful whenever you need to directly interact with the DOM.
Major Lifecycle Events
Let’s start at the top. From all the available lifecycle events, you will probably use these two the most: onMount and onDestroy.
As the name suggests, onMount will be called when the component was just mounted to the DOM. This is an excellent place to access DOM nodes (e.g. to focus an input or when interacting with external frameworks).
Its counterpart is onDestroy, which will be called when the component was just unmounted from the DOM. Typical use cases include canceling store subscriptions or cleaning up from external libraries.
Related to the above are beforeUpdate and afterUpdate. These will be called before and after the DOM is updated, respectively. A typical cycle looks like this:
- The component receives updated props or state.
beforeUpdateis called.- The DOM is updated.
afterUpdateis called.
For example, you could use this to update the scroll position of an element (which is also the example in the official tutorial).
Note that the first call to beforeUpdate happens even before the component is mounted, so be careful when trying to access any DOM elements here. Also, since these might be called a lot, it is probably prudent to ensure your code here is efficient. If you want to read more about them, head over to the relevant section of the API reference.
From my experience, the events above should already cover a lot of the use cases you typically encounter. Sometimes, however, you might want more control (e.g. when transitioning elements). This is what the next section is about.
Transition Events
Transitions are essentially animations which are applied to an element when it is mounted to or unmounted from the DOM. As soon as you use transitions on an element, Svelte will trigger several events about the transition.
Note that these are not technically lifecycle events, but they instead happen on each DOM element which has transitions assigned individually. Here is what happens during an in-transition:
- Svelte calls the function which is assigned to the in-directive (or the transition-directive in case that is what you use) to create the transition.
- The
introstartevent is dispatched. - The in-transition is applied (i.e. the element is animated in. Note: If you use Javascript for your transition, the tick function will be called for each update cycle during the animation.)
- The
introendevent is dispatched.
You can easily hook into these events by using the on:introstart or on:introend directives.
Out-transitions work essentially the same way, just with “outro” instead of “intro.” So you would use on:outrostart and on:outroend.
I would fully understand if this still seems rather theoretical. Therefore, I created an interactive Svelte REPL where you can see all this happening for yourself. App.svelte mostly sets up the environment. The interesting part is inside Component.svelte. The code should be more or less self-explanatory, but if something is unclear, please let me know in the comments.
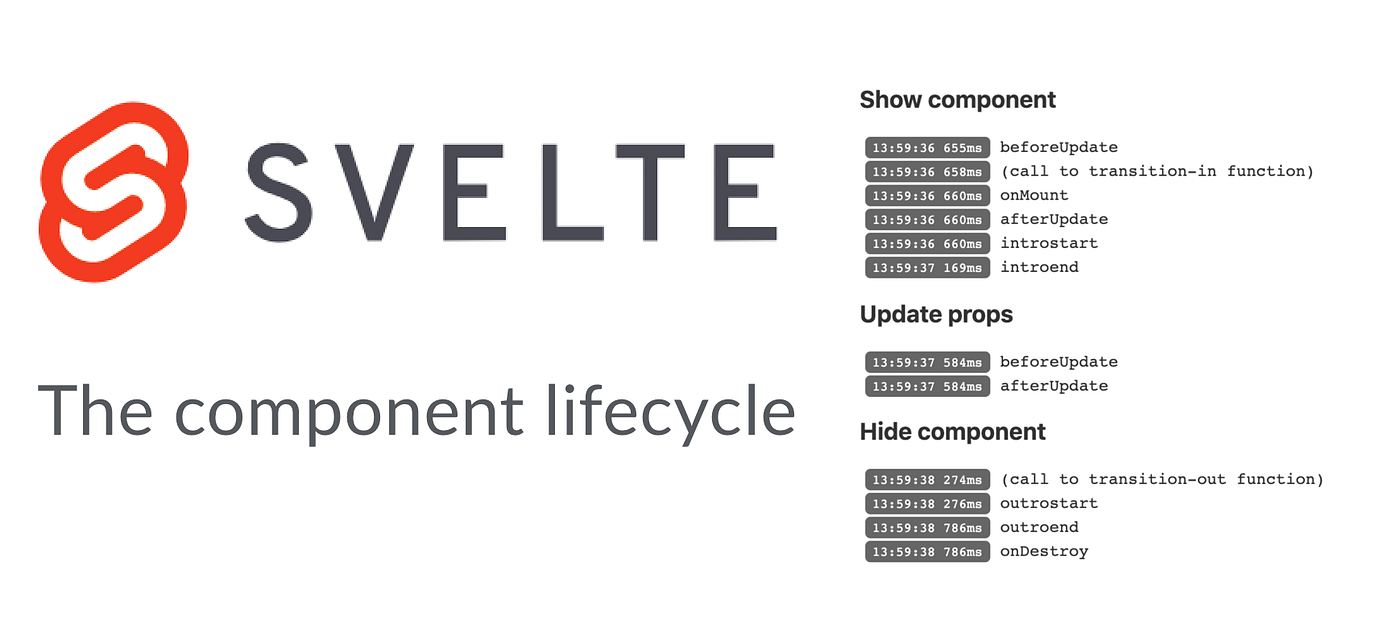
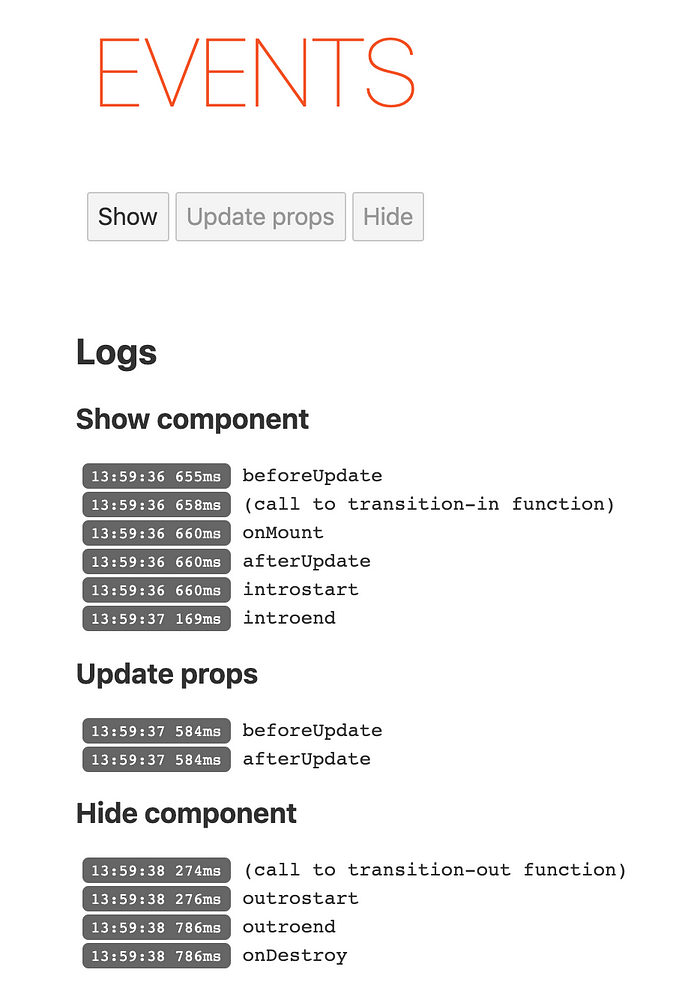
If you click through all three buttons in order, you should get an output similar to this:
I encourage you to play around with this. For example, remove the out-transition to see that no more outrostart and outroend events are dispatched.
This almost concludes the overview of lifecycle functions. There is, however, one more function which Svelte provides. It is called tick and is not really a lifecycle hook but very closely related to the lifecycle. And once you understand it, it might save you a lot of frustration (and hacks such as setTimeout).
Bonus: Tick
So what is tick? Let’s start with the technical definition: Whenever you call tick(), it will return a promise which resolves after the DOM has been synced with all pending prop/state updates. In other words, you can wait for a promise to resolve to make sure Svelte has done all relevant DOM updates.
To illustrate what this means, let’s look at a simple example (note that there are other ways to solve this particular problem, but I want to illustrate the point): Let’s say we want to conditionally show an input and focus the input as soon as it is mounted. We might set a boolean to show the input. This will trigger Svelte’s internal mechanism to update the DOM. But how do we know when the DOM update is complete? You might try something like setTimeout, but that might feel like a hack (rightfully so).
Instead, you can simply add tick() and wait for its promise to resolve:
This is now what happens when we click the button:
- The (asynchronous) event handler
showInputis called. - The boolean is set to true, triggering Svelte to show the input during its next render cycle.
- We call
tickand wait for the promise to resolve. - Svelte does all the DOM updates (i.e. mounting the input) and then resolves the
tickpromise. - We can safely call
focus()on the input.
This is especially useful if you need to wait for DOM updates based on changes inside a component. If you conditionally mount a whole component, you would rather use onMount.
Conclusion
Understanding the lifecycle events not only helps to stay sane as a developer, but it can also help you build more robust applications. I hope this overview helped you to feel more confident with the various part of the Svelte component lifecycle. Let me know in the comments what you think. I would also love to know what you use the various lifecycle events for.

