SwiftUI Architecture — A Complete Guide to the MV Pattern Approach
Instead of fighting the framework, try to embrace it

Update 03/09/2023 — I published a brand new article titled “Building Large-Scale Apps with SwiftUI: A Guide to Modular Architecture”.
Update 02/03/2023 — I recently published few more articles about SwiftUI Architecture. This includes exploring the Container Pattern(https://azamsharp.com/2023/01/24/introduction-to-container-pattern.html), which is a common pattern when building ReactJS applications and Active Record Pattern (https://azamsharp.com/2022/10/06/practical-mv-pattern-crud.html).
For me personally, Active Record Pattern felt more natural when building **Core Data** applications with SwiftUI. This was primarily due to the similarities between Core Data and a traditional ORM. My recommendation is that you try out all the different architectural patterns and see which one fits your needs. For client/server applications, I am comfortable with using the MV pattern discussed in this article.
I was listening to an amazing talk by Matias Villaverde and Rens Breur at NSSpain about “Lessons learnt rewriting SoundCloud in SwiftUI.” You can watch the complete talk here.
This talk really resonated with me because I made similar mistakes when building SwiftUI applications. Instead of embracing the simplicity of the framework, I added unnecessary complexity to please the design pattern gods. This included creating view models for each view, ignoring @FetchRequest and @SectionFetchRequest property wrappers, passing @EnvironmentObject to the view model instead of accessing it directly in the view and much more.
After almost two years of driving in the wrong direction, I decided to slam on the brakes and think about my decisions. In this post, I will discuss the SwiftUI architecture I am using for my apps.
There is no official name for this architecture, but in the iOS community, it is known as the MV pattern. This pattern is inspired from Apple’s WWDC videos and sample applications. You can find the links to the sample apps in the resources section below.
Let’s get started!

Architecture
The architecture for our app will revolve around a few different components. This includes an aggregate model, webservice, and server. The primary purpose of an aggregate root model is to provide other model objects to the view.
Depending on your app, you may have model objects for Order, Coffee, Category, etc. The view will communicate with the aggregate root model to fetch, persist, and sort different models. An aggregate model can be used as a @StateObject or injected as a singleton into the @EnvironmentObject so it can be accessed in any view. Since this is a client-server app, an aggregate model will invoke the webservice that will return model objects to the view.
For small apps, you just need a single aggregate model. This is shown in the figure below:

For larger apps, you can introduce several aggregate model objects based on the bounded context of the application. Here’s an image:
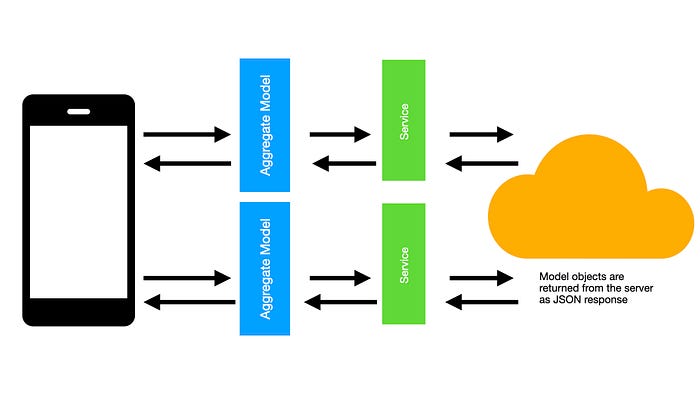
You don’t need an aggregate model per view. The aggregate models are based on the bounded context of the application and not on the number of screens in an app.
This pattern was discussed in Apple’s WWDC video Data Essentials in SwiftUI.
The main purpose of an aggregate root model is to allow access to the entities/models under a certain bounded context. The bounded context is determined by the business domain. In the figure below, you can see different aggregate root models for an e-commerce application.
Each aggregate root model will perform actions on the entities related to their bounded context.
![catalog — models and functions related to the Catalog. Payment — models and functions related to Payment. Shipping — models and functions related to shipping. Inventory — products: [Product], categories: [ProductCategory], addProduct, removeProduct. Customer Management — models and functions related to Customer Management](https://miro.medium.com/v2/resize:fit:700/1*Az_LHgVGSPKZZqetRoau0w.jpeg)
Each aggregate root model will be responsible for performing actions on the models that come under their context. The Inventory model will allow you to access products and product categories, add new products, remove products, update products, search, etc.
Aggregate root models can also communicate with each other to access entities that are not under their context. For example: A
Shippingroot model can access theCustomer Managementroot model to find the information about a particular customer.
For our small application, we will only be working with a single aggregate root model, larger apps can have multiple root models.
Implementing the Aggregate Root Model
In Apple’s documentation, they have used different names for their models. This includes Model, FoodTruckModel, FrutaModel, etc. I believe the model name should be based on the bounded context. For an e-commerce app, your aggregate root model might be Catalog, Payment, Shipping, Inventory, etc. Each aggregate model will allow you to access the entities controlled by the root.
For the sake of simplicity, I am calling my model, Model. The basic implementation is shown below:
An aggregate root model may look like a view model, but it is not. A root model is not responsible for formatting data to be presented on the screen. Unlike view model, a separate root model does not need to be created for each screen. For smaller apps, you can use a single model for your entire app.
If your model is getting larger, then it would be a good idea to think about separating it and distributing the responsibilities among different aggregate models. You break a root model into smaller models depending on the bounded context of the application domain.
You don’t create root models based on the number of screen of the app.
You can read more about bounded context here.
If you were following the MVVM pattern, then you would have ended up with several view models including
OrderListViewModel,OrderViewModel,AddOrderViewModel,OrderDetailViewModel, and more. We have completely removed the view models from the picture and the view is directly consuming the models, which are supplied by the root model. Keep in mindView is the View Modelin SwiftUI.View is the view model does not mean you should start putting networking code in the
View. As shown in this post, it is a good idea to create a separate networking layer so the same network requests can be invoked in other views.
The complete implementation of the model is shown below:
The model calls the OrderService to get all the orders and performs different actions related to orders like inserting, updating, sorting and filtering, etc.
You might be wondering that why the view can’t directly call the
OrderServiceand store all the orders in a local/private state using the@Stateproperty wrapper. You can definitely do that, but since we are allowing users to edit the orders on a separate screen and then refreshing on the original screen, it would make more sense for the orders to be available globally.Also, if you store data in view’s local state and the same data is needed by other views, then you will have to pass the state to the child views using
@Binding. Again, there is nothing wrong with that, but it can end up being more work especially when you are passing a state too deep into the view hierarchy.
Another reason is that the root model can provide sorting and filtering capabilities, which do not fit well in the OrderService. The root model can also invoke multiple services to aggregate and return data to the view and even provide caching support (through a caching layer) to the app.
Next, let’s take a look at OrderService.
Implementing OrderService
The main purpose of the OrderService is to fetch the data from the server and then hand it to the aggregate model. The complete implementation of the OrderService is shown below:
If needed, you can also create a generic webservice that has all the basic operations like
getAll,getById,delete, etc.
Next, let’s take a look at the implementation of the SwiftUI views.
Implementing Views
SwiftUI views are not just views, but they are also view models. But that does not mean that you should put networking code right inside the view.
By networking code, I mean
URLSession.shared.xxx. Although it will work, it will be harder to reuse the same networking calls from other views. This is the main reason we created theOrderService. In React apps, developers usually call the networking code using libraries like fetch or axios from directly inside the components. This is perfectly fine until you need to make the same call in some other component.
In our app, all SwiftUI views need to access the root model object so they can persist and fetch orders. @EnvironmentObject will be a good fit for this scenario. The root model object is injected as an @EnvironmentObject in the root view. This is shown in the implementation below:
In the above code, I am injecting a hard-coded base url. In your application, the url can be based on the environment (dev, test, qa, production). This will allow you to easy switch environments for testing purposes.
The implementation for ContentView is shown below. The ContentView is responsible for displaying all the orders to the user.
Let’s take a look at AddNewCoffeeOrderView. The AddNewCoffeeOrderView view is responsible for allowing the user to place a brand-new order. The same view is also used to update an existing order.
AddNewCoffeeOrderView also performs UI validation and displays error messages to the user. Here’s what it looks like:
If you have a large form to validate then you can also introduce a view model, which will be populated through the TextFields. The view model can also provide validation support. One possible implementation is shown below:
The same techniques for validation are used in React apps. If the field validation is unsuccessful, then a flag is set that displays the error message to the user.
UI validation is not business logic. UI validation is just checking if the user has entered valid information. The business rules (if any) will be executed on the valid data. Let’s say you are building a website where the user can enter their credit score and get an APR rate (interest rate).
The UI validation is going to check that the credit score
TextFieldis not left empty. It will also check that the score only consists of numbers between a certain range. All of this will be UI validation. Once the user successfully submits the credit score, the system will run business rules to find out the appropriate APR for the user.
Even HTML provides attributes to validate the user interface. Take a look at the code below:
<input type = 'text' required />The above code will validate the input field (TextBox), when the form is submitted. If the input field is blank then the form will not be submitted and the user will get an error message. This is an example of UI validation and not business rules.
In most client/server apps, business rules lives on the server and the client just provides the UI.
One of the benefits of using the @EnvironmentObject is that when the orders are altered, views are automatically reevaluated. Reevaluation is not the same as rerendering. Revaluation means that SwiftUI will look at the diff tree and then decide which views need to be rerendered. Revaluation is a very fast process, so although your view body might be getting fired constantly it does not mean all views in the body are getting rerendered.
Take a look at the code below:
If you type in the TextField, then you will notice that the body is fired each time. The main reason is that the @State variable name is getting new values from the TextField, and it is causing the body to be reevaluated. But that does not mean that all views inside the body are getting rerendered. Only the views that are changed are getting rerendered.
In the same way, when using the @EnvironmentObject, several views may get reevaluated but only those that need to be rerendered are rendered again. If you are getting unwanted rerendering, you can always split your @EnvironmentObject into multiple objects. This is shown in my article Slicing Global State in SwiftUI Using Multiple EnvironmentObjects.
Testing
Update — 02/20/2023: I have recently published number of articles on testing. This includes [Pragmatic Testing and Avoiding Common Pitfalls](https://azamsharp.com/2012/12/23/pragmatic-unit-testing.html), [Testing is About Confidence](https://azamsharp.com/2023/02/15/testing-is-about-confidence.html), [Testing View Model Does NOT Validate the User Interface](https://azamsharp.com/2023/02/16/testing-view-models.html).
Testing is a very important part of software development. Testing is usually broken down into three main categories, known as Testing Pyramid.
- Unit Tests
- Integration Tests
- E2E Tests
Depending on the complexity of your app, you can invest your time in different parts of the pyramid. If your application has lots of domain rules then you should write a lot of unit tests against the aggregate model. If your app is integrating with unmanaged dependencies then you will need integration tests. Finally, the best tests for your application are E2E tests. These tests view the app as it is used by the user and are integral to guard against regression.
Side Note
Kent Beck said it best, “I get paid for code that works, not for tests, so my philosophy is to test as little as possible to reach a given level of confidence.”
Nowadays, I see developers religiously testing every single line of their code and aiming for that 100% code coverage. Developers are paid to write features/code, not unit tests. But I always witness projects where the test code is almost three times more than the code base.
Testing is definitely important but only if you are writing meaningful tests. Consider a case where we have to write a unit test for the following scenario.
A user should be able to add transaction to their existing budget
If this operation is part of your model, then your test should create a user and add a budget for that user in the database. After that, it should add a new transaction to that budget and then check if the transaction was added successfully.
Unfortunately, most developers will ignore the database part and run their test against a mocked object. In the end, their test will run fast, and they are happy to see the test pass, but what exactly did they test? They simply tested that their mock object work as expected. In this scenario, a real test would hit the database and check if all the rules were met or not.
For the above scenario, we are considering a device database like Sqlite being managed by Core Data or Realm.
I have worked with companies that have more than 2,000+ tests. But if you looked closely, you will find out the tests were not testing anything related to the business domain. They were actually testing the programming language.
This is why it is important to test the behaviors of your application instead of the implementation. When writing a test, ask yourself what business logic is being tested. If you cannot answer that question, stop writing the test.
Testing is very important. That is why I give more precedence to domain layer unit tests and full system end-to-end functional tests. Functional system tests will ensure that the system works with all the other layers of the application.
Conclusion
SwiftUI already has MVVM built in. This means you don’t need an extra layer of view models for your applications. A lot of other developers are coming to the same conclusion and rewriting their apps using features provided by SwiftUI.
SwiftUI adds some magic to its property wrappers, which makes everything simple and performance efficient at the same time. For your next app, try creating views without view models and allow the views to directly talk to the model objects.
Instead of fighting the framework, try to embrace it.
Source Code
You can download the source code using the link below: https://github.com/azamsharp/CoffeeAppMV
Resources
- SwiftUI View is also a View Model
- WWDC — Data Flow Though SwiftUI
- Lessons learned rewriting SoundCloud in SwiftUI
- Fruta: Building a Feature-Rich App with SwiftUI
- Food Truck: Building a SwiftUI Multiplatform App
- Meme Creator
Want to Connect?If you are interested in learning more about the MV Pattern in iOS—or end-to-end testing—check out my brand-new course:MV Design Pattern in iOS — Build SwiftUI Apps Apple’s Way

