Simplify Your React Component’s State With a State Machine
Use a reducer to implement a fully-typed state machine without breaking a sweat.
As React developers, we’ve all had to work on a component where the state had become impossible to manage. It may have been a clumsy, yet working component, until we modified it. The tiny extra bit of code we added created yet one more opportunity for the component to break. Cracks soon started to appear.
Such horror stories often involve components doing things or displaying stuff conditionally and the possible states for the component are many.
A journey gone wrong
Let me take you with me on a journey where implementing a simple component quickly takes a wrong turn.
Let’s say that we’ve been asked to implement a ‘fire’ button that says ‘💥 BOOM’ when clicked. Cool, we declare a button, change its state on click, set the text based on its state and we’re done:
So far, so good.
Next, we’re told that we need to call a function called fire when clicking the button. It’s an asynchronous function that takes time to complete. So we should show the text ‘🚀 firing’ while waiting for it.
Okay… so when the user clicks the button, we have to remember that fire has been called, but it has not fired yet. So we add another boolean as state, which we call firing:
Well, that was a bit naive. If we run this code and click the button, it’ll just say ‘🚀 firing’ indefinitely. Spotted the mistake? Yes, we forgot to reset the firing state after the operation was completed. So we are currently in a no man’s land where both firing and fired are true at the same time.
Fine, let’s fix that handler:
const handleClick = async () => {
  setFiring(true);
  await fire();
  setFiring(false);
  setFired(true);
};
But wait! What if the user wants to re-fire and clicks the button again? We also need to reset the fired flag at the beginning of the function:
const handleClick = async () => {
  setFired(false);
  setFiring(true);
  await fire();
  setFiring(false);
  setFired(true);
};
All cases handled!
Knock, knock, knock! Here comes a new requirement! I forgot to mention, but the fire function may fail from time to time… When this occurs, we want to change the text to ‘🤷 oopsie…’ and prevent re-fires (health and safety, you know…)
Meh! One more flag and this is sorted. How about faulted? We can use a try-catch block to set it. And if the faulted flag is set, we’ll ignore the click.
Also, let’s not forget to reset the other flags when this happens (we just learned this the hard way!).
This should look something like this:
Hmm… let’s read this again a few times to make sure it’s correct. Yep, I think it is. It wasn’t that hard to implement, or was it? True, it wasn’t too bad.
A few days or weeks later, new requirements arrive. We’ve already forgotten about this code. Now it doesn’t look so clear anymore. We might have to add yet more state to it, change the conditions or add some more UI to it that changes the current state. The truth is, we’ve already created opportunities for cracks to appears. And if we’re not paying attention, the component will eventually end up in an impossible state as the number of cases to handle continues to increase.
Can we do better?
Sure we can!
An experienced developer would have noticed that the component could only be in a number of states:
initial: the button hasn’t been interacted withfiring: we’ve calledfireand are awaiting completionfired:firehas successfully completedfaulted:firehas failed
So instead of having three booleans, we could just use one enum to store the current state. With this enum, we’d only have 4 cases to handle (the possible states) instead of potentially 8 (2^3, the number of possible combinations for 3 boolean values).
But there’s more! Developers who’ve used the useReducer hook before know that reducers offer a good way to manage complex states and avoid inconsistencies. The idea is that you dispatch an action (eg: ‘fire’…), and the reducer takes care of the rest, returning a new state.
So we’ve just said that our component could only be in a number of states (firing, fired…), and also that useReducer could be used to manage state and dispatch actions (‘fire’…).
This sounds a lot like a state machine to me:
A finite-state machine (FSM) […] or simply a state machine, is a mathematical model of computation. It is an abstract machine that can be in exactly one of a finite number of states at any given time. The FSM can change from one state to another in response to some inputs; the change from one state to another is called a transition.
Sure, we’ve just called these transitions actions as per useReducer’s jargon. But it’s the same. These transitions are also sometimes called events.
State machine baby!
So let’s try to draw a schema with the states and events (transitions) that we’ve identified:
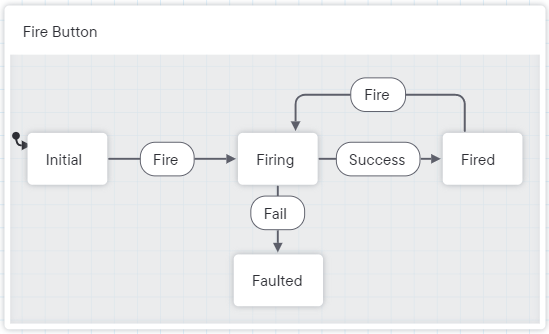
We can then enumerate the states and events with TypeScript and write a reducer function that transitions from one state to another:
In the above code, we’ve translated the state machine to a switch statement that looks at the current state and returns a new state based on the event received. The Initial and Fired states have been merged together since they handle the ‘fire’ event the same way, and Faulted has been omitted from the statement since it’s a dead end (there’s no transition going out of this state).
Also, note that we’ve used Reducer<ButtonState, ButtonEvent> to force the type of state and action (or rather event in this case) that are accepted by the reducer. This will give us type safety and proper completion as we use it.
As a side note, I feel that I have to mention that ButtonState and ButtonEvent could have been declared using literal types instead:
type ButtonState = "initial" | "firing" | "fired" | "faulted";
type ButtonEvent = "fire" | "success" | "fail";
This is more concise, and I often see it used in state machines. It’s also more efficient than enums since TypeScript will not have to emit extra JavaScript for it.
I think you can call me boomer for still using enums here. Don’t be like me!
So here we have a robust, fully-typed state machine. To use it, all we have to do is call useReducer with that reducer function and specify the initial state. The hook will return the current state and a dispatch function which we can call to trigger transitions:
Is it shorter? Maybe. Not sure. We slightly changed the way we set the button text for the sake of clarity and there’s still the code for the reducer that adds in.
But more importantly, we’ve eliminated the risk of invalid states and extracted all the state logic into one place. The component itself is more declarative, so it’s easier to read, and it no longer needs to worry about the many conditions that cause the state to change.
Is that all?
Yes, that’s all. State machines are pretty straightforward to implement in React. This is good because it allows us to focus on what our state machines should be, rather than how to implement them.
Sure, we could improve the code further by using console.warn in the reducer, in case the dispatched event is not supported in the current state (or throw an error, #FailFast). In this example, we decided to simply ignore it and return to the current state.
But if you are looking for more, you might want to check XState. It’s arguably the best and the most comprehensive library for implementing state machines at the moment. The schema I made earlier was actually designed with their visual editor, Stately. You can even have it generate the code for you! Just beware that TypeScript support is not for the faint-hearted, so you might want to save it for more advanced use cases.

