Serving and Deploying ML Models With Seldon Core on Kubernetes
Deploying Ml models as microservices under Kubernetes

In the Data science field, we used to hear that pre-processing takes 80% of the time and it’s mostly the important task in the machine learning pipeline for a successful ML model, but by the time we need to deploy that “successful” ML model to production, 80% to 90% of ML trained models never make it to production and this is due to a lot of factors (consistent change of data , model degradation) or even sometimes it performs well on intern but once we deploy that model we get rusty accuracy (for example, we have image classification; our model is trained on cats & dogs, but we give him an elephant picture). Furthermore, model deployment is a hard task and it costs a lot of resources and time.
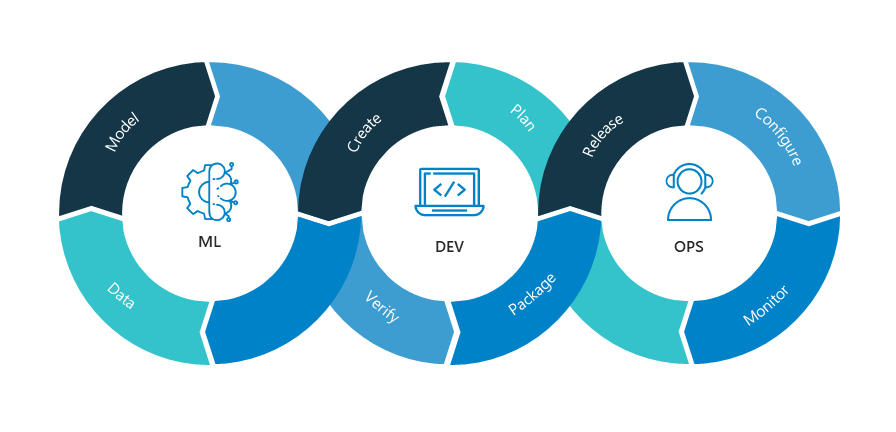
We recognize the importance of MLOps approaches in today’s machine learning projects, particularly with the CI/CD/CT (Continuous integration, development, and training) that makes this task easier and more fluent.
For example, we are trying to classify an image of either a cat or dog, and we have trained five models, but with the consistent changes of data, we might have a new pattern that shows off and our model is having a rough time trying to classify it, so we will have to spend a short time training the new model on the new inputs and then deploy it without having an issue or people recognizing it through production.
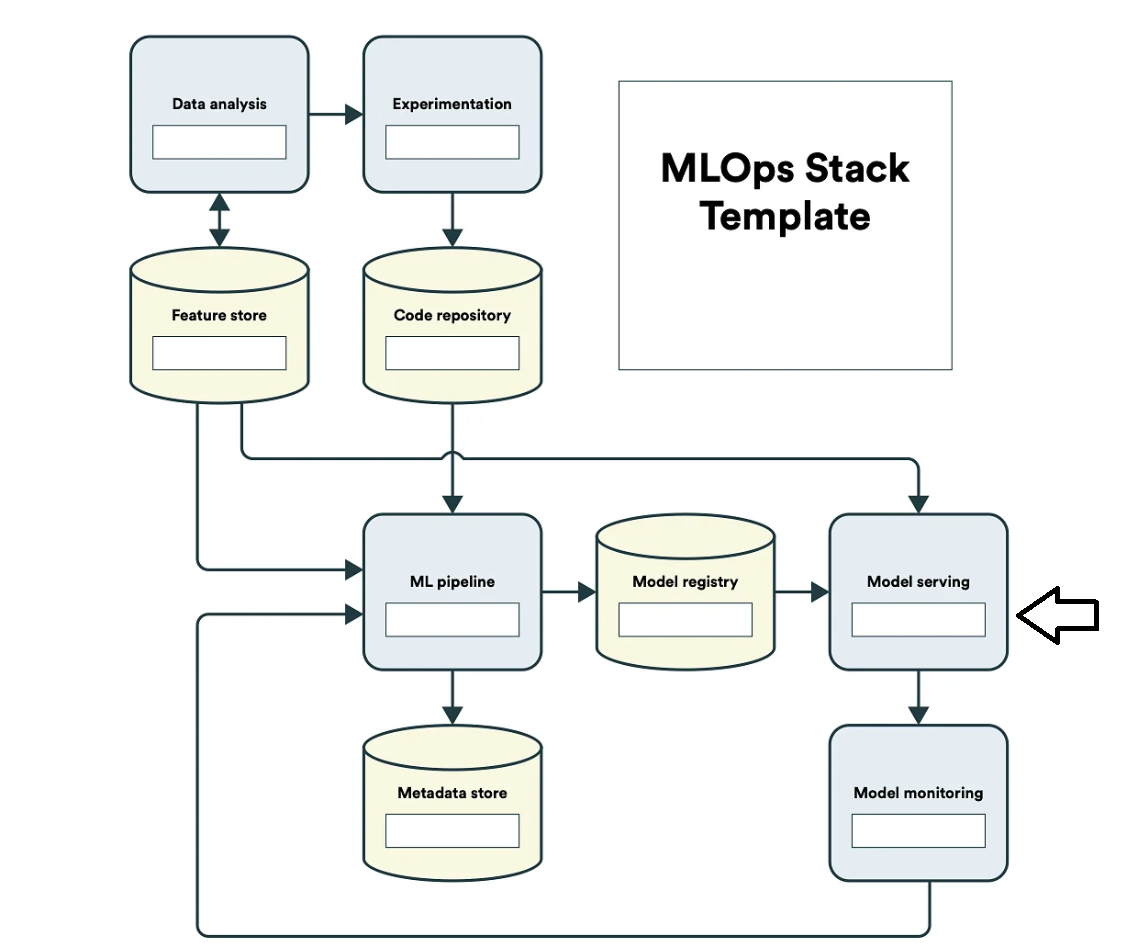
We can also define an MLOps pipeline through three phases (data processing, data modeling, and operationalization).
We will be working on the model serving & deployment part, and to handle this important task, we will use Seldon Core which is a mature Open Source tool with important documentation. In this tutorial, we will deploy a basic CNN model trained on the MNIST dataset.
What is Model Serving?
Once we develop a Machine Learning model we will need to deploy it to production in a way that allows end-user access to it from a mobile application or just an API from a browser so that applications can incorporate AI into their systems. Model serving is crucial, as a business cannot offer AI products to a large user base without making its products accessible. Deploying a machine-learning model in production also involves resource management and model monitoring, including operations stats as well as model drifts.
Seldon Core
Seldon handles scaling to thousands of production machine learning models and provides advanced machine learning capabilities out of the box including Advanced Metrics, Request Logging, Explainers, Outlier Detectors, A/B Tests, Canaries and more.
Requirements — For this tutorial, we will need a Google Cloud account so we can save our trained MNIST classifier in a Google bucket and a working Kubernetes environment (Minikube or Kind) with Docker.
Minikube
Minikube is a good tool for K8s beginners, which it’s a local Kubernetes environment with basic commands easy to learn.
We will be using a Docker container to start our Kubernetes cluster.
Install Minikube — We can install it from their official documentation website here, and we can verify if it’s well installed by the command kubectl version
Docker
Docker is an open platform for developing, shipping, and running applications. Docker enables you to separate your applications from your infrastructure so you can deliver software quickly
Install docker — If you do not have Docker installed, click here to install it.
Once we have our environment set up, we can install Seldon Core but it needs to verify some pre-requisites:
- Kubernetes cluster version equal to or higher than 1.18
- The installer method, in our case will be Helm with a version 3.0 higher or equal
- An Ingress to have external access to our different cluster services ( Istio 1.5 or Ambassador v1)
Helm
Helm is a Kubernetes deployment tool for automating creation, packaging, configuration, and deployment of applications and services to Kubernetes clusters. and we can install it from here depending on your Os and we will need to add it to our environment variables so we can launch our helm commands.
Istio
Istio extends Kubernetes to establish a programmable, application-aware network using the powerful Envoy service proxy. Working with both Kubernetes and traditional workloads, Istio brings standard, universal traffic management, telemetry, and security to complex deployments. We can install it from here.
Now everything is Gucci, we can start installing Seldon Core but first, we will create a namespace for it in our K8s cluster.
To start our K8s cluster, we can start with:
minikube startand we can verify if everything is working with minikube status

Then we can create our namespace with kubectl create namespace seldon-system You can name it whatever you want, but it’s just preferred to have this name.
Now we will install our tool:
helm install seldon-core seldon-core-operator \
— repo https://storage.googleapis.com/seldon-charts \
— set usageMetrics.enabled=true \
— set istio.enabled=true \
— namespace seldon-system
If you are using a Windows command line you can just change the \ with ^
We can verify the pod that manages seldon-core by checking his health with:
kubectl get pods -n seldon-systemTraining MNIST Classifier
We will create our own CNN basic model to classify our different digits from 0 to 9. Let’s create a new python file, we will be naming it mnist_predict.py.
Our model will be saved in our folder saved_model, then we will store it in our google storage through a Google bucket. To create your Google bucket, you can check this.
Since the classifier is trained with the Tensorflow package we will have to create a new directory with the name 1, and we will save there our trained model. We will have something like this.

Service account
Service accounts are a special type of non-human privileged account used to execute applications and run automated services, virtual machine instances, and other processes. Service accounts can be privileged local or domain accounts, and in some cases, they may have domain administrative privileges.
We will be creating one with GCP and a JSON key so we can have access to our stored model from different API.


After specifying a service account's unique name we can just press on Done button, and then generate the JSON file that will grant us access to our stored MNIST classifier.

We create a new key respecting the JSON extension. Furthermore, we will just have to download our JSON file and rename it with a simple name like seldon-credentials and place it in the same directory.
Let’s create our secret:
kubectl create secret generic user-gcp-name --from-file=gcloud-application-credentials.json=<LOCALFILE>In our case, our LOCALFILE will be seldon-credentials and the user name can be anything.
Our Service account can be created through a YAML file:
kubectl apply -f serviceaccount.yaml
Now our SeldonDeployment object which will be responsible of deploying our Ml model, replace gs://<your_bucket_name>/mnist
kubectl apply -f seldondeployment.yaml
Last but not least, we will create the Ingress file that will grant us access to our deployed model through different external services.
We will have to check our new service with kubectl get svc , and put it the service name parameter in our config YAML file.
For your host parameter, you can either just put localhost or define a customized one in your /etc/hosts file.
We create our ingress by the same command:
kubectl apply -f ingress.yamlNow since everything is working, we can get our tutorial fruit, which it’s the prediction.
Let’s have a last look at our dataset:
Prediction through Rest webservice
We created two functions, one to get a look at our chosen MNSIT digit to predict and the last one for the rest prediction.

We will have to port-forward our pod so we can access to our mnist classifier outside the cluster, this can be done with:
kubectl port-forward pods/pod-name desired-port-number:9000Since it’s a Rest prediction it can be done with the 9000 port, and you can get the pod name with kubectl get pods
We chose the port number 9500 as a desired-port number, our prediction can be done like this:
result = rest_predict_request("mnist.plz:9500", data)
result
The values field has a total of ten values (separated by commas). The first value represents the probability that the image is a ‘0’, the second value represents the probability that the image is a ‘1’, and so on.
Thus, the ninth value represents the highest probability that this picture is ‘8’, we can see that the model is performing well since the digit 8 prediction score is a solid 99% accuracy.
Conclusion
By the end of this tutorial, we are capable of deploying our models as microservices under Kubernetes.
Seldon Core supports many advanced features that I did not touch upon within this article, but I encourage you to really peruse the project’s extensive documentation to better understand its overall design and vast feature set.
I’ll write more articles about Seldon Core on the different complex inferences parts and challenge its different features of it. Keep an eye out !!

