The Search Bar With Combine in SwiftUI
Search in your app, powered by Combine
Recently I was working on a project on SwiftUI. SwiftUI is a breeze for iOS developers to work in. I remember the time when it was hard for us to lay out views, be it using a programmatic or a storyboard approach (I am not a fan of storyboards, though). For me, moving back and forth between simulator and designer is a tedious task. Luckily, SwiftUI came along, and the facet of iOS development is slowly evolving. Of course, we all love UI Kit and it will still reign the fortress the iOS development for years.
Nevertheless, SwiftUI is easy to work and implement in, albeit still there are some caveats. For example, UISearchController and SearchBar are not available for use in SwiftUI, and also the delegate methods to get the typed text. Here I am trying to present a simple situation where you want to send a network request with the searched keyword and present the data in SwiftUI.
To fulfill the purpose of this demo/tutorial, I will be using Combine and SwiftUI. Combine, which was also was introduced in WWDC 2019, is a reactive framework and Apple’s implementation of Rx programming style. For those who have no prior experience with RxSwift, like me, Combine will feel tough. However, the benefit of using Combine over a traditional approach is more robust code and elimination of various completion handler blocks which we usually implement on our network calls and other places. I will try to best explain the approach used; nevertheless, I highly suggest reading more about Combine.
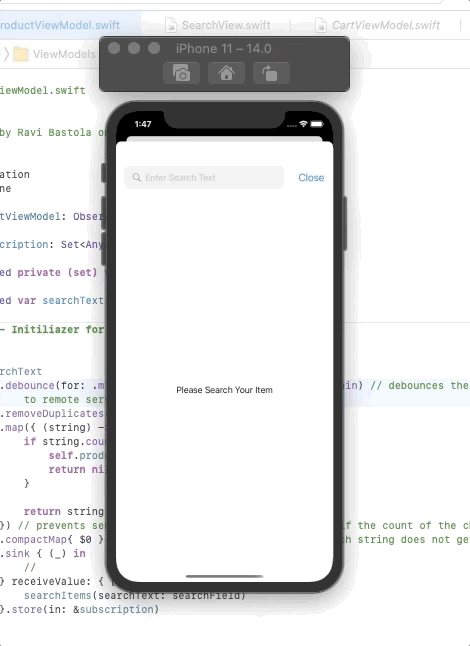
For this example, we will create a plain view, which has a search bar in it that allows searching for products on some remote server.
There are a lot of things happening in this code which do need some explanation. First of all, the layout array defines how the items shown in the list should be. It could even be said to be a collection view for SwiftUI as it acts as the delegate flow layout’s sizeForItemAt method. Nevertheless, the layout property is telling SwiftUI that, “Hey SwiftUI, I want a grid item which has flexible width or which spans the entire width of the view.” Easy, right? The second thing in this code base which might seem daunting is the property wrapper for ObservedObject. I will explain it later, but let’s focus on the layout initially.

The layout is simple: We are creating a VStack which will hold our search bar and the results. The search bar is a plain text field inside HStack and some calculations of its width to adjust all screen sizes. There is also a ScrollView which wraps the LazyVGrid which holds the responsibility to show the list items. The ItemView embedded inside has a ZStack and HStack which are relatively easy to understand.
The TextField in SwiftUI expects a binding of string which has been passed from the ProductViewModel which is a crucial part of this puzzle. We are doing all of the heavy lifting of sending network a request and updating the data source inside the view model. Note the Published property wrapper in the variables; it will help SwiftUI to compute diffing of the states. Let’s look into the organization of the view model.
As we can see, the ViewModel is doing all of the heavy lifting. The bindable string for the TextField is also provided from this object. Notice the @Published keyword in front of the products array and the searchText.
First of all, let’s look into the searchText. This works as an upstream publisher which emits values over time. Meaning, this searchText produces values whenever the user starts typing on the field. On the initializer of this ViewModel, we are subscribing to the searchText publisher’s emitted values. Here we are debouncing, meaning delaying the retrieval of values for 800 milliseconds because we do not want to send a request right after the user types, we want to wait for some seconds so that we do not have to take a round trip on every typed letter. After waiting for 800 milliseconds, we will move to another operator, removeDuplicates, which if the user types duplicate letters and rapidly deletes them to crash us, iOS will smartly handle this.
Thereafter, there comes the map operator on the subscriber chain, which checks if the count of the string is appropriate or not. For example, if the user places the cursor and keeps it dull, there is no point in going to the server to fetch data. The published value only passes through map if the count is greater than 1; if not, then nil will be passed. Notice the compactMap, which cleverly filters out nil values which will not be passed below this operator, and as a consequence, it will permit us to go to the network.
If all of the above operators are successful, we will send a network request and retrieve the results. The set of subscription plays an important role for us. It holds the subscription for us and clears the memory when needed. This is done by iOS itself so we do not need to worry about it. But it would be better to remember to hold onto a subscription whenever we want to use the publisher-subscriber chain. Later then, a function is called which goes into the network and fetches the desired result.
Now let's see the results.
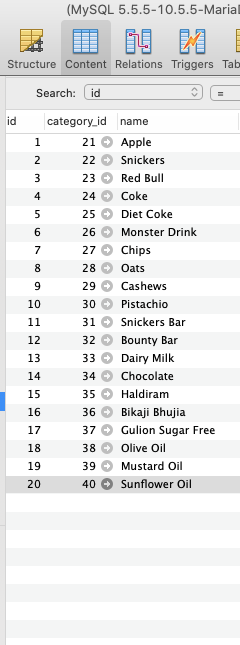
I hope this was an exciting read for all of us. I have not included the Codable model file, which we all know is simple and easy to implement, and also not added the NetworkManager code. It simply goes to the network and gets the results for the endpoint with the desired query string. I have also added the screenshot of the database, which serves as evidence for us.

