COMPUTER VISION
Scanning Credit Cards with Computer Vision on iOS
Leverage Vision’s Rectangle Detection and Text Recognizer to detect credit and other business cards in a live camera feed
Photography has been Apple’s central focus since the inception of the iPhone. Over the years, they’ve released amazing new features that make the world a difficult place to live in without an iPhone. Users are able to capture better and better photos, thanks to state-of-the-art image intelligence features Apple has steadily added.
Specifically, Apple has been investing heavily in the field of computer vision, rolling out major updates every year through its Vision framework, which was released in 2017.
With face detection, object tracking, capture quality, and image similarity features, Apple has been making it possible for mobile developers to integrate complex computer vision algorithms to build AI-powered photo-based applications.
Among the WWDC 2019 new releases, Vision’s Text Recognition and Saliency features stood out.
But that’s not where we’re heading in this article.
Our Goal
- The idea of this piece is to dig deep into Vision’s rectangle detection request.
- We’ll be exploring the various configurations possible with the
VNDetectRectanglesRequest. - Over the course of this article, we’ll be developing an application that scans credit cards or other business cards of similar dimensions and crops the image out of the application’s live camera feed.
- Finally, we’ll use Vision’s Text Recognition request to parse only the desired values from the card. Values that the user picks through gestures.
Need For Rectangle Detection
If you’ve got a chance to play with iOS 13’s Document Camera for scanning documents — it’s built-into the Notes, and Files Apps as well, you’ll notice that it requires you to set the corners of the document manually.
By leveraging Vision’s Rectangle Detection, we can automatically detect the corners of a document that typically are rectangular in shape.
VNDetectRectanglesRequest
Vision’s rectangular detection request is an image-based request that looks for rectangular regions in an image. Besides specifying the confidence threshold, we can customize this request with the following properties:
- VNAspectRatio — By specifying the minimum and maximum aspect ratios on the Vision request, we can restrict the type of rectangles we want to detect. Setting
minimumAspectRatioandmaximumAspectRatioto 1 would set the request to detect square shapes only. - Minimum Size — We can specify the minimum size of the rectangle we wish to detect. It needs to be specified between 0 and 1.0, with the default being 0.2.
- Maximum Observations — An integer property specifying the maximum number of rectangles the Vision request can return.
- The degree between the sides — By using the property
quadratureTolerance, we can specify the amount by which the edges of the rectangle can deviate from 90 degrees.
In the next few sections, we’ll be creating an iOS application that uses the Vision framework with AVFoundation to scan documents from the custom camera.
We’ll do perspective correction before cropping the detected region and saving it as an image. Let’s get started!
Getting Started
Launch your Xcode and create a new single view application. Make sure to add a description for the camera’s privacy policy by adding the key NSCameraUsageDescription in your info.plist file.

Setting Up Camera Input
In the following code, we’ve set up our back camera, with the media type as video, and added it to the AVCaptureSession:
private let captureSession = AVCaptureSession()private func setCameraInput() {guard let device = AVCaptureDevice.DiscoverySession(deviceTypes: [.builtInWideAngleCamera, .builtInDualCamera, .builtInTrueDepthCamera],mediaType: .video, position: .back).devices.first else {
fatalError("No back camera device found.")
}let cameraInput = try! AVCaptureDeviceInput(device: device)self.captureSession.addInput(cameraInput)}
Next up, we need to add the camera feed to the view of our ViewController.
Displaying the Camera Preview and Setting Up the Output
The following code contains the functions that display the live camera feed and sets up the output. The output video frames will eventually be fed to the Vision request:
private lazy var previewLayer = AVCaptureVideoPreviewLayer(session: self.captureSession)private let videoDataOutput = AVCaptureVideoDataOutput()private func showCameraFeed() {
        self.previewLayer.videoGravity = .resizeAspectFill
        self.view.layer.addSublayer(self.previewLayer)
        self.previewLayer.frame = self.view.frame
    }
    private func setCameraOutput() {
    self.videoDataOutput.videoSettings = [(kCVPixelBufferPixelFormatTypeKey as NSString) : NSNumber(value: kCVPixelFormatType_32BGRA)] as [String : Any]self.videoDataOutput.alwaysDiscardsLateVideoFrames = true
    self.videoDataOutput.setSampleBufferDelegate(self, queue: DispatchQueue(label: "camera_frame_processing_queue"))self.captureSession.addOutput(self.videoDataOutput)
    guard let connection = self.videoDataOutput.connection(with: AVMediaType.video),
        connection.isVideoOrientationSupported else { return }connection.videoOrientation = .portrait
}
To receive the camera frames, we need to conform to the AVCaptureVideoDataOutputSampleBufferDelegate protocol and implement the captureOutput function.
Our camera is ready! Add the three functions to the viewDidLoad method of the ViewController and simply invoke the startRunning function on the AVCaptureSession instance.
override func viewDidLoad() {super.viewDidLoad()self.setCameraInput()
self.showCameraFeed()
self.setCameraOutput()
self.captureSession.startRunning()}
Setting Up Our Vision Request
Now it’s time to set up our Vision rectangle detection request. In the following function detectRectangles, we set up our VNDetectRectanglesRequest and pass it to the image request handler to start processing:
A few things to note in the above code:
- We’ve set the
minimumAspectRatioandmaximumAspectRatiosto 1.3 and 1.7. respectively, since most credit and business cards fall in that range. - The above function is invoked in the following function:
func captureOutput(
        _ output: AVCaptureOutput,
        didOutput sampleBuffer: CMSampleBuffer,
        from connection: AVCaptureConnection) {

        guard let frame = CMSampleBufferGetImageBuffer(sampleBuffer) else {
            debugPrint("unable to get image from sample buffer")
            return
        }

        self.detectRectangle(in: frame)
}- The result returned by the Vision request in the completion handler is of type
VNRectangleObservation, which consists of theboundingBoxand theconfidencevalue. - Using the bounding box property, we’ll draw a layer on top of the camera where the rectangle is detected.
- The
doPerspectiveCorrectionfunction is used to fix the image in case it’s distorted. We’ll look closer at this shortly. This function is invoked when the user taps the “Scan” button to extract the fully-cropped card from the camera feed.
Drawing Bounding Boxes on the Camera View
Vision’s bounding box coordinates belong to the normalized coordinate system, which has the origin as the lower-left corner of the screen.
Hence, we need to transform the Vision’s bounding box CGRect into the image coordinate system, as shown in the code below:
func drawBoundingBox(rect : VNRectangleObservation) {


let transform = CGAffineTransform(scaleX: 1, y: -1).translatedBy(x: 0, y: -self.previewLayer.frame.height)

let scale = CGAffineTransform.identity.scaledBy(x: self.previewLayer.frame.width, y: self.previewLayer.frame.height)

let bounds = rect.boundingBox.applying(scale).applying(transform)createLayer(in: bounds)}private func createLayer(in rect: CGRect) {        maskLayer = CAShapeLayer()
        maskLayer.frame = rect
        maskLayer.cornerRadius = 10
        maskLayer.opacity = 0.75
        maskLayer.borderColor = UIColor.red.cgColor
        maskLayer.borderWidth = 5.0

        previewLayer.insertSublayer(maskLayer, at: 1)}
Instead of doing a CGAffineTransform to transform the bounding box into the image’s coordinate space, we can use the following built-in methods available with the Vision framework:
func VNNormalizedRectForImageRect(_ imageRect: CGRect,
_ imageWidth: Int,
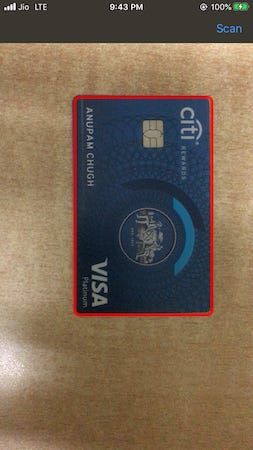
_ imageHeight: Int) -> CGRectWhen the maskLayer is set on the detected rectangle in the camera feed, you’ll end up with something like this:
The job is only half done! Our next step involves extracting the image within the bounding box. Let’s see how to do that.
Extracting the Image from the Bounding Box
The function doPerspectiveCorrection takes the Core Image from the buffer, converts its corners from the normalized to the image space, and applies the perspective correction filter on them to give us the image. The code is given below:
The UIImageWriteToSavedPhotosAlbum function is used to save the image in the Photos library of a user’s device.
The image doesn’t show in your album if you directly pass the CIImage into the UIImage initializer. Hence, it’s crucial that you convert the CIImage to a CGImage first, and then send it to the UIImage.
Let’s look at the extracted image with perspective correction applied:
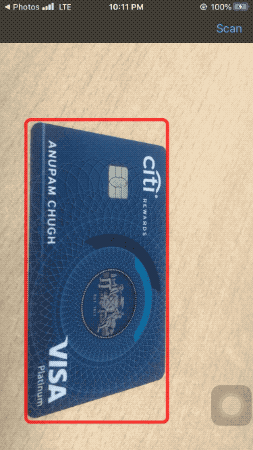
It’s evident from the above illustration that applying a perspective correction filter on the Core Image fixes the orientation of the said image.
Next, let’s look at extracting only the desired text from the scanned image.
Optimized Vision Text Recognition
iOS 13’s Vision was bolstered with the inclusion of text identifiers in the VNRecognizeTextRequest, which previously only told us whether the text was present or not. We had to use Core ML models to parse the values said text.
Specifically, we had to use regex, which not only is inefficient but also doesn’t work universally. Using a regex pattern would require supporting a lot of edge cases for filtering different types of credit cards (for instance, not all cards have 16 digits. AMEX has 15).
Instead, we’ll allow the user to use gestures to create a movable rectangle on the image. Subsequently, we’ll parse the text from the region selected by the user. This not only makes it efficient, but it also gives the user control over the data they’re sharing.
To create a movable rectangle, we’ll track the user’s touch on the scanned image and redraw the selected region, as shown below:
Once the user selects a rectangular region and presses the “Extract” button, we’ll crop the image from the rectangle and pass it on to the Vision Request.
Instead of pasting the completing source code of the TextExtractorVC.swift, I’ve just shared the relevant snippets below:
Here’s the output of the final application in action:
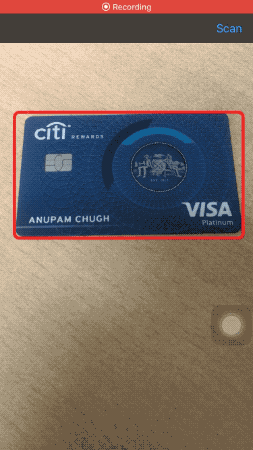
Instead of extracting and giving away the digits of my credit card number, the above illustration does the extraction on the front side of the card.
When Used with PencilKit, Accuracy…Isn’t the Best
Vision’s rectangle detection doesn’t work the best on hand-drawn shapes. Here’s a glimpse at an experiment I ran on the PencilKit framework while using the above Vision request:

Conclusion
In this post, we worked through another classic application of computer vision, wherein we used the rectangle detection request in a live camera feed to detect a credit card and crop it out, while taking into account its orientation and distortion.
Moving forward, we implemented the text recognizer on the image we’ve just scanned to extract the credit card’s digits. By letting the user select the region of interest to be parsed, we’re not only giving them the control on their information but also getting rid of the information that’s not needed.
Setting a bounding box on the recognized texts and doing hit tests on them could be another way of extracting the information you want—from a card!
The full source code of this project is available in this GitHub Repository.
That’s it for this one. Thanks for reading.