Rive 2 — 2.5D Avatar With Pointer Tracking Using Flutter
Applying state machines

Introduction
It’s been a long time since my last Rive article. It was Rive 1 (Flare) back in the day, but now, the sun is rising on Rive 2. It already has most of the features from the first one, plus the State Machines! And it’s a game-changer, so here I will show you why, with this “how-to” tutorial, creating a live pseudo-3D avatar that follows the pointer/tap position in the Rive 2.
Something similar to this video, hm… yeah, the design is super awesome (as usual), but how to make it become interactive on your website or application? And here’s how it worked out for me, let’s go!
In this tutorial, I will show the implementation of the code part made in Flutter, however, the logic here is very similar to React Native.
Design part
I won’t go into details on how to correctly create a person or creature avatar and animate it — it only depends on your imagination and design skills, there are plenty of examples and tutorials, including the one in the link above. In this article, I will describe to you how to apply a State Machine and link different states with animations, and most importantly, tie the whole thing to your code. It will not take longer than several minutes, you can also see this part in this video.
State Machine saved me about a hundred lines of code during the migration. In my case, I will link eye and head movement with breathing animation, exit animation of eyes returning to their original position (when the cursor leaves the avatar), and on-press animation of the background. So let’s say, you already made some designs with animations in Rive 2, and want to animate them with pointer movement — then, let’s start.
The Breathing animation

First, create an empty State Machine, if you do not already have one, in my case, I need to implement an animation that is played endlessly in a loop, regardless of the state of anything — the animation of breathing.
To do this on an empty layer, drag the animation (“breath” in my case) and link the blue block “Any State” to the animation of breathing by pulling from its edge to the block animation.
At the arrow that appears, you can set Duration to zero, so that the animation starts instantly. Press the play button to see that the animation now loops and plays infinitely. Simple enough, right? The next layer will be a little bit more complicated.
The Background Animation
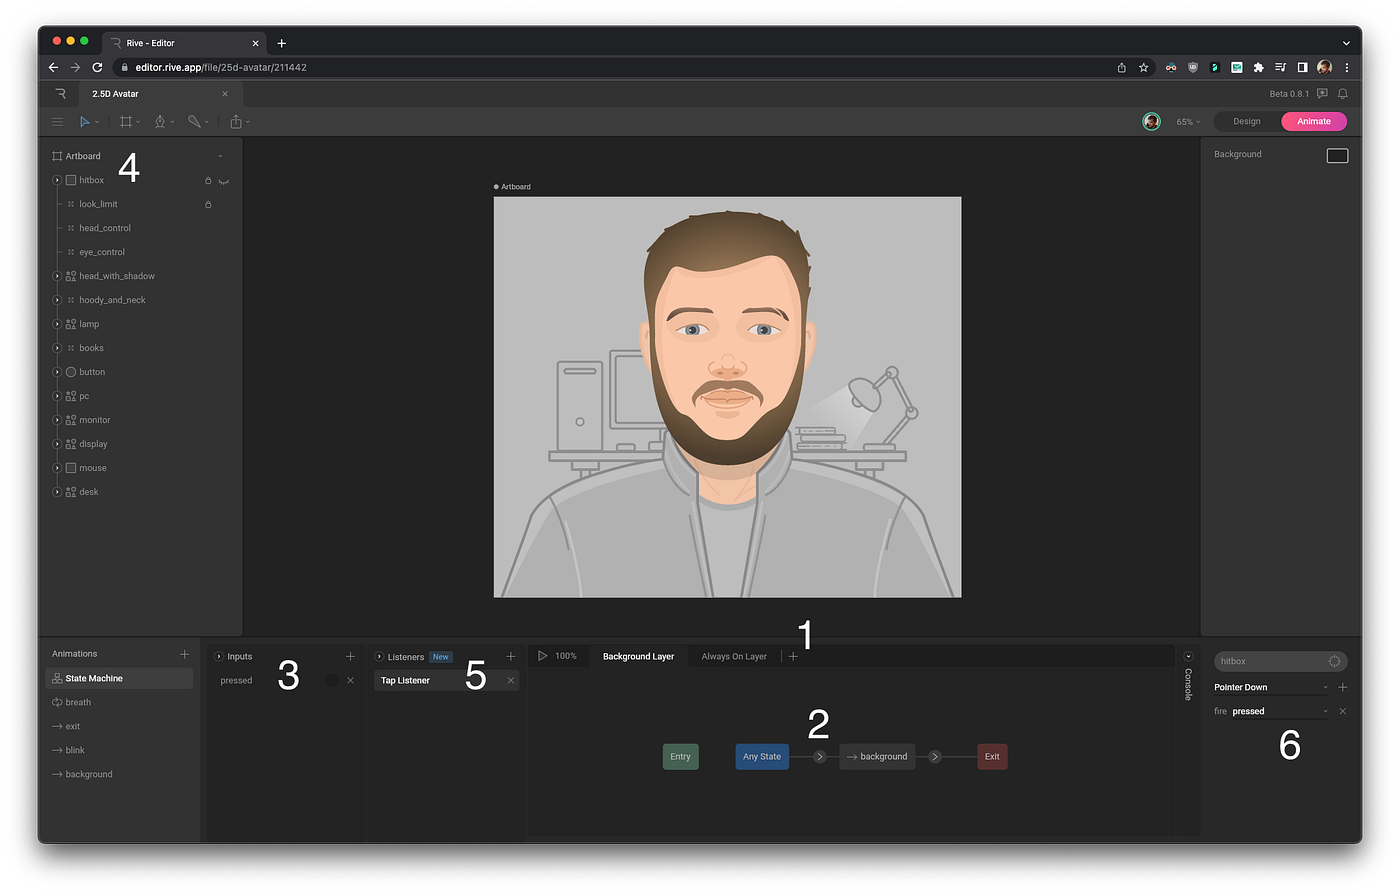
Create a new layer, again drag your background animation, and link it to the blue block, with the same duration, but this time we need to set the callback to play this “one-shot” animation. We will use “Listeners” and “Inputs”, and so in the Inputs tab create a new Trigger, let’s call it “pressed” but how to trigger it now?
First, we need to create an object the user will click/tap on. You can do it with a transparent rectangle the size of your artboard (Rive Team, why can’t we use artboard as a hitbox, btw?). Now create a new “Listener” of the “Pointer Down” type. Via the grey button, select the target — our new rectangle, specify in the drop-down “set” menu, our new Trigger “pressed”. Now at the arrow between “Any State” block > your animation, add a new “Conditions”: “pressed” and link the block animation with the red “Exit” block, so the animation will always end (otherwise, we can not call it again through “pressed” trigger, because we can not call animation which is already running, even if it’s in the finished state). The following animation will be very similar, let’s go.
The Exit animation

Again this animation is independent of the others, create a new layer, also drag the animation, and link it to the “Any State” block. Similarly, create an input trigger “exited” and a “Pointer Exit” listener, again select a “hitbox” target, and set the “exited” trigger. At the arrow between the exit animation and “Any State” block, set Conditions to “pressed”. In my case, I’ve added a 300ms duration, to make eye movement smoother. Finally, connect the animation block to the red “Exit” block.
The Cursor/Tap Animation

Now let’s add a global “Listener” that will react to the position of the pointer. The target will be our “hitbox” rectangle again, listener type should be a new “Pointer Move”, and in the “set” menu select your target nodes, i.e. points that our objects follow and change their position accordingly, in my case, there are two, eyes separately and head by itself, so choose them all.
We are done with the design part, check your animations, avatar movement, and callbacks with the play button. If you are satisfied, download your “.riv” file for the latest runtime. In the next section, we will look at the code side.
Code part
Controller class and setup
It is assumed that you have already some Flutter project or have created at least the default one. To pubspec.yaml add Rive dependency, version 0.9.1 or higher:
rive: ^0.9.1or use git dependency for the latest master.
First, let’s create a class that will control the logic of the animation, handle the callbacks, etc. Let’s call it RiveAvatar, for the Rive widget we should need as usual a field for Artboard, also some fields for Inputs/Triggers that are stored in the State Machine controller, so it should look like that.
You may notice, that StateMachineController now has a new method called pointerMove, which requires Vec2D, which is a type that is coming also from the Rive package, but Flutter does only provide us an Offset as pointer coordinate reference. Also, those SMITrigger casts look ugly, so let’s write some helper extension to map Offset to Vec2D coordinates and avoid type casting (since SMITrigger extends SMIInput type we can fool the Dart analyzer), like that:
Great, so now we can bring our avatars alive with this cute one-liner:
void move(Offset pointer) => _controller.pointerMoveFromOffset(pointer);And for triggering our exit animations we can call the fire() method this way:
void onExit() => _exitInput?.fire();Similarly for onTap events. But what about smartphones, tablets, and other devices without mouse/trackpad input? Logic will be a little bit more complicated:
void onTapDown(TapDownDetails details) {
  _pressInput?.fire(); // Fire background animation.  if (details.kind == PointerDeviceKind.touch) {
    move(details.localPosition); // Move eyes to the tap position.
    Future.delayed(const Duration(seconds: 1), onExit); // Exit after one sec.
  }
}
Our Artboard is private at the moment, but we should reference it on UI, we will need a getter for it. Also, RiveAvatar seems to be a great place for some static “.riv” file caching methods via RiveFile class. Let’s bring it all together in this dart file.
Caching and UI part
Now we have a method to cache our avatar from any place in the project, I highly recommend you to do it before the app start, since it’s async operation:
import ‘package:flutter/widgets.dart’;
import ‘animations/rive_avatar.dart’;
import ‘my_app.dart’;Future<void> main() async {
final cachedAnimation = await RiveAvatar.cachedAnimation;
runApp(MyApp(cachedAnimation.mainArtboard));
}
You may notice that mainArtboard getter because you won’t probably need the whole RiveFile, just an artboard from it. Also, you can call riveFile.artboardByName method if you have multiple artboards. Now you can provide it to any InheritedWidget, your favorite DI, or simply pass it to the constructor. I prefer the first or last one, so this is what the avatar scene class constructor might look like:
import ‘package:flutter/material.dart’;
import ‘package:rive/rive.dart’;
import ‘../animations/rive_avatar.dart’;class AvatarScene extends StatelessWidget {
final RiveAvatar _avatar;AvatarScene(Artboard? cachedArtboard, {super.key})
: _avatar = RiveAvatar(cachedArtboard);...}
To handle mouse pointer exit and hover events we should definitely use the MouseRegion widget, for simple taps handling classic GestureDetector will be enough, both widgets can provide localPosition of the hover/tap events as an Offset. Rive widget as a child of those two obviously, with useArtboardSize flag set to true. And to make it a little bit more flexible — a FittedBox on top of this all. You can also optionally provide background color to your avatar with ColoredBox, so the result could look like this.
Poscriptum, at the time of writing there, was almost no documentation for “Pointer Move” listeners, so feel free to write if you notice any mistakes or missing information. Thanks for reading!

