Reveal Animation With Bounce in Android
Show something new with style
In this tutorial, we’ll learn how to apply a reveal with bounce animation to any view in Android. I used this particular reveal animation to show bonus points in a previous application. For the purposes of this tutorial, we’ll be using it on a simple custom view. This final result can be seen at the end of the article.
First, let’s lay down the foundation on which we’ll add the animation. That includes:
- The view we want to reveal.
- The activity in which it’ll reside.
- The animator resource directory.
It’s worth noting here that you don’t have to use an activity. This is just what I’ll be using for this tutorial.
The custom view we’ll be using is a simple ConstraintLayout with a TextView in the center. It’ll look like this:

Here’s the XML for this view. We’ll name it view_bonus:
The activity in which we’ll put this view is the main activity (the launch activity). We’ll position and constraint it in its fully shown state, and we’ll give it an ID of vBonus. We’ll also add a button at the bottom that we’ll use to demonstrate the reveal animation. We’ll give that an ID of bRevealBounce. This is how it’ll look:

Here’s the XML for the activity. Notice that we’ll be setting the visibility of vBonus to gone since we’ll be revealing it later.
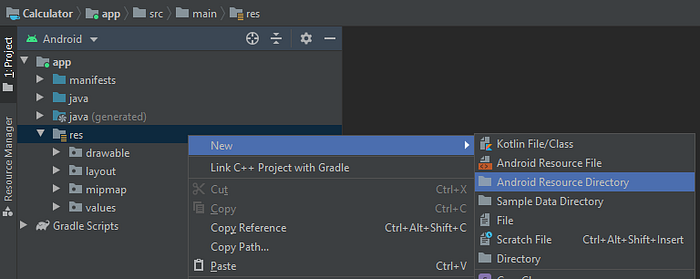
If you don’t have the animator resource directory under “res,” then you’ll have to add it. To do that, right-click on “res” -> “New” -> “Android Resource Directory.”
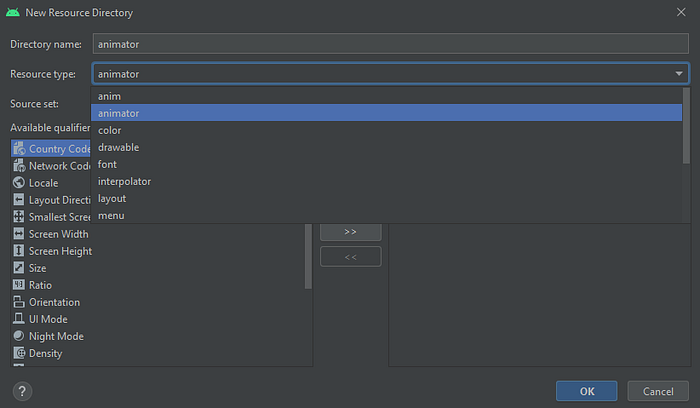
Under “Resource type,” choose “animator,” then click OK.
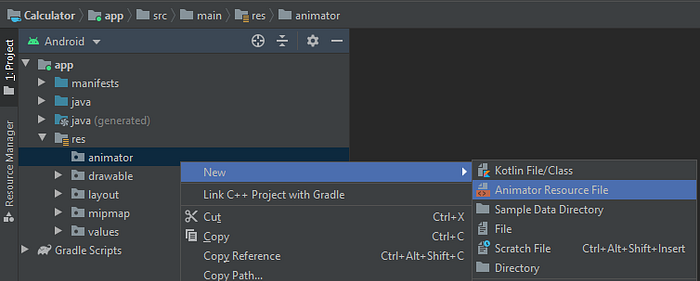
Now that you have an animator resource directory, let’s go ahead and add the Animator Resource File in which we’ll implement the animation. To do that, right-click on “animator” -> “New” -> “Animator Resource File.”
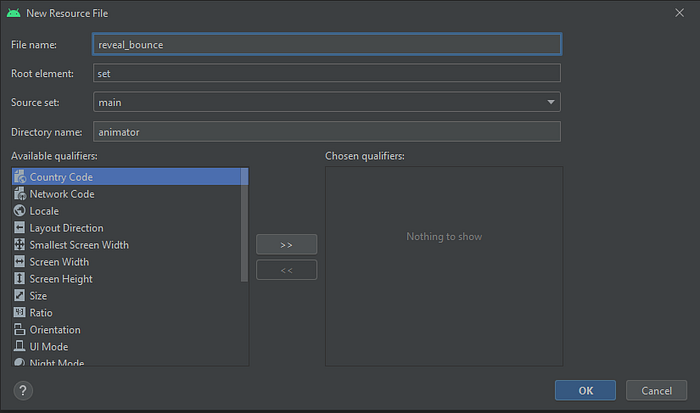
The animator resource file will consist of a set of animations, so make sure the “Root element” is “set.” Name the file reveal_bounce.
Now that we’re ready to implement the actual animation, let me briefly explain what we’re setting out to do. We want the following things to happen sequentially:
- Completely expand
vBonushorizontally and at the same time expand it just a little bit vertically so that it’s not completely hidden. - Completely expand
vBonusvertically withbounce. - Wait a little bit, then completely shrink
vBonusvertically and animate its alpha to 0 at the same time so that it disappears by the end of it.
The default ordering of a set is together — not sequentially — so the first thing we need to do is explicitly set the ordering of the parent set in reveal_bounce to sequentially.
In this parent set, we’ll add three more sets implementing the three steps we explained earlier.
The first set will have two objectAnimators. One will animate the property scaleX from 0f to 1f, which means it’ll completely expand the view horizontally. The second one will animate the property scaleY from 0f to 0.1f, which means it’ll expand the view vertically just a little bit. We’ll set the duration to 100 milliseconds for this example.
The f after each number indicates it’s a float value and not an integer.
The second set will have one objectAnimator that will animate the property scaleY from 0.1f to 1f, which means it’ll completely expand the view vertically. We’ll set the duration to 300 milliseconds for this example.
To add a bounce, we’ll have to set the interpolator property to bounce_interpolator. This interpolator already exists and you can just use it.
The third and last set will have two objectAnimators. One will animate the property scaleY from 1f to 0f, which means it’ll completely shrink the view vertically. The second one will animate the property alpha from 1f to 0f, which means it’ll completely fade out the view.
We’ll set the duration to 250 milliseconds for this example and have it wait 350 milliseconds before it starts just so that the view is visible for a little bit before it goes away.
The three sets together in reveal_bounce will look like this:
Let’s apply the animation! In our MainActivity, we’ll be doing a few things:
- Add a property of type
Animator. This will hold the animation itself, the view on which the animation will happen, and a listener for when the animation starts and when the animation ends. - Add a
setupfunction that will set up ourAnimatorwith all of the above, which will be invoked in theonCreatefunction. - Add a function to start the animation. Although starting the animation is already a one-liner, we do want to check if the animation has started already so that we can prevent starting the animation again while it’s already started.
- Add an
OnClickListenertobRevealBouncethat will invoke thestart animationfunction.
Since we’ll be setting up the Animator in onCreate, instead of using an optional in Kotlin, we’ll be using lateinit, which is basically a non-optional with a promise to initiate before use. We’ll name it revealBounceAnim.
The setup function will load the animation, set the target view to vBonus, add a listener that will make vBonus visible before animation, and hide the view when the animation ends. We’ll name that function setupRevealBounceAnimation.
To load the animation, we’ll use AnimatorInflator.loadAnimator, which takes a context and the animation file we created earlier. This will return an Animator that we’ll set revealBounceAnim to.
To set the target view of the animation, we’ll use the setTarget function on revealBounceAnim.
To add a listener, we’ll use the addListener function on revealBounceAnim. It takes an AnimatorListener. We particularly care about two callbacks here:
- The
onAnimationStartcallback in which we’ll makevBonusvisible and not transparent. - The
onAnimationEndcallback in which we’ll hidevBonus.
The reason why vBonus is treated like an optional in onAnimationEnd is just in case the application is dismissed before the animation ends, in which case the view will be gone and might cause the application to crash.
It’s worth mentioning here that this is a quick and dirty implementation. Ideally, we’d want to use reactive patterns so that we wouldn’t care if the application is dismissed or not. I’ll leave that topic for a different day, though.
To start the animation, we’ll add a function that will make sure the animation isn’t started already before starting the animation. We’ll name it startRevealBounceAnimation.
Last but not least, in onCreate, we’ll invoke setupRevealBounceAnimation and then we’ll add an OnClickListener to bRevealBounce that will simply invoke startRevealBounceAnimation.
The whole MainActivity file will look like this:

That’s it! When you click the button, the bonus view will reveal itself with a bounce before it disappears again. I hope this was useful to you. Until next time, this is Dev Bites signing out!

