Real-Time Game Server Internals: Basic Theory, Architecture, Optimization, Auto-Scaling
Learn how a real-time game server works under the hood— from basic theory to deploying it in the AWS cloud

This material represents the English translation of my article “Real-time game server in simple words.”
Who Is This Article For
The following article is for anyone interested in how game servers work because, to keep things simple, there won’t be a large amount of code but schemas and general illustrations. We’ll be discussing particular problems you meet when you design your own real-time server, what solutions you have, and which one we have chosen. Constructive criticism regarding our choices or the material is welcome in the comments.
Why It Matters
It’s no secret that making your own game is inside many programmers’ minds. For some of them, it was probably one of the reasons to get into IT. But making your own online game is a bit more complicated and not obvious at first. However, playing a game with other real players like you is almost always much more fun than playing solo.
Even the most boring project may start shining and give lots of positive emotions if you play the game with your friend. Being a fan of many cooperative PvE games such as Deep Rock Galactic, Remnant: From the Ashes, Helldivers, etc. I, as a developer, have always been wondering how exactly their architecture is built: how the servers manage game sessions, how they can handle thousands of players at the same time, synchronize players with each other, and so on. This became the purpose of my research.
Why It’s Worth Reading
After spending almost a year and a half developing our cooperative real-time game, we (programmer, graphic designer, and sound designer) finally brought it to the preproduction state. The project started purely on enthusiasm, as a way to prove that we could create our own online co-op game from scratch (in my case, without using ready-made solutions to organize multiplayer across the network).
The project itself won’t be mentioned here since it hasn’t been released yet to the public (In case this article causes some interest, then maybe there will be some additional material regarding other development aspects such as sound design, graphic design, teamwork or a comparison of Game Jolt and Itch.io platforms).
During the development process, and more particularly the backend part of the project (designing the server architecture, optimizing it, and deploying it in the cloud with fault tolerance), I had to search all corners of the internet, and this inspired me to write this article where in a structured way I put all my experience of problem-solving, so you have everything you need to know to start writing your own game server in any language from scratch.
A Bit of Theory: Server vs Host vs Client

Let’s start with the very basics. Say we have a single-player game where we play as a stickman. The game generates enemies for us and is responsible for providing object physics. Here’s what that looks like:

We want to introduce multiplayer for two players because it’s always more fun to play a game with someone, but how do we do that? Assuming we have the project's source code, let’s change it a bit. We copy the game to the second computer, duplicate the stickman, and program our computers to exchange the stickmen’s coordinates to get them synchronized across both machines:

Oops, something went wrong. The first computer and the second one generate enemies, so we have six enemies in total instead of three. Also, since they all got spawned in the same place, they scatter around according to the physics that each computer, again, calculates separately.
Here we have the conflict between two computers’ “brains.” Each one generates its own world and calculates its own physics, which is why we see a different picture on each computer.
How do we solve it? We need a single source of truth. Only one computer will be responsible for calculating the physics and generating the enemies; this computer will be spending its computing resources on that, while the other computer will be just repeating after the first one. This second computer will be only interested in the coordinates of all the objects to draw them:

This way, the first computer becomes what we call a server. It serves the other players (their computers) with its computing resources and sends them the game state (all objects’ coordinates and maybe some other data). The other players’ computers, also called clients, can repeat after the server (by drawing the same game state) and send user movements in return (for example, keyboard or mouse pressed buttons like left, right-click, right, up, etc.).
As a result, we see that the game that previously was one and whole is now divided into two parts: the server-side application and the client-side application. The computer that runs the server-side application is called a host.
This is the general client-server architecture used in the online games we play.
So a host and a server are like the same thing?
Not really. A server is a dominant part of an application that clients follow and repeat after, while a host is a machine that runs the server. Who exactly is going to be that host is the question that depending on the answer, will give us two fundamentally different architectures, each with its own pros and cons:
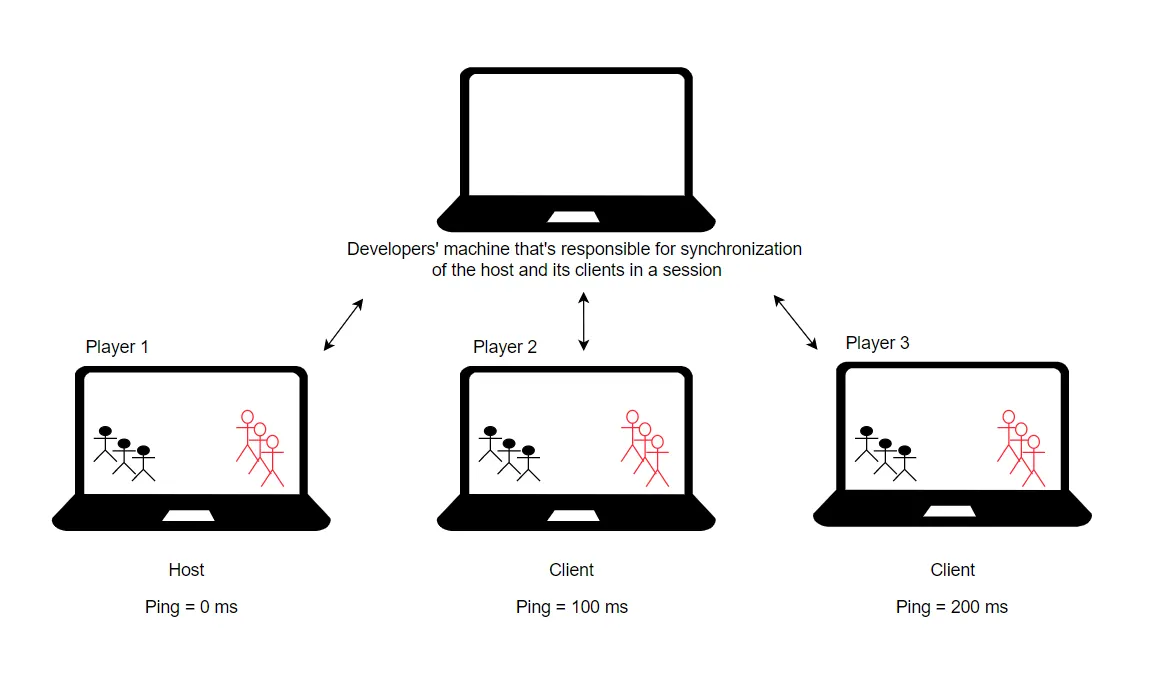
1. Host is the computer of one of the players in the game session
In this case, the player whose computer acts as a host has the real instance of the game because that player’s computer does all the physics calculations and generates the objects.
Pros:
- The game developer doesn’t have to spend a lot of money on powerful servers because one of the players’ computers will be responsible for all calculations. The developers’ machine, as a rule, will just be synchronizing the players and collecting data, which doesn’t require powerful resources.
Cons:
- The host player will have an advantage over the other players since, for the host player, the ping (latency) will always be 0 ms, so this approach is not fair for PvP sessions and is rather more suitable for co-op games
- As the server-side part of the game is controlled by one of the players, that player can use it as an opportunity to cheat
- If, during a game session, a host player machine can no longer handle the calculations (which is typical for players with old hardware) or the host has some problems with the internet connection, then it will affect everyone in the session. It can even lead to its termination
As we can see, this approach can save a developer some money, but it also has many risks since the server-side part of the application will be controlled by a host player.
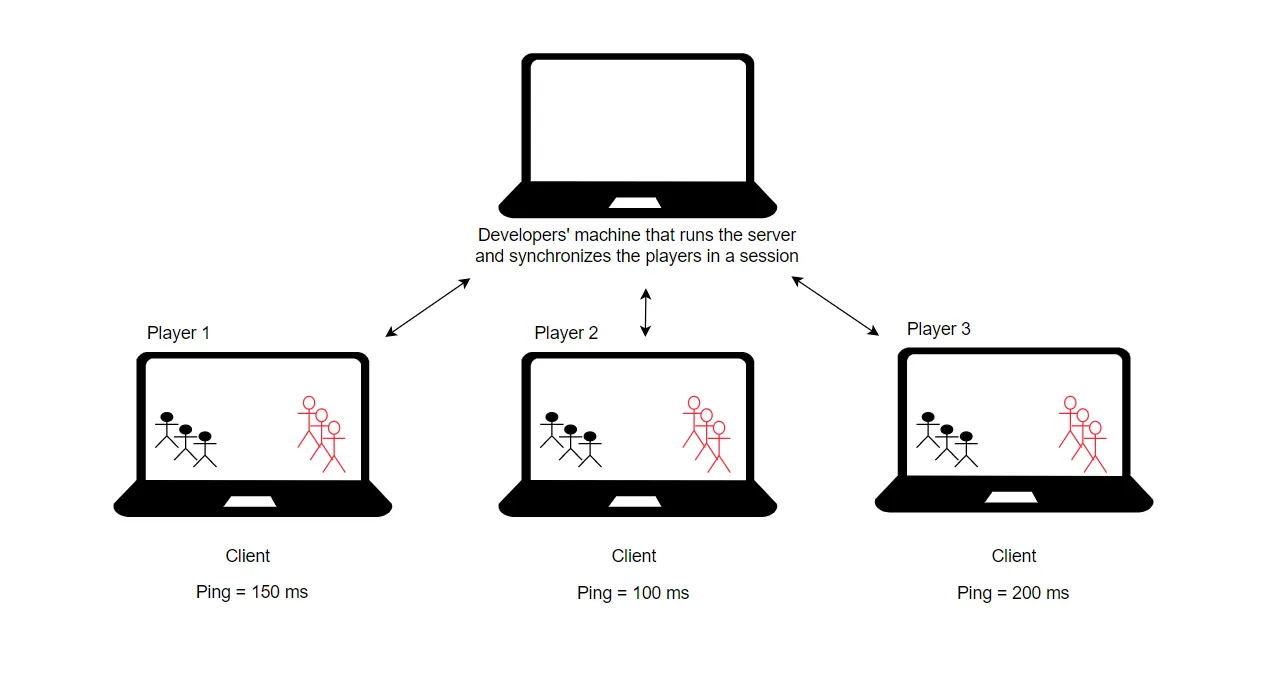
2. Host is a developer’s computer (authoritative server)
This architecture implies that an online game's developers will serve the game sessions for players by themselves. They can do it many ways, they can rent/buy some machines in a data center that will be serving the game sessions, or they can rent virtual machines from cloud providers such as AWS, Google Cloud, Azure, etc.
Pros:
- The server-side application’s code is not available to players, which makes it much harder to cheat and search for vulnerabilities
- The developers, as a rule, rent stable machines to run their servers with powerful enough hardware and a stable network to ensure all players have an uninterrupted game session
- No player has any advantage over the others. Everyone is in the same condition, and everyone follows one authoritative server, so this architecture is well-suited for PvP sessions
Cons:
- If a game involves the complex generation of the world, objects, and also physics calculation, then to handle even one session, powerful resources are needed (memory, processor), and so buying as well renting such resources can be quite expensive for a developer
Authoritative Game Server Implementation
Why authoritative server
There are several reasons:
- Although the game involves world generation and physics calculation, it doesn’t consume lots of processor time (CPU) because the game is 2D, and all the actions take place on a map of not a big size
- Even though cheating handling and uninterrupted game sessions are more critical for PvP games, rather than co-op PvE, it’s still nice to have them when you have total control over your server as a developer
- The server is written in Python. With Python, unfortunately, it’s very hard to hide the source code of your server from the players. Python is an interpreted language, meaning your program doesn’t get compiled into machine code (.exe files in the case of Windows) but represents some text files that everyone can read and that Python executes.
Yeah, I agree it’s a bit controversial because some tricks make it harder to reverse engineer Python code, and actually, even machine code isn’t protected from reverse engineering, but this point also has made an authoritative server look like a better option for us
How good Python is for a real-time game with physics
The language choice may seem strange for those who know how slow Python may be. But the trick here is that most of the time, Python doesn’t calculate formulas or physics on its own, instead, it delegates the work to C-libraries which are working under its hood.
For example, for physics calculation, we use the pymunk library, which is built on top of the 2d physics chipmunk library, which, in turn, is written in C and hence the good performance.
Python does the following on the server:
- the infinite loop (
while True:, typical code for any game, so a game gets updated constantly and doesn’t stop. It’s important the game gets updated at least 60 times per second, which is equal to 60 FPS) - game objects creation, events, and players’ connections processing
Python handles these tasks at a sufficient level.
Game Session Architecture
Each game session may have up to three players in the project. But what is a player for us as server developers? It’s a connection to our server. The player sends us pressed keyboard keys (left, right, down, space, etc.), and we return to the current game state.
This is the algorithm we need to do in parallel for all three players, and that’s not all. In addition to our three players (connections), we must process the game itself in parallel with them. In total, we have four “calculation threads“ (1st player, 2nd player, 3rd player, and the game itself) that all should be run in parallel.
How do we achieve that?

A few words about parallel programming: processes and threads
When you run an application (whether it’s a game, a server, a browser, or any other application), a process is created for that application on your computer. You can see that process in the task manager (on Windows systems). Each process contains at least one thread. A thread is a way of executing a process that runs on one processor core.
If your processor (CPU) has eight cores, then a process with one thread can only use one core of that processor (12.5% of total capacity). Therefore, if you want your application to use all the processor capacity, you need to create eight threads inside that application’s process, and it will utilize all the eight available CPU cores, which will lead to 100% usage of the processor capacity. So, by increasing the number of threads in a process, we achieve parallelism, which allows us to do several things simultaneously (multitasking) and improve our application's performance.

In our case, we are interested in multitasking. We need to process the connection of the 1st player, 2nd player, 3rd player, and the game itself all in parallel. So, for one process, with the game session, we need four threads. But, just creating four threads is not enough; we also should make them communicate somehow so they all act together, and what will help this time is a queue.
A bit of theory again. A queue is a container that allows us to arrange communication between threads. While some threads put some information into a queue, other threads can read that information from that queue. For example, a thread with a connection of the first player puts that player’s pressed mouse/keyboard keys into a queue called the “First player keys queue.” Then a thread in the game reads that queue in the first in, first out (FIFO) order and puts that player’s pressed keys into action, so the character the first player controls starts moving towards the direction that that player specified.
Game session architecture: overall picture

As you can see, we have a thread in the Game, and it reads (get operation) three queues with user movements. This thread successfully catches all the players’ pressed keys in parallel. After processing these players’ pressed keys (by moving their characters), the game thread puts the current game state (all objects coordinates) into the queue `Objects` (`put` operation) for each player.
This makes it so the players’ threads can read that current game state from there and send it to the players’ computers to update their game state in response to their pressed keys, and all of this should happen 60 times per second (60 FPS).
This way, we get a pretty simple but working system, as shown below:
- Players send their pressed mouse/keyboard keys, and the game processes it, moves their characters, and sends the current game state in return (all objects’ coordinates).
- When a player plays an online game, they may not even realize all these processes taking place under the hood. It may seem to them they pressed “left,” and the character goes left just because the computer made them go left, but in reality, the computer sent a pressed key to a remote server.
- This server has a thread with the user connection, and that thread puts this pressed key into a special queue.
- After this, the thread read that pressed key from that queue, put it into action (moved the player’s character), and sent the game state (coordinates) to another special queue.
- Finally, the thread with the user’s connection read that game state from there, sent that state to the player’s PC, and that PC redrew all the objects by new coordinates.
That’s all the magic.
Talking About Python and Its Problem With Threads
It’s no secret that Python, unfortunately, doesn’t allow all four threads to be active at the same time. Only one thread can be active at a time because of the well-known global interpreter lock (GIL) among Python programmers.
So, with Python, we don’t use four cores with four threads but just one core, so we don’t improve the performance because these four threads don’t run in parallel in Python).
Still, we achieve multitasking, and the capacity of one CPU core has turned out to be enough for three connections and the game itself.
How game sessions are managed
The architecture described above only covers a game session itself, but we still need another process to orchestrate these game sessions (or, to be more precise, their processes) such as creation, tracking, and deletion.
This is the process the players will interact with before they get into the game session. Let’s call this process the main server. The players will ask the main server to give them a list of current sessions (to connect to them) or create a new one. Let’s see what this communication looks like:

Optimization: Why Optimize
Since the project is, first of all, real-time (meaning we should reduce the time between the player pressing the keyboard keys and seeing the result as much as possible), we had to introduce some optimization on both the server and the client to achieve optimal performance and stability.
Server Optimizations
1. How data is sent
Both the server and the client were originally written in Python (the client got rewritten in Unity C# after some time), so we had an opportunity to use a Pythonic way of sending data, namely “pickle.” Here’s an example of such data traffic (from the server to the client):
[<network_classes.border.NetworkBorder object at 0x000001A44EF51070>,
<network_classes.border.NetworkBorder object at 0x000001A44EF51280>,
<network_classes.border.NetworkBorder object at 0x000001A44EF51040>,
<network_classes.border.NetworkBorder object at 0x000001A44EF83550>,
<network_classes.border.NetworkBorder object at 0x000001A44EF83520>,
<network_classes.border.NetworkBorder object at 0x000001A44EF834F0>,
<network_classes.border.NetworkBorder object at 0x000001A44EEAF790>,
<network_classes.player_ball.PlayerNetworkBall object at 0x000001A44EEAF6D0> ……..]
The pros and cons of using Pickle to exchange data between the server and the client:
Pros:
- Easy to implement on Python
Cons:
- Heavy objects for a real-time project
- Not cross-platform (both the server and the client must be written in Python)
- Security issues (It is possible to construct malicious pickle data which will execute arbitrary code during unpickling. So this approach is more suitable for private networks where you can trust the sender)
The awareness of pickle-related issues has led us to another more universal way of sending data — JSON, an example of such data traffic:
[
  {x: 12, y: 10, id: 30, radius: 80, color: “red”, cls: “ball”},
  {a_x: 22, a_y: 45, b_x: 122, b_y: 145, id: 45, color: “blue”, cls: “border”},
  ...
]
Pros:
- Still easy to implement
- No security risks
- Cross-platform
Cons:
- Still heavy objects for a real-time project (the JSON data consists of keys and values. While the values keep changing and are worth being sent every game frame, the keys remain the same and represent a redundant number of bytes. Also, we should always serialize JSON when sending and deserialize when receiving, which spends some processor time)
To achieve the best optimization, a decision has been made to switch to the usual strings of values and use the order of values itself instead of the keys. Here’s an example of such data traffic:
1.2.0.0.800.0.10.20.0.5;1.3.1200.0.2000.0.10.20.0.5;1.4.0.1200.2000.1200.10.20.0.5;1.5.0.0.0.640.10.20.0.5;1.6.0.960.0.1200.10.20.0.5;1.7.2000.0.2000.640.10.40.0.5;1.8.2000.960.2000.1200.10.40.0.5;3.11.400.100.90;3.12.1500.1100.90;3.13.1900.1000.120;3.14.300.1100.160;3.15.1200.600.50;3.16.700.1000.80;3.17.1600.700.170;3.18.800.900.170;2.1.832.1130.60.0.5.1.0.0;4.22.1832.1495.140;4.23.288.948.150;5.25.1855.531.60.7;5.26.1290.1130.60.7….Now we have no redundant data; we have pure values and delimiters.
We do the same thing for the client. For example, previously, it sent the pressed keys data in JSON format. That looked like this:
{“up”: true, “right”: true, “left”: false, “down”: false, “attack”: false, “accelerate”: false}Now it just sends a string of pure values which contains the same data but is shorter by ~10 times:
110000Pros:
- No security risks
- Lightweight objects
- Cross-platform (the only thing is we have to implement the packing and unpacking logic on both the client and the server, which is a couple of
splitoperators)
Cons:
- Hard to implement and maintain
But the advantages have outweighed the disadvantages for me, so I stuck to this approach.
2. Keep an eye on blocking operations
If your program contains several threads and connections, it’s important to monitor that we don’t have the situation when one thread stops, and so do the others because they are waiting for its input.
For example, in our process with the game session, we have a thread with a player connection that puts the player’s pressed keys into a special queue for the game to read. It’s important here that if the game thread reads this queue and doesn’t get any data (because the queue is still empty, for example, a player has a bad connection and can’t send its data), then the game thread goes further and doesn’t stop because of this player and doesn’t wait for them. In Python, you need to explicitly specify that a thread shouldn’t wait for a queue to have information to give because the get operation is blocking by default.
So this code:
player_move = player.move_queue.get()
player.move(player_move)
Should be refactored this way:
try:
	player_move = player.move_queue.get(block=False)
except Empty:
	player_move = previous_player_move
player.move(player_move)
If we receive no pressed keys from the player, we may assume that they are still pressing the previous keys, so let’s assign this data again and go further.
3. Turn off buffering for your sockets (connections)
By default, the sockets send data (from client to server and vice versa) when they reach some buffer. To send data immediately, we need to turn off Nagle’s algorithm on both the server and the client:
s = socket.socket(socket.AF_INET, socket.SOCK_STREAM)
s.setsockopt(socket.IPPROTO_TCP, socket.TCP_NODELAY, 1)
4. Use the TCP protocol, not UDP
When it comes to data streaming, we instantly think of UDP because it sends data with no other processing. Some network packets may be missed, and some may be duplicated, but it makes it much faster than TCP, ensuring all the network packets are ordered and in integrity.
And TCP could bring some latency in case we have poor network and connectivity issues, but nowadays, almost everyone is covered with a good Internet connection, so TCP doesn’t have to run back and forth with the same packets. And, as already mentioned, it guarantees data order. If we use UDP, then before the processing, we should ensure we get reliable uncorrupted data through some validation process which results in implementing something that TCP already does for us.
Note: it’s a bit controversial because not all regions have a good connection (especially when it comes to mobile data), so sometimes we have to stick to the UDP protocol, at least for characters’ movements.
5. Add delimiters between server messages
The TCP protocol doesn’t solve one problem, though. Even though it guarantees data order, it doesn’t guarantee this data will come in one single packet.
For example, if we want to send Hello world and Hi all, they may come the following way: Hell, o wor, ldHi all. So, it’s important to add some delimiters between the messages.
Let ? be the start of the message and ! the end of the message, then if we send ?Hello world! and ?Hi all! and get ?Hell, o wor, ld!?Hi all!, we can easily join these messages using the delimiters and get our original messages, which are Hello world and Hi all.
Client Optimizations
Prediction algorithm
Sometimes, the network gets unstable for 0.5–2 seconds. When it happens, the client doesn’t get any data from the server, so the game stops for the client. If it happens often, a player sees twitching objects, which ruins the gaming experience.
How do we handle that? As a rule, during 0.5–2 seconds, nothing special happens. Objects moving towards a particular direction are still moving there, so if we have no data from the server, we can keep all objects moving at their last calculated speed based on their last coordinates. For example:
Take previous coordinates: (500, -403)
Take current coordinates: (503, -410)
Calculate the theoretical speed:
speed_x = 503–500 = 3 pixels
speed_y = -410 + 403 = -7 pixels
Note that this theoretical speed should be calculated by the server, not by the client, and sent to the client along with other data. Because the client may miscalculate this theoretical speed because of packet loss.
As a result, as long as we have no data from the server, the next theoretical coordinates will be: (506, -417), then (509, -424), etc.
Deployment
Now that we have a working optimized solution, we can start talking about deploying it.
What dynamic auto-scaling is
Dynamic auto-scaling is a way to change several resources depending on the workload automatically.
In our case, it means to have as many virtual machines (=hosts that run servers) as required to process all the game sessions for players and automatically increase/decrease their number depending on players’ demand.
Why a small indie project needs an infrastructure with dynamic auto-scaling
Let’s look at a simple way to deploy our authoritative game server:

If we want to cover most of the planet with a low ping, we can rent three more or less powerful machines, each in a different region. In my case, a CPU-optimized virtual machine that can handle up to 30 game sessions costs 90 dollars in DigitalOcean (a cloud provider that allows you to rent remote resources like virtual machines to run your server).
This approach is quite understandable. With three machines in their own region, each one has its own game sessions, and you pay a fixed price for each one of them (~300 dollars in total).
Although this solution may seem simple to us as an indie developer, it’s quite expensive, and for example, our project is not commercial at all, so it would be nice to cut the costs if possible. The obvious thing we can think of is to take less powerful machines, but we instantly have lots of “what if”:
- What if the game causes interest and the servers won’t be able to handle a high workload?
- What if the server fails and can’t handle any player unless we manually restart it?
- Even if we take a powerful server, what if it experiences a DDoS attack?
- What if all of our worries are actually in vain? The project won’t cause any interest, and 300 dollars will be lost.
If only there were a way to address this question dynamically in production. If we have 1–2 game sessions in our server, then let a weak virtual machine host the server and handle them. We can temporarily increase the number of virtual machines to handle all the game sessions and then release them once we don’t need them.
With the help of big cloud providers such as AWS, we can implement this scenario:

Now in each region, instead of just one big virtual machine, we have a group of resources that always contains at least one virtual machine, which is, in our case, a t2.micro machine in AWS that is capable of handling three game sessions and costs 10 dollars per month if it’s on 24/7.
Deploying this infrastructure in three regions results in ~30 dollars per month (in case no one plays on our game servers, which is quite realistic for indie projects, but in this case, we lose just 30 dollars, not 300, as in the case described above).
Why AWS
AWS has everything that’s needed for this infrastructure. Of course, a similar infrastructure could be built using other big cloud providers, but AWS has a huge amount of documentation and a large community, so it doesn’t take much time to solve every small problem. But if we neglect this dynamic scaling, DigitalOcean looks like a better option thanks to its simple virtual machine configuration and pricing policy.
How it all looks in AWS
For each region where we want to deploy our infrastructure, we have the following picture:

What we have here and why:
Target group
Represents a group of virtual machines that host game servers. Here’s how it looks in AWS:

We can see that currently, this Target group has only one machine (in registered targets), and it’s marked as healthy. How does AWS check that? The load balancer (described below) checks the port on which a server is running, it checks it once in several seconds (we specify this number), and if it gets any response, it marks our machine as safe and sound.
A bit of theory: our server is working on a specific port (49152 in our case) associated with its process; it’s needed to create a virtual point so we can start and end players’ connections.
Elastic Load Balancer
Represents a load balancer that accepts a connection from the player and redirects it to one of the machines in the Target group in the round-robin fashion (circular order). Unfortunately, the Elastic Load Balancer (ELB) doesn’t track such virtual machines’ characteristics as CPU (processor) utilization, so it doesn’t take into account what virtual machine is loaded and what is not.
In the following screenshot, you can see the main component of the ELB, which is Listener. It defines which port to wait for players and to which Target group to redirect the players when they try to connect:

Auto Scaling
Does auto-scaling. It monitors the virtual machines’ metrics in the Target group and sets:
- Minimum capacity — (A minimum amount of virtual machines in the Target group). This is the number of machines that will run right from the start
- Desired capacity — (The desired amount of virtual machines). This number will change automatically depending on the load
- Maximum capacity — It’s the maximum number of virtual machines that we allow the Auto Scaling service to run (because each virtual machine costs money, after all)

Also, the Auto Scaling contains a Launch template; it’s an instruction that tells it how exactly to run a new virtual machine, what hardware and operating system to choose, and what commands to run:

Also, the Auto Scaling contains a Dynamic scaling policy where we tell when a virtual machine with the server on it should be added or removed:

In our case, it’s said, “The average CPU utilization on every machine shouldn’t exceed 70%. Add/remove virtual machines if needed, and give each virtual machine 60 seconds after the start before taking its metrics into account”.
DynamoDB
This service represents a NoSQL database and serves as a temporary storage for game sessions’ metadata. Why do we need that? The thing is, each virtual machine in our Target group is a separate machine, and each one has its own game sessions and is not aware of the other machines.
Let’s image a situation, you play with your friend in one region, and you want to connect to their session, but it turns out you’re playing on two different virtual machines within the region under the hood, so you need to connect to a virtual machine that you friend is playing on. How do you do that? Here’s where DynamoDB can help you.
All the virtual machines in the Target group send their game sessions’ metadata to DynamoDB (IP address + port + how many players are in the session + any other useful metadata), and no matter what virtual machine you connect to, if you ask this machine for a list of current sessions, it will give you a list of all the game sessions from all the virtual machines by taking them from DynamoDB.
As a result, a game client (that a player uses to play a game) receives all the sessions from a server, sees that a session it’s looking for is located on a different IP address, and connects to that address, for sure it does it automatically, so a player doesn’t notice these processes.
This way, a group of separate virtual machines may work as a single mechanism.
How game sessions look in this database:

Who does the client-side part of the game talk to now, to the load balancer or virtual machines directly?
Both. We can ask Auto Scaling to assign a public IP to each virtual machine that it starts:

This way, we use the load balancer for two things, we connect to a random virtual machine which either creates a new game session for us or gives us a list of current game sessions. Once we have a session, we use its metadata (IP + port) to connect to it directly without load balancer participation.
How effective is this infrastructure
AWS provides virtual machines with basic or detailed monitoring (for an additional charge). The basic monitoring (CPU/disk/network usage, etc.) sends its metrics to CloudWatch (cloud monitoring service in AWS) every five minutes. Therefore, it affects Auto Scaling performance because it makes decisions based on these metrics to take measures with a five-minute delay.
Here we have two solutions: enable detailed monitoring to send metrics every minute instead of five or decrease the threshold to start a new virtual machine. For example, if you plan to start a new virtual machine when the average CPU utilization is 70%, then make it 50% so that Auto Scaling can react in advance.
Let’s look at an example. We’ll overload the CPU of our current virtual machine in the Target group with three game sessions:

Auto Scaling sets the Desired Capacity from 1 to 2:

And we see it in the Target group:

Wait a bit, and now we have two working virtual machines:

fault tolerance in this infrastructure
Fault tolerance is a system’s ability to keep working even when some components fail.
If the Load Balancer can’t reach the server on a specified port, it marks this virtual machine as unhealthy. The Auto Scaling service sees it and replaces this machine with a new one:

DDoS protection
As AWS documentation says, it provides all its users with AWS Shield Standard at no additional charge. It defends the users against the most common DDoS attacks on the network and transport layer. But the thing is, you can’t see how it works. It runs in the background, and you can’t be sure when it protects you. There are no reports.
Also, from the official statement that AWS Shield Standard is automatically enabled when you use Elastic Load Balancing, Application Load Balancer, CloudFront, and Route 53, you can’t be sure this protection will work for your virtual machine (which is an EC2 service). There’s another service, AWS Shield Advanced, which explicitly protects EC2 virtual machines and sends its activity to CloudWatch, but it’s a paid service and costs $3,000 a month.
Still, even if our virtual machines experience a DDoS attack and fail, the Load Balancer will mark them as unhealthy, and the Auto Scaling service will restart them on new IP addresses without our participation. So we can’t say that this system is protected from a DDoS attack, but it will recover automatically after it, so we don’t have to repair the servers manually. The only thing is that players may get upset due to an interrupted game session.
Pitfalls of this infrastructure
When the Auto Scaling service starts decreasing the number of virtual machines (because the load has been reduced), then this service doesn’t care if players still have a game session on a machine that is about to be deleted. Therefore, it results in the interruption of their session and ruins the gaming experience.
Luckily, AWS allows us to suspend and resume some Auto Scaling processes. We are particularly interested in the Terminate process, which deletes virtual machines. What we do is when the Auto Scaling creates a virtual machine, we give that machine permission (through a role in AWS) to execute commands in the Auto Scaling service:

Each machine in the Target group periodically checks the list of sessions in DynamoDB, and if it sees that there’s at least one session, it blocks the Auto Scaling Terminate process from deleting the virtual machines by suspending it, and if it sees that there are no sessions it allows the Auto Scaling Terminate process to delete the machines by resuming it:
# block the Auto Scaling Terminate process from deleting the virtual machines
aws autoscaling suspend-processes --auto-scaling-group-name <scaling-group-name> --scaling-processes Terminate
# unblock the Auto Scaling Terminate process from deleting the virtual machines
aws autoscaling resume-processes --auto-scaling-group-name <scaling-group-name> --scaling-processes Terminate
As a result, if we have at least one session, then the Terminate process is marked as Suspended for the Auto Scaling service:

How much it costs
The price will vary depending on the players’ consumption and the number of regions in which you want this infrastructure deployed. In my case, since the game hasn’t been released yet, I don’t have reliable statistics but to calculate roughly:
- Virtual machines EC2 — at least one virtual machine is running in the Target group in all three regions. A virtual machine of
t2.microtype costs 10 dollars per month, and AWS gives you one such machine for free every month, so we have 20 dollars in total (in case no one plays our game, in reality, this number is going to be bigger for sure) - DynamoDB — for free, AWS gives 25 GB of storage for the DynamoDB service within the free tier, and for our use case, it’s more than enough
- Elastic Load Balancer — charged hourly for each GB of traffic, but the players are not going to use this service for the direct connection to the game session, so it’s unlikely this service is going to be charged
- Auto Scaling — for free
- There can be some additional small charges for CloudWatch that collects metrics and for several public IPs assigned to virtual machines
Overall, the infrastructure with dynamic auto-scaling has allowed us to achieve fault tolerance and significantly cut the costs for the rent of virtual machines. I consider it an ideal solution for an indie developer.
Conclusion
To dive into the world of game servers, their architecture, what tricks exist to optimize them, and how to deploy them in the cloud has become a passion for me this last year and a half. I’m glad I was able to bring the server-side part of the game to this state, and I hope that my experience will help everyone interested in that too.
Thank you to everyone who made it to the end!