How to Use React in a Ruby on Rails App
React on Rails!

I started working with React 5 years ago. Due to the Rails experience in the team, rails were set as the backend and for the frontend. After a short evaluation of Angular, React and Vue.js, React convinced us the most at that time.
At that time there was no official webpack integration in Rails, webpacker and other out-of-the-box possibilities did not exist. The best solution was React on Rails from Shakacode.
React on rails is from my point of view still the most important toolchain when it comes to bringing React and Rails together, especially because to my knowledge it is still the only way for server-side rendering in connection with rails.
Shortly before the release of Rails 7 a lot of things happened and webpacker was even retired. When creating a new rails app, the rails command now offers the following options: importmap (default), webpack, esbuild, rollup.
For this post, I looked at importmap, webpack, esbuild, and react on rails.
Importmap
Import maps let you import JavaScript modules using logical names that map to versioned/digested files — directly from the browser. So you can build modern JavaScript applications using JavaScript libraries made for ES modules (ESM) without the need for transpiling or bundling.
This frees you from needing Webpack, Yarn, npm, or any other part of the JavaScript toolchain. All you need is the asset pipeline that’s already included in Rails.
JavaScript without transpilation, without build, without complicated setup, that sounds like a dream! From my point of view, it’s no wonder that the team behind Rails 7 decided to support importmap and define it as standard for Rails applications.
Installation
- Add
importmap-railsto your Gemfile withgem 'importmap-rails' - Run
./bin/bundle install - Run
./bin/rails importmap:install
To add a javascript library, just run the following command:
./bin/importmap pin react@17.0.1For me, the following config/importmap.rb content has turned out to be the best for working with React, including different react library versions for development and production environment to enable all development modes for React:
Basically, it works great, you don’t even need a local node.js installation! As long as you don’t want to use Node.js-based development tools like eslint to lint your JavaScript files, jest to test, etc. which from my point of view are actually essential nowadays when it comes to the development of React applications.
The biggest problem that comes with the fact that there is no transpilation step, you can’t use JSX because JSX needs to be transpiled into javascript. No browser supports JSX out of the box and probably never will.
DHH recommends the library htm, which improves the situation a little bit.
To make the problem and the different possibilities more understandable, some examples for a React component once with JSX, without JSX, and once with htm:
React component with JSX:
React component without JSX:
React component using htm:
https://gist.github.com/uebelack/ce6a0487df2278ecdd7bcdeea1449686
Full examples using importmap, one with createElement and one using htm you can find it below:
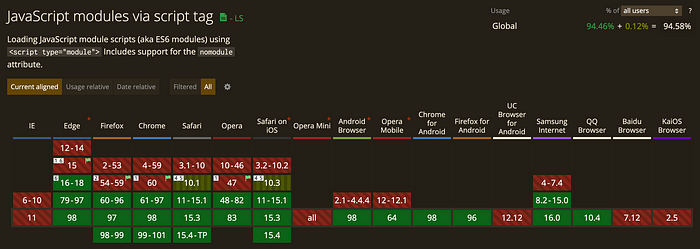
One more hint, the whole thing does not work with IE of course:
Webpack
At its core, webpack is a static module bundler for modern JavaScript applications. When webpack processes your application, it internally builds a dependency graph from one or more entry points and then combines every module your project needs into one or more bundles, which are static assets to serve your content from.
Webpack is still the most widely used tool for bundling javascript applications. Loaders and plugins can be used to process, transpile, minimize, etc. various resources.
Integration into the build pipeline of your Rails application can be done via jsbundling-rails.
Installation
If you create a new rails application you can create the app with the following command:
rails new -j webpack my_new_rails_appTo add it to an existing rails app:
- Add
jsbundling-railsto your Gemfile withgem 'jsbundling-rails' - Run
./bin/bundle install - Run
./bin/rails javascript:install:webpack - Install needed node dependencies
yarn add react react-dom
yarn add @babel/core @babel/preset-env @babel/preset-react babel-loader --dev
Create a babel.config.js in the root folder of your project, containing:
Update webpack.config.js to include the babel loader:
Generate a controller and view to serve your new react app:
rails g controller Root indexOverwrite the contents of app/views/root/index.html.erb with:
<div id="root">Change the root in config/routes.rb to your new view:
Rails.application.routes.draw do
  root 'root#index'
end
Add you're React app to app/javascript/application.js:
Finally, start your application with:
./bin/devA full working example using webpack you can find here
Esbuild
Our current build tools for the web are 10–100x slower than they could be. The main goal of the esbuild bundler project is to bring about a new era of build tool performance, and create an easy-to-use modern bundler along the way.
https://esbuild.github.io/
The new star in the sky of building tools in the JavaScript world is esbuild, supposedly much much faster than anything else … we will see…
Integration into the build pipeline of your Rails application can be done via jsbundling-rails (https://github.com/rails/jsbundling-rails).
Installation
If you create a new rails application you can create the app with the following command:
rails new -j esbuild my_new_rails_appTo add it to an existing rails app:
- Add
jsbundling-railsto your Gemfile withgem 'jsbundling-rails' - Run
./bin/bundle install - Run
./bin/rails javascript:install:esbuild - Install needed node dependencies
yarn add react react-dom
yarn add esbuild esbuild-loader --dev
Generate a controller and view to serve your new react app:
rails g controller Root indexOverwrite the contents of app/views/root/index.html.erb with:
<div id="root">Change the root in config/routes.rb to your new view:
Rails.application.routes.draw do
  root 'root#index'
end
Add your react app to app/javascript/application.js:
Add --loader:.js=jsx to the build script in your package.json:
Finally, start your application with:
./bin/devA full working example using esbuild you can find here.
React on Rails
React on Rails integrates Rails with (server rendering of) Facebook’s React front-end framework
React on Rails is the current.
React on rails is, in my view, the most comprehensive integration of React into Ruby and Rails. The main advantages over other solutions: server-side rendering and hot code replacement.
Installation
See https://www.shakacode.com/react-on-rails/docs/getting-started/
In short:
- Add
react_on_rails,shakapackerandforemanto your Gemfile and runbundle install - Run
./bin/rails webpacker:install - Run
rails generate react_on_rails:install --ignore-warnings - Start your app with
bundle exec foreman start -f Procfile.dev - Open your browser at http://localhost:3000/hello_world
A full working example using react on rails you can find here.
Conclusion
If you are not a JavaScript fan and as a rails fanatic don’t want to install node on your development machine and just want to implement a small simple frontend with react, without testing or code linting — then the integration via importmaps is the right choice.
If you want to have the fastest modern build pipeline and you don’t have any special requirements, you should try esbuild.
If you have special requirements that you can implement with webpack plugins, for which there is no solution in esbuild yet, if you don’t need server-side rendering or hot code replacement during development, then keep it simple and go for the integrated rails solution with webpack.
Finally, if you need server-side rendering you have no choice but to use React on Rails.