Python Blockchain Token Deployment Tutorial — Create an ERC20
Using Brownie, Python, and Solidity, create a token that can be viewed, bought, and sold on the blockchain

The Ethereum and blockchain ecosystem as a whole do commerce by using ERC20 tokens. Anyone can create a token and use it as a cryptocurrency. We are going to be deploying an ERC20 token using Python, Brownie, and Solidity in this tutorial. You don’t need to be that familiar with any of these for this tutorial.
What Is an ERC20? What Is an Ethereum Token?
ERC20 means “Ethereum Request for Comment 20.” Request for Comments is a way for social groups to have ideas peer-reviewed. Ethereum makes improvements to the ecosystem by having people create ideas and having others comment on them. These are slightly different from Ethereum Improvement Proposals (EIPs). There is a difference between the two, but you’ll sometimes hear them used interchangeably.
When people refer to ERC20, they are referring to the 20th Ethereum Request for Comment, which was created by Fabian Vogelsteller and Vitalik Buterin.
This request for comment laid out a way for “tokens” to be created on the Ethereum platform — a standard for all tokens to follow so they could be easily used by platforms and engineers without having to redo work.
Imagine if each token had its own function to transfer tokens from one wallet to another. This would make building protocols around these tokens really difficult. Think interchangeable parts, but for functions in Solidity.
Each of these ERC20s follows the same pattern and has the same list of functions that do essentially the same thing. Some of them are:
transfer: Transfer a token between owners.balanceOf: How to see how much of the token an address has.transferFrom: Allows a non-owner to move tokens from one address to another.approve: Approves a contract to call thetransferFromfunction.
In their simplest form, they are a contract that keeps track of how much of some unit of value each address on the blockchain has. They use mappings in Solidity to make this possible.
Is there a TL;DR?
Yes. ERC20 are smart contracts that represent tokens.
What are some examples?
Some examples of ERC20 tokens are LINK, AAVE, USDT, and DAI. You’ll notice that some tokens like the LINK token are actually more advanced forms of the ERC20. LINK, in particular, is an ERC677, which adds some additional functionality for working with oracles, but it is still backward-compatible with ERC20s and has all their functions.
Another popular token standard is the ERC777, which includes some nice quality-of-life improvements over the ERC20 and is also backward-compatible with the ERC20.
Why make ERC20s?
What do ERC20s do? What is their purpose?
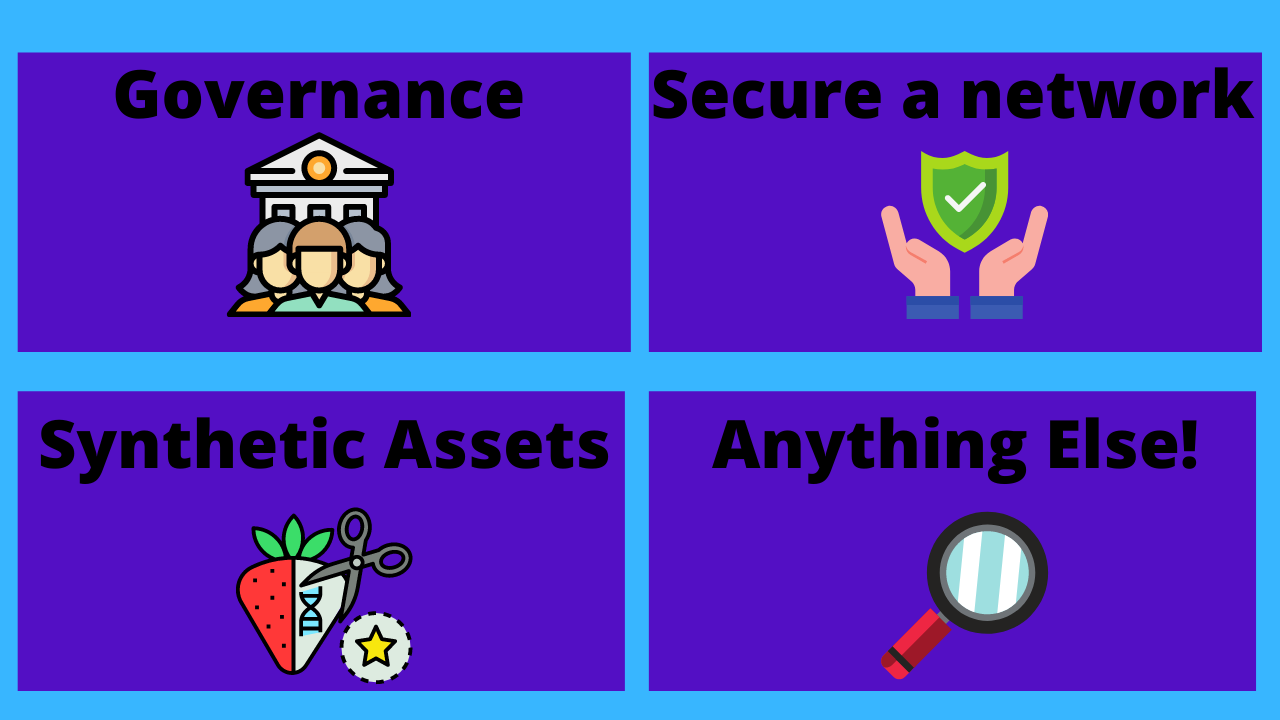
ERC20s can be used for a number of different reasons. Here are some of the most popular ones.
1. Governance
Governance tokens are tokens that allow users to vote and hold a stake in the future of a protocol. Some examples of governance tokens are UNI, AAVE, and CRV. Tokens can be “staked” into the platforms and used to vote and propose new directions for the protocol to hear.
2. Secure a network
Oftentimes, a network or protocol goes multi-blockchain, and the security of the protocol as a whole shouldn’t be tied to a single underlying blockchain. Protocols often need to engage in commerce with an underlying asset that makes more sense for the protocol. It separates the asset from the market volatility of some other asset that is unrelated to the network.
If it were the underlying chain, then the security of the network could be reduced if the underlying market volatility took a turn for the worse.
3. Synthetic assets and Stablecoins
If you have some sort of price feed, you can easily make synthetic assets with some sort of collateral backing. This is a great way to get exposure to and trade assets that aren’t in the blockchain ecosystem. This is exactly how the Synthetix protocol works, combining Chainlink price feeds with SNX-staked collateral to give DeFi (decentralized finance) investors exposure to the traditional financial world.
Stablecoins in the same sense are also synthetic assets, except they represent “stable” assets like the U.S. dollar. Tether, USDC, and Dai are examples of Stablecoins.
4. Anything else!
Creativity is your only limitation when coming up with ideas for why to make an ERC20 token. We’ve seen protocols that use ERC20s to stake as underlying collateral assets, give rewards as an incentive for using a protocol (see yield farming), create an economy around a token, and more.
How To Create an ERC20
Let’s get started by cloning this sample repository and installing eth-brownie. We are assuming you have Python installed. Brownie is a Python framework dedicated to making smart contract deployment easier.
git clone https://github.com/PatrickAlphaC/erc20-brownie
cd erc20-brownie
pip install eth-brownie
We have two contracts in the contracts folder:
The TokenERC20 is an example of how we could write the entire contract ourselves since all we have to do is make sure we implement the proper functions.
Alternatively, an easier way is to use the OpenZeppelin package. This abstracts away the majority of the functions and allows us to use Solidity’s inheritance to have our contract “inherit” all the functions that we need to implement! All we have to do is give the token a name, symbol, and initial supply.
EasyToken.sol
In this example, we’ve named the token EasyToken with a symbol of EzT and an initial supply of 1 million. You might be asking why it’s not an initial supply of 1000000000000000000000000. Well, Solidity doesn’t work with decimals, so we actually assign 18 additional zeros as the decimal so we can interact with fractional pieces of the token.
Once we have the token contract created, we can create a script to deploy it to a blockchain:
from brownie import accounts, config, EasyToken, EasyToken
from scripts.helpful_scripts import get_accountdef main():
    account = get_account()
    erc20 = EasyToken.deploy({"from": account})
Brownie allows us to pull the contract from itself, and we can just call the function in our main contract:
EasyToken.deploy({"from": account})This will deploy it to whatever blockchain Brownie is connected to. You’ll notice that for every transaction, we also need to have an account associated with it. We got our account from our get_account function. We can ignore this for now.
Deploying to a blockchain
This package is set up by default to deploy to a local ganache blockchain. You can follow the readme if you’d like to learn more about working locally. I suggest you do if you’re looking to become a full-time Solidity developer! Working with local blockchains is much faster than testing on a Testnet all the time!
We are going to show you how to deploy to the Kovan Testnet since this will enable you to “see” the tokens on Etherscan. You’ll need two environment variables:
export WEB3_INFURA_PROJECT_ID='aaa5aa5a5a5a55555aaa555a5a5555a`# export PRIVATE_KEY='asdfasdfasdfasdfasdfasdfasdfas'Your WEB3_INFURA_PROJECT_ID is your project ID from Infura. Infura is a way for us to connect to a blockchain and has a free tier for us to use. You’ll also want to set your PRIVATE_KEY as an environment variable. You can get your private key out of your MetaMask. If you don’t have MetaMask, you can learn how to download and set it up in this video:
You can get your private key by exporting it from MetaMask and adding a 0x to the start. You can learn more about environment variables and how to set them in this blog post.
Once you’ve set your environment variables, you’ll also want to get some Testnet Kovan ETH. Then you can run the deploy script:
brownie run scripts/2_deploy_easy_token.solAnd you’ll see an output like this:
Running 'scripts/2_deploy_easy_token.py::main'...
Transaction sent: 0x223af315917c07956243ed0915a3b142a5697ad6e497adeae3e3ad886f37b37a
  Gas price: 3.0 gwei   Gas limit: 792680   Nonce: 3653
  EasyToken.constructor confirmed - Block: 24760550   Gas used: 720619 (90.91%)
  EasyToken deployed at: 0x8922C8e8534e10A0B42c072eA0e94A80Cb2E0985
We can then take that address and pop it into Kovan Etherscan, and you’ll see your token there!
The last thing you’ll want to do is take that address and add it to your MetaMask. You can hit the “add token” button in your MetaMask, go to custom token, and add your contract address on the Kovan network, and you should see your tokens there.
Congratulations! You’ve deployed your first ERC20 token!