Deploy a Production Django App With Elastic Beanstalk (Part 1)
Using Django 3.1.3, Python 3.7.9, and Amazon Linux 2
In this tutorial, we’ll be creating a simple Django Rest Framework (DRF) app and deploying it with Beanstalk to make our endpoints available on the web. We’ll do everything, from creating our virtual environment and getting the Django app running locally, to deploying the code on Beanstalk and hooking it into a Postgresql RDS database. Let’s get going!
If you’re already familiar with everything covered here, or you’re looking for help with handling production static and media files, database settings, or environment variables — check out part 2 instead!
Table of Contents
- Why Use Elastic Beanstalk
- Installing Pyenv and Pipenv
- Clone The Repo
- Preparing Beanstalk
— Downloading the EB CLI
— Initializing elastic Beanstalk
— Creating the Beanstalk environment
— Adding .ebextensions - SSH Into the Server (Debugging)
— Grab your EC2 instance public IP
—Checking the log files - Add Your .ebextensions directory and deploy
Why Use Elastic Beanstalk?
EBS (Elastic Beanstalk) is a platform-as-a-service used to deploy web apps without the pain of creating your own EC2 instances, load balancers, auto-scaling, health monitoring, and more. It’s a quick and relatively easy way to get your app on the web. Despite everything being managed by AWS, it still leaves a decent amount of control and visibility to the developer.
To get started, we’ll be using Pipenv and Pyenv to help manage our dependencies and Python version.
Installing Pyenv and Pipenv
If you’re using a Mac, you can brew install both requirements (shown below). If you’re not on a mac, follow these instructions to install Pipenv, and these for Pyenv.
brew install pipenv
brew install pyenv
For use with Pyenv, you’ll also want to add this to your ~/.zprofile | ~/.zshrc if using zsh— or ~/.bashrc | ~/.bash_profile if using bash.
export PYENV_ROOT="$HOME/.pyenv"
export PATH="$PYENV_ROOT/bin:$PATH"
if command -v pyenv 1>/dev/null 2>&1; then
  eval "$(pyenv init -)"
fi
After making changes to your ~/.zshrc or ~/.zprofile, be sure to restart your shell:
exec "$SHELL"Now we have both installed, let’s download Python 3.7.9:
pyenv install 3.7.9This will take a minute, but once it’s finished you’ll have python 3.7.9 available on your pyenv path.
Clone the Repo
Now, let’s create the project and the virtual environment with pipenv. Clone my lightweight Image Of The Day repo (built with DRF) to follow along with the tutorial:
git clone git@github.com:zackcpetersen/iotd.git
cd iotd
pipenv install --python ~/.pyenv/versions/3.7.9/bin/python
Note: if you don’t have the correct python version on that path try this:
~/.pyenv/shims/versions/3.7.9/bin/pythonThis will set the Python version in the virtual environment to 3.7.9 and install all requirements from the Pipfile.
Pro tip: If you have a requirements.txt file already, use pipenv install -r requirements.txt to install everything from there.
The project directory should look something like this:
├── Pipfile
├── Pipfile.lock
├── db.sqlite3
├── images
│   ├── __init__.py
│   ├── admin.py
│   ├── api
│   ├── apps.py
│   ├── management
│   ├── migrations
│   ├── models.py
│   ├── tests.py
│   └── views.py
├── iotd
│   ├── __init__.py
│   ├── asgi.py
│   ├── settings.py
│   ├── urls.py
│   └── wsgi.py
├── manage.py
├── media
└── static
    ├── admin
    └── rest_framework
In a terminal, run pipenv shell, if you haven’t already, and we’ll make migrations, migrate, and createsuperuser. At this point, our local server should be ready to go!
The createsu command is a django-admin custom command you can find in images/management/commands/createsu.py:
python manage.py makemigrations
python manage.py migrate
python manage.py createsu
python manage.py runserver
Navigate to 127.0.0.1:8000/api/ and you’ll see a page that looks like this:

Click on http://127.0.0.1:8000/api/images/ to go to the image page of DRF. From here, add an image and give it a name. When it finishes uploading, click on the image link and your image will load from your local filesystem with the URL: http://127.0.0.1:8000/media/<img_name> .
Congratulations! You’ve successfully set up your local environment and are ready to deploy to Beanstalk.
Preparing Beanstalk
Before you can use Beanstalk, you’ll need an AWS account. If you don’t have an account already, create one here.
Downloading the EB CLI
Let’s go back to the terminal window and install the Beanstalk CLI (pipenv install --dev if you cloned the repo). Be sure to run the pipenv shell first:
pipenv install awsebcli --devI’m installing to dev here because we most likely won’t need the CLI on the production server, so it’s best to leave it for development only.
Confirm you have it installed with eb --version.
❯ eb --version
EB CLI 3.19.2 (Python 3.7.9)
Initializing elastic Beanstalk
Since we’re all set up with AWS and Beanstalk CLI, let’s get started!
eb initThis will prompt you to get set up with Beanstalk and configure the default application options.
- Default Region: The default AWS region for beanstalk
- Credentials: Your AWS IAM user creds. Follow this guide to create one if you don’t have them already
- App name: What your application will be named
- Python version: At the time of this writing, you can choose from Python 3.6 and Python 3.7. They are fundamentally different and this tutorial covers 3.7 with Gunicorn.
- CodeCommit: Out of the scope of this tutorial — select no.
- SSH: Select
create_new_keypair. Follow the prompts to create it and remember the name (default isaws-eb). In my opinion, tailing the server logs is the easiest way to figure out deployment problems. - Keypair: You’ll probably want to generate a new keypair, this will be passed as part of your SSH command to log in to the server.
Once you’re done setting this up, you’ll notice a new hidden directory in your project called .elasticbeanstalk.
There is a config.yml file in there and it’s everything you set up saved to your local directory for future use.
Pro tip: If you need to start over with Beanstalk on this project for whatever reason, delete this directory and run eb init again to change any defaults.
Creating the Beanstalk environment
Now that we have an application created on Beanstalk, let’s create our environment:
eb createAgain, you’ll be prompted with questions about what you would like to create.
- Env Name: What your environment will be named.
- DNS CNAME prefix: Leave as the default.
- Load Balancer Type: Choose Application.
- Spot Fleet Requests: Out of scope, select no.
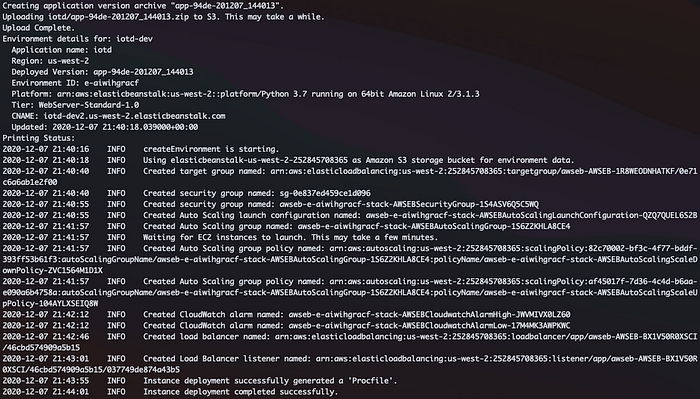
After you finish with the setup, it will begin to create the environment for you and try to deploy it to Beanstalk. This takes a few minutes, but feel free to watch events and see what’s happening under the hood.
Adding .ebextensions
Once the deployment is finished, it should say it was successful. However, if you run eb open , you’ll get a 502 error when the webpage opens. This can difficult to debug because without a decent amount of digging, there’s no way to see why. Hint: it’s your WSGI path.

To fix this, we’ll create a new directory called .ebextensions. Inside, we create a file called django.config. Make sure you’re in at the project root for these commands.
Note: If you cloned the repo, this file already exists and you just need to uncomment the config settings.
mkdir .ebextensions
touch .ebextensions/django.config
Here’s how our project should look after creating the directory and file:
├── Pipfile
├── Pipfile.lock
├── db.sqlite3
├── .ebextensions
│   ├── django.config
├── images
│   ├── __init__.py
│   ├── admin.py
│   ├── api
│   ├── apps.py
│   ├── management
│   ├── migrations
│   ├── models.py
│   ├── tests.py
│   └── views.py
├── iotd
│   ├── __init__.py
│   ├── asgi.py
│   ├── settings.py
│   ├── urls.py
│   └── wsgi.py
├── manage.py
├── media
└── static
    ├── admin
    └── rest_framework
Inside the django.config file, add the following:
option_settings:
  aws:elasticbeanstalk:application:environment:
    DJANGO_SETTINGS_MODULE: "iotd.settings"
    PYTHONPATH: "/var/app/current:$PYTHONPATH"
  aws:elasticbeanstalk:container:python:
    WSGIPath: "iotd.wsgi:application"
  aws:elasticbeanstalk:environment:process:default:
    HealthCheckPath: "/api"
    MatcherHTTPCode: "200-499"

container_commands:
  01_makemigrations:
    command: "source /var/app/venv/*/bin/activate && python3 manage.py makemigrations --noinput"
    leader_only: true
  02_migrate:
    command: "source /var/app/venv/*/bin/activate && python3 manage.py migrate --noinput"
    leader_only: true
  03_createsu:
    command: "source /var/app/venv/*/bin/activate && python3 manage.py createsu"
  04_collectstatic:
    command: "source /var/app/venv/*/bin/activate && python3 manage.py collectstatic --noinput"
    leader_only: true
There’s a lot going on here, but this config file has all the commands to get set up on the server and have your Django app running properly, including setting up your WSGI path.
My first time deploying to Elastic Beanstalk with Amazon Linux 2 was challenging because of these config settings. At the time of writing, it’s not documented that you need to run the migration commands after manually activating the virtual environment (see docs here). They tell you to run django-admin.py migrate, which was throwing all sorts of errors for me and it was difficult to figure out what was wrong.
After some trial and error, I discovered the virtual environment on the application server is located at /var/app/venv/. So in the config commands, I first source (activate) the virtualenv and then run my migration commands as normal.
### To run a command during deployment
source /var/app/venv/*/bin/activate && python manage.py migrate
Another “gotcha” I discovered when making my first Beanstalk environment is you need to have all the files you want to be deployed to the app server committed to git. For example, if you don’t commit the .ebextensions directory, it doesn’t get added as a file in deployment and none of the commands inside will run. The same is true for your Pipfile and anything else Beanstalk needs to set up your app.
SSH Into the Server
Let’s SSH into the server and watch our custom commands output as the app deploys. (This is optional but helpful for debugging if your deployment is having issues).
Grab your EC2 instance public IP
The new keypair you created with eb init earlier should be stored in your ~/.ssh directory. With that in mind, navigate to your AWS EC2 instances and find the Public IPv4 address with the instance that was created. If you don’t see your instance, check your region!
If you aren’t sure which instance it is, check the tags on your instances to find the one that corresponds with your Beanstalk name.

Copy the address and run:
ssh -i ~/.ssh/<keypair_name> ec2-user@<public_ipv4_address>
## Example
ssh -i ~/.ssh/aws-eb ec2-user@34.216.119.130
Type yes to add the host to your known hosts. We’re in!
Now to check the log files. You can accomplish something similar by downloading the logs from the Beanstalk console, but it was annoying to me and took too many extra steps. Here, we’re going to tail the log files as they populate and see if we run into issues in real-time.
Checking the log files
Navigate to the log directory with cd /var/log/:
[ec2-user@ip-172-31-21-105 ~]$ cd /var/log/In this directory, if you ls you’ll see a whole bunch of log files to check out. In my experience with Beanstalk, there are three that are the most informative about deployment issues:
eb-engine.log
cfn-init.log
cfn-init-cmd.log
When I have an issue on deployment, I check the logs in this order and have been able to pinpoint the problem exactly. For this example, let’s tail the most granular log and see the output as it deploys:
tail -n 100 -f cfn-init-cmd.logThe -f in this command means follow, so you will be able to see the logs as they are updated. Leave this here for now, we’ll come back to it.
Add Your .ebextensions Directory and Deploy
In a separate terminal window, navigate back to the iotd project root and add everything to git (including db.sqlite3). Note: you don’t have to push anything up, you only need to commit the files that you want deployed.
git add .
git commit -m "adding .ebextension config file"
Once your changes are committed, it’s time to deploy again — this time, we’ll watch the logs to see what happens. Make sure to run pipenv shell before running any commands.
Pro Tip: If you’re serious you can open three terminal windows and watch all three log files at once.
eb deployIf all goes well, as the deployment runs you should see outputs that look something like this:
 Command 01_makemigrations
 -----------------------Command Output-----------------------
  Migrations for 'images':
    images/migrations/0002_auto_20201125_0049.py
      - Alter field image on image
 ------------------------------------------------------------
 Completed successfully.
Now if you go back to your project root folder and run eb open again, you should land on a page that looks like this:

Progress! This is much better than the 502 error we had before. To fix this, go to the iotd/settings.py file and add your beanstalk URL to the ALLOWED_HOSTS setting. Commit your changes to git and run eb deploy again.
Hint: Find your beanstalk URL with eb status, look for CNAME.
Run eb open and add “/api/” to the end of your URL. This time, success! Except…

There’s no styling! This is because, even though we ran collectstatic in the deploy, we haven’t configured production static and media settings, so Django doesn’t know where to find the static files.
Conclusion
We’ve covered a good amount here, and you should be more familiar with the deployment process and debugging in Elastic Beanstalk.
We will continue from here in part 2 and go over production static and media storage with S3!

