Phoenix 1.6 With TypeScript and React
Elixir, Phoenix, TypeScript, and React — the 2022 edition
This is the 2022 update to my earlier article on building up a modern Web application stack.
The code is also up on Github: aisrael/elixir-phoenix-typescript-react.
The release of Phoenix 1.6 brings with it a couple of notable improvements, such as HEEx templating. To me, though, the most remarkable thing that improves developer experience was dropping webpack in favor of esbuild.
Not only does esbuild promise faster build times, it supports TypeScript out of the box, and adding React is also so much easier!
The entire process has become so streamlined that in this article we can skip entire sections from its predecessors.
With that out of way, let’s go ahead and create a new project using Elixir and Phoenix 1.6 with TypeScript and React.
Prerequisites
This guide will require you to have the following, with indicated versions as of this writing:
On macOS, the easiest way to get started is to install Homebrew, then use Homebrew to install Node, Git, Docker, and asdf.
$ brew install node git homebrew/cask/docker asdfWe can then use asdf to install both Erlang and Elixir:
$ asdf plugin add erlang
$ asdf install erlang 24.2
$ asdf global erlang 24.2$ asdf plugin add elixir
$ asdf install elixir 1.13.1
$ asdf global elixir 1.13.1
Phoenix
For those already familiar with Elixir and Phoenix, you may wish to skip ahead straight to integrating TypeScript and React with Phoenix 1.6.
If you haven’t already done so, let’s install Phoenix following the Phoenix installation instructions.
First we’ll want to get the Hex package manager:
$ mix local.hex
Are you sure you want to install "https://repo.hex.pm/installs/1.13.1/hex-1.0.1.ez"? [Yn]
Then install the Phoenix application generator:
$ mix archive.install hex phx_new
Resolving Hex dependencies...
Dependency resolution completed:
New:
phx_new 1.6.5
* Getting phx_new (Hex package)
All dependencies are up to date
Compiling 11 files (.ex)
Generated phx_new app
Generated archive "phx_new-1.6.5.ez" with MIX_ENV=prod
Are you sure you want to install "phx_new-1.6.5.ez"? [Yn]
You can check if Phoenix installation went well using mix phx.new --version:
$ mix phx.new --version
Phoenix installer v1.6.5
Generate the Phoenix app
$ mix phx.new hello --umbrellaThis will generate a Phoenix umbrella project named hello_umbrella in the current directory, with the following directory structure:
.
├── apps
│   ├── hello
│   └── hello_web
└── config
The two Elixir apps are /apps/hello (the domain model) and /apps/hello_web (the Web application).
Each app will have its own dependency configuration, though the entire umbrella project will have a shared dependency library (in /deps) for all apps.
All child apps will also share the same root configuration in the /config folder.
We start with an umbrella project because it helps organise code as the application grows in size and complexity. I’ve also found that it’s easier to refactor an umbrella project down to a single app project than it is to go the other way around.
If you think you only need a single app project, simply use mix phx.new hello (without the --umbrella option).
PostgreSQL, MySQL, or None
Phoenix by default uses Postgres for its database.
If you want to use MySQL rather than Postgres, then you’ll need to generate your Phoenix app using
mix phx.new hello_react --umbrella --database mysqlIf you won’t be needing a database or only wish to follow along without one, then create your Phoenix app using
mix phx.new hello_react --umbrella --no-ectoThe rest of this guide, however, assumes the default which is Postgres.
Git
At this point, we should start using Git to track our changes. If you don’t need to use Git, feel free to skip to the next section.
$ cd hello_umbrella~/hello_umbrella$ git init
Initialized empty Git repository in /Users/aisrael/hello_umbrella/.git/~/hello_umbrella$ git add -A
~/hello_umbrella$ git commit -m "mix phx.new hello --umbrella"
Docker Compose
We’ll be needing a PostgreSQL server to run our Phoenix app. For local development and testing purposes I’ve found that using Docker, or specifically, Docker Compose makes dealing with service dependencies a breeze.
Create the following docker-compose.yml file in the project root:
version: "3"
services:
  postgres:
    image: postgres:14.1
    ports:
      - 5432:5432
    environment:
      POSTGRES_USER: postgres
      POSTGRES_PASSWORD: postgres
      POSTGRES_DB: hello_dev
Note that we configure PostgreSQL (using the POSTRES_* environment variables) to work with the generated Phoenix app defaults.
Then, to run Postgres in the background you only need to go:
$ docker compose up -d
[+] Running 2/2
⠿ Network hello_umbrella_default             Created
⠿ Container hello_umbrella_postgres_1        Started
For other Docker Compose commands please just visit https://docs.docker.com/compose/reference/
If you can’t or don’t want to use Docker & Docker Compose, you’ll have to install PostgreSQL by hand on your local workstation. Make sure to configure it with the same defaults generated by mix phx.new, or, modify the respective config.exs files with the appropriate configuration.
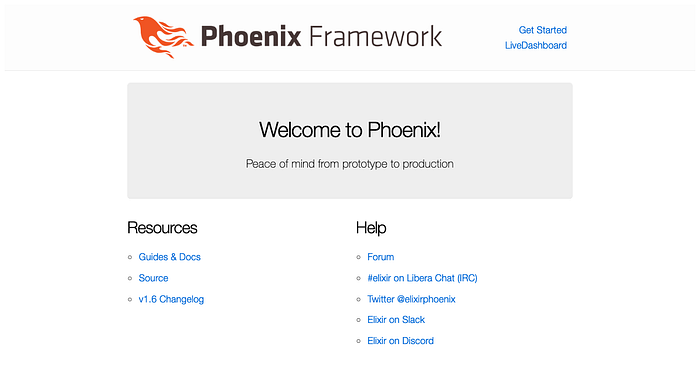
Welcome to Phoenix!
At this point we should be able to run our Phoenix application. From the project root (you may wish to run this in a new terminal window or tab), just go:
~/hello_umbrella$ mix phx.server(If you get a prompt asking if you want to install rebar3, just go ahead and say yes.)
Now if we visit http://localhost:4000 we should be able to see the familiar “Welcome to Phoenix!” page:
TypeScript in Phoenix 1.6
The best thing about Phoenix 1.6 is that it ditched webpack in favor of esbuild.
Not only does this promise shorter build times, esbuild supports TypeScript out of the box!— no further tooling or configuration required!
Welcome to Phoenix with TypeScript
To demonstate TypeScript in action, let’s create a new TypeScript module apps/hello_web/assets/js/greeter.ts:
function greet(name: string): string {
  return "Welcome to " + name + " with TypeScript!";
}export default greet;
Then, in apps/hello_web/assets/js/app.js, add the following lines toward the end:
import greet from "./greeter";document.querySelector("section.phx-hero h1").innerHTML = greet("Phoenix");
Refresh the page at localhost:4000 and you should now see it say “Welcome to Phoenix with TypeScript!”:

That’s it! No need for npm or fiddling with tsconfig.json and webpack.config.js!
React
Now we can add React into the mix. For this, we’ll now need npm to fetch and install the necessary packages.
First, make sure we’re in the apps/hello_web/assets directory:
~/hello_umbrella$ cd apps/hello_web/assetsFrom there, we’ll issue:
npm install --save react react-dom
npm install --save-dev @types/react @types/react-dom
Our First Component
Let’s rename greeter.ts to greeter.tsx (similar to how you would rename a regular .js file to .jsx).
Then, replace the contents of greeter.tsx with a Greeter React component:
import React from "react";interface GreeterProps {
    name: string;
}const Greeter: React.FC<GreeterProps> = (props: GreeterProps) => {
    const name = props.name;
    return (
        <section className="phx-hero">
          <h1>Welcome to {name} with TypeScript and React!</h1>
          <p>Peace-of-mind from prototype to production</p>
        </section>
    );
};export default Greeter;
Welcome to Phoenix with TypeScript and React
Next, edit the file apps/hello_web/lib/hello_web/templates/page/index.html.heex and replace the entire section that goes:
<section class="phx-hero">
  <h1><%= gettext "Welcome to %{name}!", name: "Phoenix" %></h1>
  <p>Peace of mind from prototype to production</p>
</section>
With just
<div id="greeting"/>Now, we’ll need to rename apps/hello_web/assets/js/app.js to app.jsx, and replace the last two lines we added earlier with:
import React from "react";
import ReactDOM from "react-dom";import Greeter from "./greeter";const greeting = document.getElementById("greeting");
ReactDOM.render(<Greeter name="Phoenix" />, greeting);
(We need to rename it from .js to .jsx to avoid a syntax error in the last line.)
Finally, we’ll need to edit config/config.exs to tell esbuild to look for app.jsx instead of app.js. Look for the section starting with # Configure esbuild and replace the line that goes
~w(js/app.js --bundle --target=es2017 --outdir=../priv/static/assets --external:/fonts/* --external:/images/*),with
~w(js/app.jsx --bundle --target=es2017 --outdir=../priv/static/assets --external:/fonts/* --external:/images/*)At this point, we might have to restart our Phoenix server (press Ctrl+C then (a)bort) and restart it again with mix phx.server.
When we reload http://localhost:4000, we should then be greeted with:
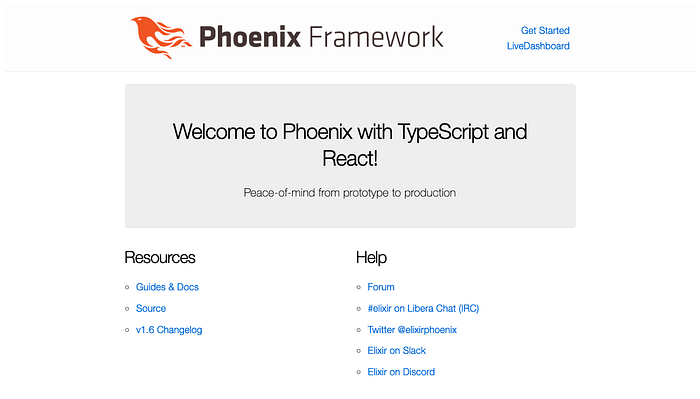
Voila!
I think that Phoenix 1.6 with esbuild provides one the best developer experiences I’ve ever encountered lately in setting up one of the most modern and productive Web app stacks around, and I hope this article has convinced you of how easy it is, especially compared to before.
Now get out there and build your next unicorn Web app!