Managing Jetpack Compose UI State With Sealed Classes
Use Sealed Classes to handle possible states of composable views
Updating the UI to conform to a given state is a regular task for most Android developers. One of the most common efforts is transitioning between loading, error, and success states coming from an API request.
Managing UI state in the XML View System is a pretty standard process usually composed of setting the view's properties to reflect the current state and hiding/showing views according to necessity. For example, hiding the loading view, showing the content view, and populating it with the desired content. There's not much to talk about this process except for its major flaw: human error.
In your career as an Android Developer, you have probably stared at a ViewBinding based screen for several minutes (or even hours for really complex layouts) trying to understand why your UI is not updating correctly, to after some time discover that you forgot a myView.visibility = View.GONE , this is a widespread mistake caused by the manual effort to update your views for every possible state.
State and recomposition
Jetpack Compose is designed to enable the creation of actual reactive screens through the usage of the State class, changing the value of a State triggers the recomposition of Composable functions that depends on this same state, in other words, if our State object holds a String value a new composition will be triggered every time it changes, providing the updated String value without the need of manual set methods. The same is valid for every combination State<T> so if our UI state is held within a state object we can automatically update the UI for every state change.
But enough talking, let's do some real code.
Designing our UI State
First, let's create a sealed class responsible for describing the possible states of our screen, this particular use case requires 3 different cases: loading, error, and ready.
Notice that in this scenario the only state that contains any data is Success , this is because our use case doesn't need any additional information for loading or error states.
Handling state changes
Our use case follows the MVVM pattern so our screen's current state will be stored in a ViewModel.
A privateMutableStateFlow will be used to hold the UI state, a public StateFlow to propagate this information for our Compose view, and a mocked implementation using a delay to simulate the loading state caused by the async request.
Since we know that an API request will be launched as soon as the ViewModel is instantiated, we can safely assume the starting state of our screen is loading.
Reacting to state changes
With the AlbumState setup ready, we'll move to the UI and make it react and recompose according to the current state stored in the ViewModel.
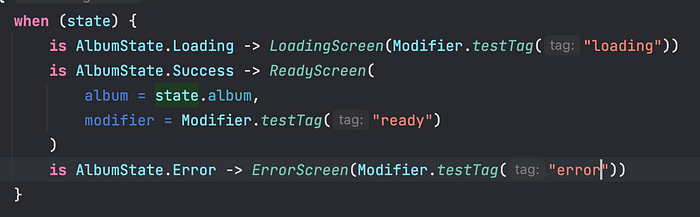
This layout is composed of two different Composable functions, AlbumScreen which contains the injected ViewModel, and its stateless companion Content, responsible for the layout configuration.
Content contains a default Material Design Scaffold containing a TopBar and a when case, being the last one responsible for informing what should be displayed for every AlbumState. When running the app we can see that our behavior is working as expected.

Previewing multiple states
Previews can be used to help developers to see a visual representation of the Compose UI being written.
To avoid relaunching the app to see the visual result of every state we can use a Preview annotated function alongside a PreviewParameter provider to render a unique preview for all of our states.
By doing that we can assert two things: the layout of each screen is correctly designed, and the fact that all the possible states are mutually exclusive.
Declaring a PreviewParameterProvider<T> allows the usage of this provider in Preview annotated functions, the way it works is that a new preview will be generated for every value contained in the values sequence.
Now at the design tab, we can see the other previews generated for each state:
Unit Testing UI State
The screen state is now stored at the ViewModel so it's interesting to write unit tests to guarantee that the states are being updated correctly. Since the UI's state is a StateFlow, we can use the Turbine library to make it easier to collect every value of our flow easily.
Tests below were written with Kotlin coroutines version 1.6.1. Test API might change according to the version you are using.
UI State Instrumentation Tests
Instrumented tests are very useful to guarantee that composables are displaying the correct layout for a given state. These tests can be written with the compose standard library for UI tests.
In this case for each of the states, a different composable will be used, so it's possible to add a test tag to be used in our test. The test tags will serve as identifiers for our test, so we can assert which component is being shown on the screen.
When should you use sealed classes for UI State?
Sealed states are very useful when the UI has a set of mutually exclusive layouts. This approach (if implemented correctly) guarantees that only one screen state is visible at any given time, avoiding possible bugs caused by multiple states being rendered at the same time.
When not to use sealed classes for UI State
When the UI doesn't need to have mutually exclusive layouts the usage of sealed classes to handle state may not be useful at all, sometimes, being even a problem that only causes an increase in state management complexity. For these cases prefer using a single data class containing the information you need.
A full sample code is available here:

