How to Create Wobble Animations Using UIKit
Making components come alive in your iOS applications
In this article, I’m going to share a bit about my experience while making micro-interactions on simple components like buttons and UICollectionView cells.
These micro-interactions, implemented in our Macro Challenge app — OTIN was initially a challenge for the design team, and our tech team built it.
Keywords:
- UIView Animate
CGAffineTransformCAKeyFrameAnimation
What are micro-interactions?
Micro-interactions are small but functional animations that give feedback to the user about the current state or conditions of a component inside a user interface. Things like loading animations and button shrink on presses can be considered micro-interactions.
Take a look at some micro interactions examples below:

This is a default editing mode animation that is triggered when tableView.isEditing is set to true. The animation that shrinks the left and right parts of the cell gives a sense that there is something to interact with on both sides of the cell — namely deleting and reordering in our case.
The wobble animation below is inspired by the default iOS / iPadOS animation when the home screen is in edit mode.

Enough with the definitions, let’s see some more examples and how to make them.
Animating UITableView Editing mode
To create editing mode animations like the first example above, there’s no animation code whatsoever actually. It’s the default state of the UITableView. You just need to implement the delegate based on your needs.
Create a button that handles the editing state toggle:
@objc private func editButtonAction() {
    tableView.setEditing(!tableView.isEditing, animated: true)
    // You can also use the .toggle() function
}
By implementing the delegate, UITableView will automatically invoke the appropriate editing mode which is active.
You can also explore animations for each cell, when deleting through tableView.deleteRows(...) and when inserting through tableView.insertRows(...):
extension ParentRoutineViewController: UITableViewDelegate, UITableViewDataSource {
		...
    // Defines the editing style for each cell
    func tableView(_ tableView: UITableView, editingStyleForRowAt indexPath: IndexPath) -> UITableViewCell.EditingStyle {
        guard tableView.isEditing else { return .none }
        return .delete
    }

    func tableView(_ tableView: UITableView, commit editingStyle: UITableViewCell.EditingStyle, forRowAt indexPath: IndexPath) {

        if editingStyle == .delete {
            // What happens after clicking delete?
	    tableView.deleteRows(at: [indexPath], with: .left)
        }
    }
}

extension ParentRoutineViewController: UITableViewDragDelegate {
  func tableView(_ tableView: UITableView, itemsForBeginning session: UIDragSession, at indexPath: IndexPath) -> [UIDragItem] {
        // What to do on drag?
    }

    func tableView(_ tableView: UITableView, moveRowAt sourceIndexPath: IndexPath, to destinationIndexPath: IndexPath) {
        // What to do after dropping?
    }
}
Animating UICollectionViewCell
To create wobble animations on UICollectionViewCell, we can use CAKeyframeAnimation, since we want to control how far the transformation will occur on each animation movement.
// Create wobble animation
let wobble = CAKeyframeAnimation(keyPath: "transform.rotation")
wobble.values = [0.0, -0.025, 0.0, 0.025, 0.0]
wobble.keyTimes = [0.0, 0.25, 0.5, 0.75, 1.0]
wobble.duration = 0.4
wobble.isAdditive = true
wobble.repeatCount = Float.greatestFiniteMagnitude
// Add wobble animation to each collection view cell
collectionView.indexPathsForVisibleItems.forEach { (indexPath) in
let cell = parentActivityListDetailView.collectionView.cellForItem(at: indexPath) as! CustomCollectionViewCell
cell.layer.add(wobble, forKey: "wobble")
}Don’t forget to remove the animations when you are done editing:
collectionView.indexPathsForVisibleItems.forEach { (indexPath) in
    let cell = parentActivityListDetailView.collectionView.cellForItem(at: indexPath) as! CustomCollectionViewCell
    cell.layer.removeAllAnimations()
}
Animating UIButtons — Shrink and Grow
Buttons are one of the most common components to be animated, especially when adopting gamification. In this example, let’s take a look at shrink and grow animations on a UIButton.

You have to create a button first. You can create it through a storyboard using @IBOutlet or create it programmatically. Here I’ve created a standard UIButton named button.
We use CGAffineTransform because it is commonly used for scaling and translation. Use the scaleX and y parameters for scale manipulation, and use the translationX and y for translation manipulation.
button.addTarget(self, action: #selector(animateUp), for: .touchUpOutside)
button.addTarget(self, action: #selector(animateUp), for: .touchUpInside)
button.addTarget(self, action: #selector(animateDown), for: .touchDown)
// Set the default state with 1.0 scale on the up state
@objc func animateUp(_ sender: UIButton) {
UIView.animate(withDuration: 0.1, animations: {
button.transform = CGAffineTransform(sscaleX: 1.0, y: 1.0)
}, completion: { _ in
// Completion Handler
})
}
// Scale down to 0.9 when on click
@objc func animateDown(_ sender: UIButton) {
UIView.animate(withDuration: 0.1, animations: {
button.transform = CGAffineTransform(scaleX: 0.9, y: 0.9)
}, completion: { _ in
// Completion Handler
})
}Animating UIView — PIN Input
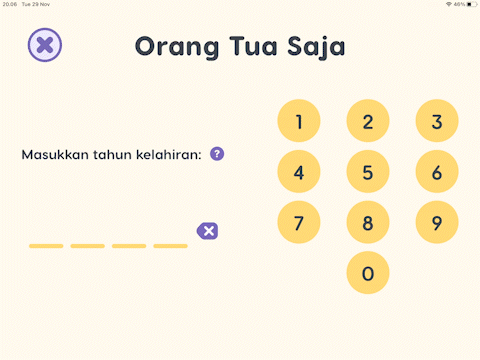
PIN Pad
The pin pad in this project is actually an UICollectionView. So to mimic UIButton states like .touchDown, .touchUpInside, and .touchUpOutside, we have to use some of the protocol stubs of the collection view itself. Check the code below for details.
extension ChildPinUnlockViewController: UICollectionViewDelegate {

    // touchUpOutside
    public func collectionView(_ collectionView: UICollectionView, didUnhighlightItemAt indexPath: IndexPath) {
        let cell = collectionView.cellForItem(at: indexPath) ?? UICollectionViewCell()
        UIView.animate(withDuration: 0.05, animations: {
            button.transform = CGAffineTransform(scaleX: 1.0, y: 1.0)
        }, completion: { _ in
          // Completion Handler
        })

    }

    // touchDown
    public func collectionView(_ collectionView: UICollectionView, didHighlightItemAt indexPath: IndexPath) {
        let cell = collectionView.cellForItem(at: indexPath) ?? UICollectionViewCell()
        UIView.animate(withDuration: 0.05, animations: {
            button.transform = CGAffineTransform(scaleX: 0.9, y: 0.9)
        }, completion: { _ in
          // Completion Handler
        })
    }

    // touchUpInside
    func collectionView(_ collectionView: UICollectionView, didSelectItemAt indexPath: IndexPath) {
        let cell = collectionView.cellForItem(at: indexPath) ?? UICollectionViewCell()
        UIView.animate(withDuration: 0.05, animations: {
            button.transform = CGAffineTransform(scaleX: 1.0, y: 1.0)
        }, completion: { _ in
          // Completion Handler
        })
    }

}
When the PIN is wrong, we want to shake the PIN input field left and right like on the iOS lock screen. To achieve that, we want to specify the keyframe translation, which we have to use CAKeyframeAnimation
let shake = CAKeyframeAnimation(keyPath: "transform.translation.x")
shake.values = [0, 20, -20, 0]
shake.duration = 0.25
shake.repeatCount = 1
pinStackView.layer.add(shake, forKey: "shake")
That’s all. Thanks for reading.
Our Otin app help parents with Autism Spectrum Disorder (ASD) children in Indonesia to maintain their children's routines and consistency to improve self-independence.
