Angular
Introduction to Angular Template-Driven Forms
Explore Angular Template-driven forms by building a simple form step by step
Angular offers two main approaches to handling user input through forms: reactive and template-driven. Both approaches build on top of a common Forms API.

In this post, I will build a form following the template-driven approach.
You can find the same form using the reactive approach in Intro To Angular Reactive Forms.
Overview of Template-Driven Approach
According to the documentation,
template-driven forms “rely on directives in the template to create and manipulate the underlying object model. […].
They’re straightforward to add to an app, but they don’t scale as well as reactive forms.
If you have very basic form requirements and logic that can be managed solely in the template, template-driven forms could be a good fit”.
While building the form, I will loosely follow building a template-driven form. However, I will simplify some aspects and leave out most of the styling.
FormsModule & Two Directives
First of all, we need to remember to import FormsModule because it “exports the required providers and directives for template-driven forms.”
Therefore, we import FormsModule in app.module.ts.
import { FormsModule } from '@angular/forms';and declare it in the imports in @NgModule.
imports: [BrowserModule, FormsModule],This is important because both NgModel and NgForm directives, which we will see in a moment, are exported from FormsModule.
Second, we need to remember two directives while using template-driven forms:
NgModelallows two-way data binding. “Template-driven forms use two-way data binding to update the data model in the component as changes are made in the template and vice versa”.NgFormtracks “aggregated form value and validation status. As soon as you importFormsModule, this directive becomes active by default on all<form>tags”.
We will start by building an element to collect users' inputs using NgModel.
Building a Form Element
In theory, we could start from either the class or the template.
However, “In template-driven forms, the form model is implicit, rather than explicit. The directive NgModel creates and manages a FormControl instance for a given form element.”
In template-driven forms, it is more natural to start from the template and I will follow this approach.
A Generic Form Element
A generic form element in Angular forms may look like the following:
This is pretty much plain HTML, except for line 7 where [(ngModel)]="email" introduces the first directive mentioned above, ngModel, to add two-way data binding.
The ngModel directive binds the input controls to the corresponding emailproperty with two-way data binding to update the data model in the component.
Notice the for attribute of the label and the id attribute of the input does not impact the element, however, linking the label to the control improves accessibility.
Since we don’t have a property called email, we need to create it in template-form.component.ts.
import { Component, OnInit } from '@angular/core';@Component({...})
export class TemplateFormComponent {  email: string | undefined;}
Once the property is in place, the value of email is updated when changes are made in the template through the input element, or in the component class programmatically.
Side note: The nameattribute is not necessary if you are using two-way data binding outside a formelement, but it is necessary for template-driven forms, i.e., inside the formtag.
Does it mean that our element is not a form?
Well, yes and no.
If you have a very simple “form,” say an input field to collect users’ emails, that’s it! You can add a button to trigger a click event, stop here, and be happy!
You could also add some more elements using the same pattern. It would work just fine!
However, since those elements are independent of each other, we don’t really have a form. It is a bunch of elements that behave like a form.
As a consequence, you might end up in a situation where you need to check the validity of each element, say required, to activate the submit button.
Let’s take a step further in that direction.
From One Element To A Form
Starting from the generic element above, we can create the following form:
Most of the elements are similar to the generic building block we saw above.
They are wrapped in a regular HTML form entity. However, since we imported FormsModule in app.module.ts, form creates a new NgForm instance under the hood.
For the moment, we don’t care about that. But notice the form tag with an event listener.
<form (ngSubmit)="onSubmit()">Now, the form listen for the “ngSubmit” event. The “ngSubmit” event is triggered by the button of type submit.
In template-form.component.ts, we need to add a property for each form element:
We could also create an object that models the shape of the form, and that would be even better. See Bind input controls to data properties for an example.
Angular Prevents Native DOM Validation
It is worth knowing that, when using the template-driven approach Angular adds the novalidateattribute to the form tag.
From the documentation: “In order to prevent the native DOM form validation UI from interfering with Angular’s form validation, Angular automatically adds the
novalidateattribute on any<form>wheneverFormModuleorReactiveFormModuleare imported into the application”.
So, if you try the code above, you will see that you can submit the form even without filling in the required fields. We see the same behavior using the reactive approach in Intro To Angular Reactive Forms.
However, that makes sense for two reasons:
- The browser’s native form validation is disabled by the default
novalidate - The submit button triggers the ngSubmit” event. However, we didn’t require the form to be valid to be submitted.
ngNativeValidate: browser’s native validation
As a side note, you may want to try out the browser’s native form validation.
You can enable the native validation by adding thengNativeValidateattribute to the form tag.
<form (ngSubmit)="onSubmit()" ngNativeValidate>ThengNativeValidateattribute enables the browser’s native form validation, and you can see an example below.

In the example by MDN, the input element has a required attribute that triggers the browser’s native validation when a user clicks on the Submit button when input has no value.
You might dislike it, but it is a simple working validation and error message.
Back to our form
We are still dealing with a bunch of independent elements.
If we submit our form, we easily get the values of the underlying elements, but not their properties, nor the status of the form as a whole.
If all those elements are minions, you would rather talk with the boss, right?
Use Template Reference
So, the boss of all those minions is the form element. We want to deal with that.
Remember that, since we imported FormsModule, form creates a new NgForm instance behind the scenes.
To get access to the NgForm instance and the form status, we need to use a template reference variable, as we will see in a moment.
Thanks to the template reference variable we will get access to the value and status of the form, “as well as user interaction properties like dirty and touched.”
A few examples:
- if any element in the form is invalid, the form itself will be invalid
- if any element in the form has been
touched, the form will result astouched
In our case, f is the template reference variable. In other words, f represents the form that we created in the template.
#f="ngForm"Thanks to template variables we can use data from the form in another part of the template or we can pass it to the class.
We will follow the latter. So, the form tag becomes
<form (ngSubmit)="onSubmit(f)" #f="ngForm">In so doing, we are passing the value and status of the form to the class on submission.
We need to change the onSubmit method to receive the form. So, the class becomes:
Remember that Angular adds the novalidateattribute to the form tag in the template.
So, again, it is possible to submit the form even without filling in the required fields.
But this time is different because we might want to build on the validation that comes with FormsModule!
Let’s look at the log:
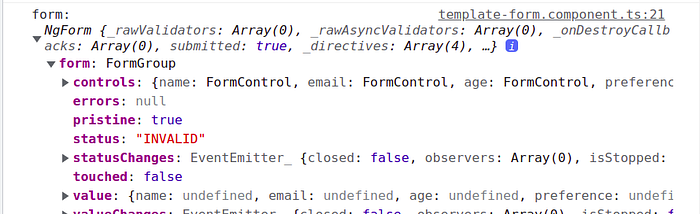
The status of the form is INVALID because some of the required controls are not valid.
A simple way to disable the button if the form status is INVALID is to bind the status of the button to the disabled property of the button.
<button
  type="submit"
  [disabled]="f.status === 'INVALID'"
>
  Submit
</button>
It is worth knowing that since we are using ngModel,
“The NgModel directive […] tracks the state of that control.
It tells you if the user:
- touched the control,
- if the value changed,
- or if the value became invalid.
Angular sets special CSS classes on the control element to reflect the state […]”, angular.io.
Special CSS Classes?
Angular adds and removes classes to the form tag based on the user interaction with the form! So, as reported in the documentation,
- If the control has been visited:
ng-touched, elseng-untouched - If the control’s value has changed:
ng-dirty, elseng-pristine - If the control’s value is valid:
ng-validelseng-invalid
Let’s have a quick example.
Let’s add the following class to template-form.component.css:
// template-form.component.css.ng-invalid {
  border-left: 5px solid #a94442; /* red */
}
In our template, we require the name and the preference.
Therefore, in the beginning, Angular will add the ng-invalid class to both of them and we will see the left border red.
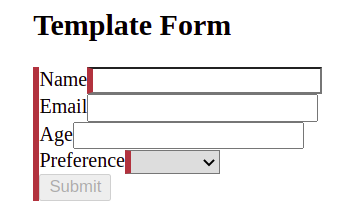
As you can see, the left border of the whole form is also red! And it makes sense because, at this point, the form as a whole is not valid.
As in the docs, we can add the :not(form) CSS pseudo-class to select any element that is not a form.
// template-form.component.css.ng-invalid:not(form) {
  border-left: 5px solid #a94442; /* red */
}
However, the point is that we are now dealing with the form as a whole and Angular supports it by providing default classes that can simplify our job for common validations.
Adding some basic CSS we get:
Feel free to look at the code on GitHub. If you want to improve the CSS, feel free to contribute!
Quick Summary
Angular offers two main approaches to building forms: reactive and template-driven. In this post, we explored the template-driven approach.
Both approaches build on top of a common Forms API.
- Import FormsModule in
app.module.ts - Use
[(ngModel)]=’property’to get two-way data binding <form>tags implementNgFormby default after importingFormsModule- Angular prevents the browser’s native form validation by default
- Use template reference
#f='ngForm'to access theNgForminstance
Feel free to take a look at the code on GitHub, or read about the reactive approach in Intro To Angular Reactive Forms.