Integrating Stripe Payment Gateway to Your Rails API
A hands-on guide on Stripe’s Charge API Integration

Hello, everyone! In this article, I will go through a Payment Gateway Integration in a Rails API using the Stripe API. This will be a single payment approach, like a purchase. I’ve written about a recurring payment approach before. You can check it out here.
Getting Started
Stripe APIs have amazing features for e-commerces and marketplaces. To make our developer’s life easier, they offer SDK for some programming languages, including Ruby.
We will start adding the Stripe SDK Gem to our Gemfile using the following code:
gem 'stripe'Don’t forget to run bundle install in your terminal after that.
Now you will need to create a stripe initializer file in your application. For that, run the command below in your terminal:
touch config/initializers/stripe.rbThen, open the stripe.rb file and write the content below:
Stripe.api_key = Rails.application.credentials.stripe_secret_keyWe didn’t add that Stripe’s Secret Key in our credential file, so let’s do this.
To open your credential file, run the following in your terminal:
EDITOR=nano rails credentials:editGet your Stripe Secret Key here.
Your credential file must look like this:
# aws:
#   access_key_id: 123
#   secret_access_key: 345
# Used as the base secret for all MessageVerifiers in Rails, including the one protecting cookies.secret_key_base: [YOUR SECRET KEY BASE]
stripe_secret_key: [YOUR SECRET KEY HERE]
Note that the secret_key_base is autogenerated; you don’t need to edit.
Order and Payment Logic
This section is about the model’s logic on our side, our API. It will consist of two models: Order and Payment.

Our order model will have a single payment associated with it and will belong to a customer. The payment will be created as a callback when the order is created. Note that we will not store the payment method information (credit card data, for example).
For the customer model, you can associate with your user model or go ahead and create an auth endpoints for them in your API. We will not explore this possibility here because it is not the focus. The customers will be generated via seeds in this tutorial.
Payment method information will be passed as virtual attributes on the create order endpoint.
The Models
Now we will code the Models based on the logic we saw above.
Run the following in your terminal:
rails g model Customer name email stripe_idCustomer attributes:
namewill be a string that represents the name of the customer;emailwill be a string that represents the email of the customer;stripe_idwill be a string that represents a reference to ourCustomerin the Stripe API.
rails g model Order amount_cents:integer payment_method:integer customer:referencesOrder attributes:
amount_centswill be an integer that represents the value of an orderpayment_methodwill be an integer. We will use a rails enum to track the desired values for it (we will use onlycredit_cardin this tutorial, take a look at all available payment methods in Stripe)customerwill be a reference to aCustomerrecord
rails g model Payment order:references stripe_idPayment attributes:
orderwill be a reference to aOrderrecord.stripe_idwill be a string that represents a reference to ourPaymentin the Stripe API.
Now we need to code our models. They should look like this:
Our customer records will never be created without a Stripe ID. Before the validation process, our callback create_on_stripe will be triggered to create a customer on Stripe.
Learn more about Rails enum here.
Our get_token method reach the Stripe API to generate a token to use the credit card to charge the customer. The generated token will be passed on the create_on_stripe method with the other needed parameters.
Setting up Database
We will need a customer record to test the controller, so add the following code in your seeds.rb file:
Customer.create!(name: "Luke Skywalker", email: "luke@test.com")Now run in your terminal:
rails db:create db:migrate db:seedThe Controller
Now working on the controller, we will write only a single create action. A better approach would be an order controller and a payment controller. First, we’d create an order. After that, we’d create a payment in a checkout endpoint. My focus in this tutorial is not the controllers; it is the payment processing and integration with the Stripe API. So the payment params will be passed on at the moment of order creation.
To generate your controller, run the following in your terminal:
rails g controller Api::V1::OrdersAnd add the following code to your routes file.
Rails.application.routes.draw do
  namespace :api do
    namespace :v1 do
      post :orders, to: 'orders#create'
    end
  end
end
Now let’s work on the Orders controller. Here’s the code:
Note that the parameters amount_cents and payment_method are being filled automatically in the controller because, in this tutorial, we are only testing with a credit card as the payment method, and we don’t have a Product model. Imagine that we had a Product model representing what’s being purchased. We could define the price with something like:
Product.find(:id).amount_centsAwesome!! We can test it now.
Testing in an HTTP Client
In the screenshots below, I’m using an HTTP Client called Paw, but you can use your favorite. It will not affect the results.
- Remember to add a Content-Type Header to your request. It must be
application/json. - To test Stripe API, use the test data provided by them.
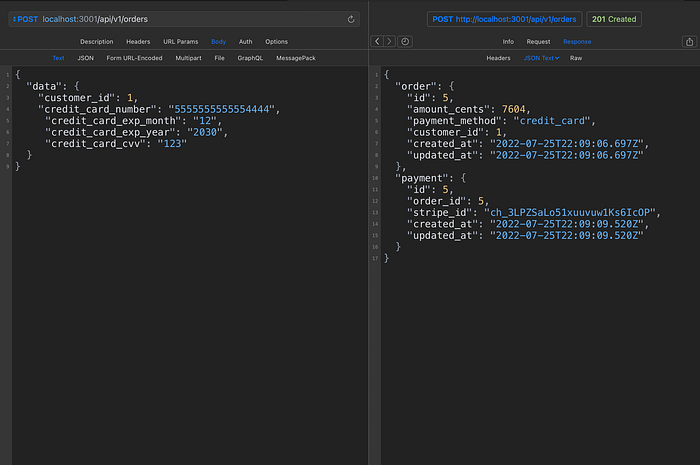
Our endpoint succeed!
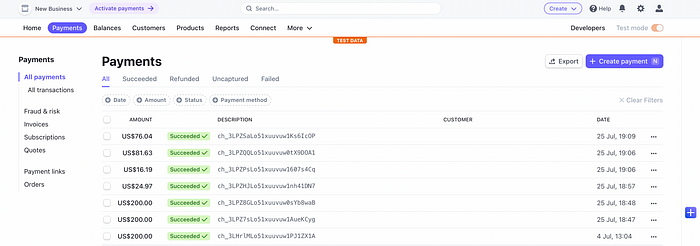
Now you can see the created payment in your Stripe Dashboard.
Stripe Makes the Integration With Their API Pretty Simple and Easy With the SDK.
There are a lot of resources on Stripe API that were not explored during this article.
You can check the complete Stripe Docs here.
Want to Connect?If you have any questions or suggestions, text me on Twitter.

