Integrating Smart Contracts Using Hardhat With NextJS and TypeScript
Blend smart contracts in your frontend
This is part 5 of a series, if you haven’t checked out the previous posts, here are the links for part one, part two, part three, and part four.
So far, we have initialized a NextJS app, added TailwindCSS, integrated Web3 with Ethers.js, and converted to a monorepo with yarn workspaces.
In this post, we will add Hardhat as an additional yarn workspace, and start integrating a smart contract or two into our frontend.
To use smart contracts with our dapp, we’ll be using Hardhat, an excellent framework with a rich plugin ecosystem.
The author of one of the great plugins, hardhat-deploy, has written a great starter template that we will utilize. You can find the template here. We’ll be using a branch I forked, which you can find here.
I went ahead and set this project up as a workspace, as well as changing out some of the example code. We’ll go over that more in a bit.
Let’s start by cloning the workspace branch into our project. There’s certainly an elegant way to do this, but to keep it simple:
git clone --branch as-workspace git@github.com:wk0/template-ethereum-contracts.gitYou’ll then see the template-ethereum-contracts/ folder. Then let’s do a quick manual merge.
- Move the
contracts-tests.ymlto the.github/workflowsfolder - Move the
contractspackage into ourpackages/folder - Delete the
node_modulesand any lock files fromcontracts - Copy the
template-ethereum-contracts/package.jsonscripts to our rootpackage.json - Remove the folder with
rm -r template-ethereum-contracts(may need sudo)
Then just rerun yarn to resolve the dependencies from the new package.
Double-check everything is working by running yarn web and then yarn contracts
If you run into any problems, just delete the internal node_modules of each package, then the root node_modules and any lock files. You may also want to delete the .next folder.
Then run yarn web:test:ci && yarn contracts:test:ci to make sure those both pass. If they do, then our Github actions test should pass as well.
If things are looking good, run yarn contracts:test (Note: not the ci). You should see some failing tests from EnvTest.test.ts
We have a few dependencies we will need for our contracts development flow. Let’s copy the example env and populate those.
cp packages/contracts/.env.example packages/contracts/.envThen register API Keys (don’t worry, they all have free tiers) for:
- Coinmarketcap
- Tenderly
- Etherscan
- Alchemy — Create one for Development with Ethereum on Kovan and one for Production on Mainnet.
For the mnemonic, run npx mnemonics (you can also use this to import via Metamask).
I recommend generating a new mnemonic, even if you already have one for security reasons. You don’t want to accidentally leak it in your repo. The .env also supports separate Mnemonics for different chains/networks.
Alright, so now we have a pretty decent workspace setup. Let’s start utilizing some of the benefits of having both parts of our project together.
yarn add -W concurrentlyConcurrently will let us run our yarn commands concurrently — which will end up being pretty useful.
Let’s also use it within our scripts to launch the full dapp:
"scripts": {
    "dev": "concurrently --kill-others-on-fail \"yarn contracts\"  \"yarn web\"",
    ...
},
Cool, now its super easy to quickly develop against.
One great thing about this setup is the hardhat network — we can switch over in our dapp frontend to have a low-stakes environment to experiment with.
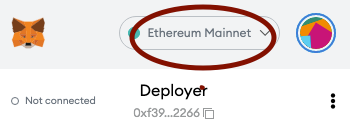
When you run yarn dev you’ll notice hardhat has generated a list of 20 public & private key pairs. You can access these by opening your Metamask, clicking the circle in the top right, and importing an account. Paste the private key from account #0.

If you click the three dots on account once selected, you can rename it in account details. I called it Deployer, as thats what we named account 0 in our hardhat.config.ts
Also repeat this for account #1, the Beneficiary.
After you’ve added the two accounts to your Metamask, verify the local network is still running in your terminal, and click the Ethereum network dropdown within Metamask.
Click this, and then select Add Network.
Fill out the network info like this:

And you can now select Hardhat within your Metamask. You should see you have a very large amount of ETH, somewhere around 10,000. Make sure your local hardhat node is still running, otherwise you’ll get an error and won’t be able to add the network.
Cool, now let’s utilize it in our web app.
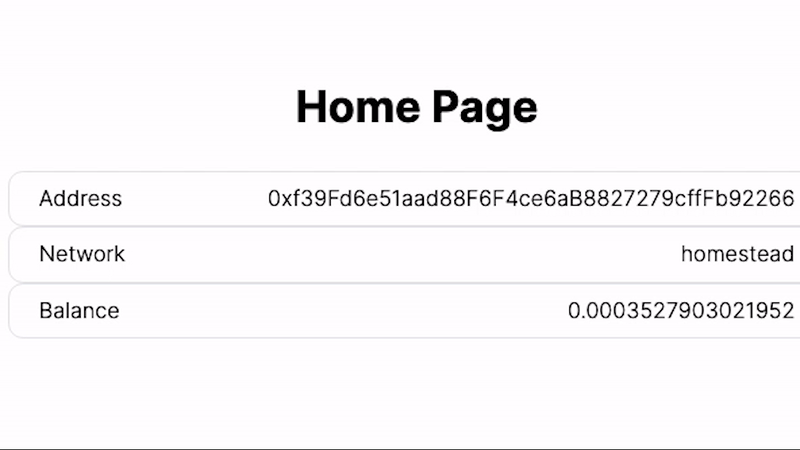
There isn’t too much to be done to support multiple networks until we get the contracts involved, but we can at least get a better idea of the state by adding a couple more info rows.
Create two more components, Web3Balance.tsx & Web3Network.tsx in our components/ folder.
And then update our index.tsx to utilize the new components:
Great — you should now be able to switch through networks via Metamask. You should see something like this:
Leave a comment if you would like more explanation around the contracts template and I’ll work on a supplemental article. Up next, we’ll actually put our contracts to use within our dapp.
Thanks for reading!
Check out the repo here: https://github.com/wk0/boilerplate-next/tree/tailwind
Want to Connect?Check out my website: https://wk0.dev