Implementing Snowflake Algorithm in Golang
Snowflake in action
The background of the snowflake algorithm is, of course, the demand for unique ID generation in the high concurrency environment of Twitter.
Thanks to Twitter’s internal technology, the snowflake algorithm can be spread and widely used today because it has several characteristics.
- It can satisfy the non-repetitive ID in the high concurrent distributed system environment.
- High production efficiency.
- Based on timestamps, ordered increments are guaranteed.
- No dependencies on third-party libraries or middleware.
- The generated id is sequential and unique.
Snowflake Algorithm Principle
Let’s take a look at a picture.

We can see from the figure that the SnowFlake ID structure is a 64bit int data.
- 1bt.
In binary, the highest bit is 1. Because the ids we use should be integers, there are negative numbers, so the highest bit here should be 0.
- 41bit: timestamp.
41 bits can represent ²⁴¹-1 numbers. If it is only used to represent positive integers, the range of values that can be represented is 0 — (²⁴¹ -1). The reason for subtracting one here is because the range of values is from 0to start counting, not from 1.
The unit here is milliseconds, so 41 bits can represent ²⁴¹-1 milliseconds, which translates to unit years as (²⁴¹-1)/(1000 * 60 * 60 * 24 * 365) = 69.
- 10bit: working machine ID.
Here is the id used to record the worker machine. ²¹⁰=1024 means that the current rule allows the maximum number of distributed nodes to be 1024 nodes. This includes the five-digit WorkerID and the five-digit data center, which can be indistinguishable here, but the code below makes a distinction.
- 12bit: sequence number.
Used to record different ids generated within the same millisecond. The largest positive integer that 12bit can represent is ²¹²-1=4095, that is, 4095 numbers 0, 1, 2, 3, … 4094 . This can be used to indicate that the same machine is generated within the same timestamp (milliseconds). 4095 ID sequence numbers.
The principle is the above. There is no difficulty. Let’s see how the code is implemented.
Go Implements the Snowflake Algorithm
1. Define basic constants
2. Define worker nodes
Because this is an ID generation algorithm used in a distributed environment, we must abstract the node parameters if we want to generate multiple workers.
Code explanation:
mu sync.Mutex: add mutex to ensure concurrency safety.LastStamp int64: Record the timestamp of the last ID generation.WorkerID int64: The ID of the worker node, which has a meaning for the 5bit WorkerID in the above figure.DataCenterID int64: The data center ID of the node.Sequence int64: The id sequence number that has been generated in the current millisecond (accumulated from 0) A maximum of 4096 IDs are generated within one millisecond
3. Create a worker object
4. Generate ID
The code is a bit long, so let me explain it in turn:
getMilliSeconds(): A method encapsulated to get the current millisecond value.func(w *Worker) NextID() (uint64, error)
The content of this code has no special effect, mainly for decoupling. The only point to pay attention to is the lock and release steps.
The implementation here is divided into several steps:
- Obtain the current timestamp and make a judgment. Make sure that the current timestamp value is greater than the timestamp of the last ID generation. Otherwise, there will be duplicates.
- If they are equal, first get the id sequence number generated by the current millisecond. You may not understand here. It is equivalent to
if w.sequence++ > maxSequence. - If the id sequence number generated in the current millisecond overflows, you must wait for the next millisecond. If you don’t wait, it will cause many repetitions.
- We set
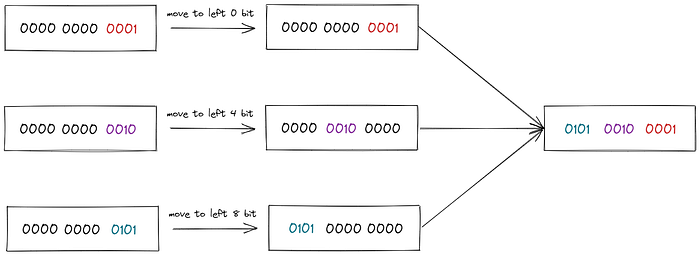
w.sequenceto0in the else, here is an explanation, if the current time is inconsistent with the last time the worker node generated the ID, the sequence number of the worker node’s ID generation needs to be reset. - The last step, which is more important, uses the
ORoperation. The purpose here is to return the bits of each part and integrate them through the bitwiseORoperation (that is, this|).<<This is the function of shifting to the left for homing, and the|operation is for integration.
5. Test
After writing the code, let’s test it. Here I generate IDs with 10,000 goroutines concurrently, store them in the map, and check if there is duplication. Let’s see the code:
Here are the validation results:
All 10000 snowflake ID Get successed!Thank you for reading this article.

