Implementing RabbitMQ With Node.js

This article is the 8th in the article series which will help you grasp different concepts behind Node.js and will empower you to create production ready applications. This article expects the reader to know Babel and how to set it up. Please read this article if you need to know how to set it up.
Using a message queue is a no-brainer if you need to throttle the requests going to your API or workers, or you want things to happen asynchronously. If you still want more reasons, please go through the following article.
Some popular message queues are:
- RabbitMQ
- Kafka
- IBM MQ
- ActiveMQ
- RocketMQ
- Qpid
RabbitMQ is the most popular open source message broker. RabbitMQ is lightweight and easy to deploy. It supports multiple messaging protocols. RabbitMQ has decent performance and a strong community. If your requirement is to process thousands of messages per second, I would suggest you go for something like RabbitMQ.
I have seen people jumping to Kafka without going through their requirement properly. No doubt Kafka gives better performance and features than messaging queues like RabbitMQ, but it is quite complex to set up. The Kafka server uses Zookeeper for cluster membership and routing. Setting up both servers will be unnecessary if the payload isn’t that high.
In this article we will be exploring RabbitMQ and how to use it with node.js/express APIs.
To be honest, the RabbitMQ documentation is so well written, you don’t need anything else. But we need a RabbitMQ tutorial as part of this series. So I will be summarizing the documentation to some extent and see how we can build a REST API to work with RabbitMQ drivers.
A normal work queue setup in RabbitMQ looks like:

There are 3 important parts in the RabbitMQ setup:
- Producer. A program that sends messages is a producer. (Represented by P in the diagram).
- Queue. Messages are stored inside a queue. It’s essentially a large message buffer. A queue is only bound by the host’s memory and disk limits. (Represented by the red rectangular boxes in the diagram).
- Consumer. A consumer is a program that mostly waits to receive messages. (Represented by C1 & C2 in the diagram).
There can be multiple producers and consumers to a queue. But in normal use cases, we don’t need multiple producers, as putting messages into a queue is quite simple and fast. But consuming a message from the queue and performing a task based on the message normally takes time. Thus we tend to implement multiple consumers for a queue, so that when a consumer is busy, the other consumer can read from the queue and perform the task.
Doing a task can take a few seconds. You may wonder what happens if one of the consumers starts a long task and dies with it only partly done. In this case, if the worker crashes, we will lose the message it was just processing. In order to make sure a message is never lost, RabbitMQ supports message acknowledgments.
An ack(nowledgement) is sent back by the consumer to tell RabbitMQ that a particular message has been received, processed, and that RabbitMQ is free to delete it. RabbitMQ will understand that a message wasn’t processed fully and will re-queue it. If there are other consumers online at the same time, it will then quickly redeliver it to another consumer.
But what if the RabbitMQ server crashes ? Will the messages in the queue get lost?
By default, yes. But there are steps to ensure your queue and messages are persistent to your disk. So that, in the case of a server crash, you can restart your server and process the messages.
First, we have to ensure our queue is declared as durable. We can either do that in RabbitMQ admin console, or through code. Then we should ensure the messages in the queue are persistent by setting the persistent field as true.
We will check both of them when we code.
We can have a RabbitMQ setup on our local machine by installing RabbitMQ, but to spice things up we will use a remote RabbitMQ server like we do in production environments.
There is a company which is generous enough to provide a free plan for developers.

Their free plan is enough for learning purposes. Create an account in their website and create an instance.
Once you create an instance, click on the “RabbitMQ Manager” button.

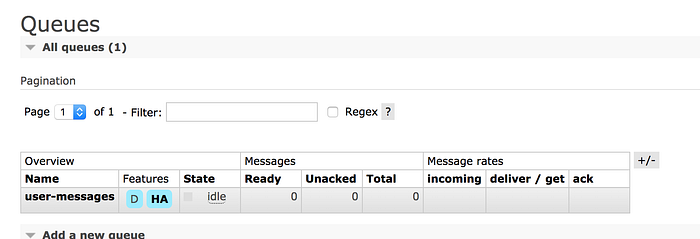
This should open the standard RabbitMQ admin console. Let us create a durable queue in the same console.

We can also create a queue from code. The queue should be ready in seconds.
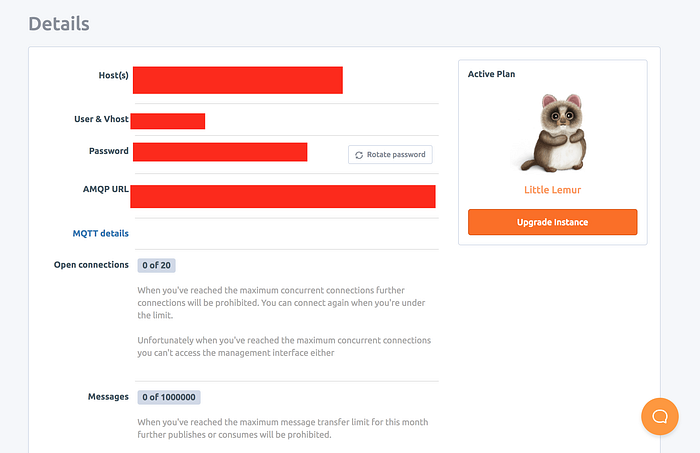
Now we need to connect the RabbitMQ instance from our code, for which we need the connection urls. Click on the “instance name/row” to get the connection and other instance details.
You might see a lot of simple programs just putting a message into the queue. But in a real life example, it is more likely that a REST API is called, which in turns puts the message in the queue.
Let us start with a boiler plate I created earlier. If you have followed the series from the start, the boiler plate should be very clear.
First install the following library.
npm install amqplib --saveIn the 5th article, we saw that one way to reuse the MongoDB connection is by injecting it to the request object. In this article we will see another way to achieve the same thing.
Create the following file services/MQService.js
Import the library and keep the connection url in a constant variable.
import amqp from 'amqplib/callback_api';const CONN_URL = 'amqp://gsgmnvnl:NITe9ThLkXQvKVLl7L6gEtMllb6obQmw@dinosaur.rmq.cloudamqp.com/gsgmnvnl';
We can use the connect() method provided by AMQP to create a connection. In order to send or receive messages from a queue, we have to use the channel object. The way to do this is:
let ch = null;
amqp.connect(CONN_URL, function (err, conn) {
   conn.createChannel(function (err, channel) {
      ch = channel;
   });
});
Then let’s create a method to send messages to the queue which implements the sendToQueue method.
export const publishToQueue = async (queueName, data) => {
   ch.sendToQueue(queueName, new Buffer(data));
}
The MQService file looks like:
We also added a process listener to close the RabbitMQ connection when we kill the process.
Let’s add another route in our routes/User.js file. First let us import the publishToQueue method we created in the service.
import {publishToQueue} from '../services/MQService';Then add the following route method.
We are sending the message to the queue and we’re sending a success response.
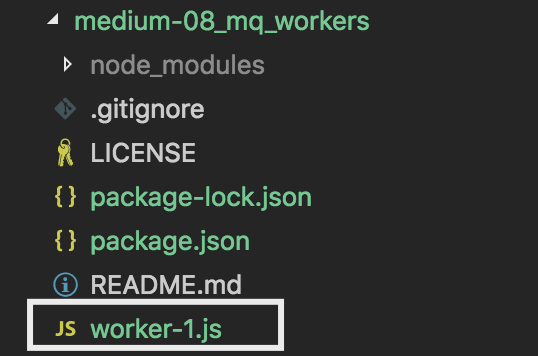
Now let’s work on the consumer. Create a new project where we will define our workers/consumers.
Create a file like worker-1.js in the project.
It is best practice to keep the workers lean and simple as you might need to spawn multiple instances of the same to handle the traffic.
Now for simplicity, I am not using Babel here. So you won’t see any ES6 in the worker file.
Write the following code in the worker file.
Here, we first import our dependency and then we do the connection initialisation we did earlier. Once we have the channel connection, we use the consume method which takes three parameters:
consume(queue_name, callback , ack)
The first parameter is the queue name, the second param is the callback method, which will be invoked once we get a message in the queue. The third parameter is the acknowledgement setting.
noAck:trueIf we set the noAck field as true, then the queue will delete the message the moment it is read from the queue.
In the callback function, we’re printing the message after a delay of 4 seconds just to mock a I/O operation.
function (msg) {
  console.log('.....');
  setTimeout(function(){
    console.log("Message:", msg.content.toString());
  },4000);
}
Firstly, let’s only run the producer.

Hit the REST API like we did before, in the earlier articles. Mention the queueName and the payload as shown in the diagram.
You should get a response immediately, as we don’t wait here for the consumer to perform the task.
As we did not start our worker, we should see the message in the queue.
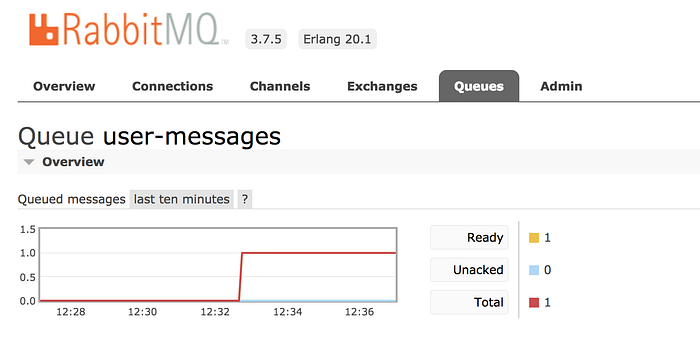
Now let’s start the worker.

We should see the message after 4 seconds.
Hit the API again with a different payload.

The worker reads the message from the queue and prints it after 4 seconds.
Perfect!
In a real life scenario however, the consumer might crash while doing some operation. In that scenario, we want the message to go back to the queue, so that the message can be consumed by another worker, or by the same worker when we spawn it again.
To achieve this, we have to do a couple of things.
The first thing to do, is to change the third parameter value in the consume method. noAck : false
As we have set the noAck as false, we have to explicitly call the channel.ack() method. Now our consume method looks like:
We’ve also increased the sleep time, so that it’s easy for us to reproduce the scenario.
Let’s push another message to the queue and then kill the worker before the eight second wait is over.

In the above screenshot, we killed the consumer while it was waiting for the timeout. Thus emulating a consumer crash in between a task.
The message is back in the queue.

Restart the worker and see if it reads the message again.

What if our RabbitMQ instance went down? How do we ensure that the payload is not lost?
We have to declare our queues to be durable, which we’ve done already in the RabbitMQ admin console. Secondly, we have to add a third parameter to the sendToQueue method in our producer code.
{persistent: true}So the function looks like:
export const publishToQueue = async (queueName, data) => {
  ch.sendToQueue(queueName, new Buffer(data), {persistent: true});
}
This was a very basic use of RabbitMQ. You can do a lot more with it. You can run multiple consumers and decide on the strategy of dispatching messages to them. You can also design a pub/sub service using RabbitMQ, as well as topic based routing.
Code
https://github.com/pankaj805/medium-08_mq
https://github.com/pankaj805/medium-08_mq_workers
If you liked the article, please comment and share it with others. You can find the entire article series here.

