How to Use the Swift Package Manager
Retire Cocoapods and Carthage from your project

Swift Package Manager (SPM) was the dependency manager for Swift that Apple released together with Swift in 2015, joining other well-known dependency managers, such as CocoaPods and Carthage. However, it was not until the publication of Xcode 11 that this tool was integrated into Xcode itself, which made it easier to use. Now we’re going to learn how to use the Swift Package Manager.
The Swift Package
A Swift package is made up of a series of files with the source code and a manifest, a file called Package.swift (found in the root directory), which defines the name of the package, its contents, and so on. When we compile these files, we generate a separate module that can then be shared (from GitHub, for example) imported into other projects. These files are compiled to form a module that can then be imported by other projects.
How to Create a Swift Package
With Xcode 11, it’s easy to create a Swift package. In the Xcode menu select File > New > Swift Package:

Then we give the project a name and create it:

It’s that simple — we have now generated a Swift package. The first thing we see on the screen is the contents of the Package.swift file:
import PackageDescription

let package = Package(
    name: "MyLibrary",
    products: [
        // Products define the executables and libraries produced by a package, and make them visible to other packages.
        .library(
            name: "MyLibrary",
            targets: ["MyLibrary"]),
    ],
    dependencies: [
        // Dependencies declare other packages that this package depends on.
        // .package(url: /* package url */, from: "1.0.0"),
    ],
    targets: [
        // Targets are the basic building blocks of a package. A target can define a module or a test suite.
        // Targets can depend on other targets in this package, and on products in packages which this package depends on.
        .target(
            name: "MyLibrary",
            dependencies: []),
        .testTarget(
            name: "MyLibraryTests",
            dependencies: ["MyLibrary"]),
    ]
)
In this manifesto we find:
name—The name of the project.products— Defines which executables and libraries defined in the project are visible to other packages.dependencies— Here are defined other packages on which our project depends.targets— This is where we add the new dependencies to our main project.
Adding dependencies: An Example
For example, suppose we want to create a Swift package and we know that we’re going to use the RxSwift library. First, we access the RxSwift GitHub repository. If we go down to where it indicates how it can be installed, we will see that it gives us the options of Cocoapods, Carthage, and Swift Package Manager. The latter is the one that interests us — that’s where we can observe what dependency and what target we have to add to our Swift package:
let package = Package(
  name: "RxTestProject",
  dependencies: [
    .package(url: "https://github.com/ReactiveX/RxSwift.git", from: "5.0.0")
  ],
  targets: [
    .target(name: "RxTestProject", dependencies: ["RxSwift", "RxCocoa"])
  ]
)
Therefore, in our Package.swift we add these values, with what remains as follows:
import PackageDescription

let package = Package(
    name: "MyLibrary",
    products: [
        // Products define the executables and libraries produced by a package, and make them visible to other packages.
        .library(
            name: "MyLibrary",
            targets: ["MyLibrary"]),
    ],
    dependencies: [
        // Dependencies declare other packages that this package depends on.
        .package(url: "https://github.com/ReactiveX/RxSwift.git", from: "5.0.0")
    ],
    targets: [
        // Targets are the basic building blocks of a package. A target can define a module or a test suite.
        // Targets can depend on other targets in this package, and on products in packages which this package depends on.
        .target(
            name: "MyLibrary",
            dependencies: ["RxSwift", "RxCocoa"]),
        .testTarget(
            name: "MyLibraryTests",
            dependencies: ["MyLibrary"]),
    ]
)
The value from: “5.0.0” tells us which version of RxSwift will be included in our project. That is, the latest version of RxSwift that’s equal to or greater than 5.0.0 will be included. However, we can also indicate that only a certain version, branch, or even revision is included:
// Version of a package
.package (url: "https://github.com/ReactiveX/RxSwift.git", .exact ("5.1.0"))

// Version of a certain branch (for example, develop)
.package (url: "https://github.com/ReactiveX/RxSwift.git", .branch ("develop"))

// Version of a certain revision (commit):
.package (url: "https://github.com/ReactiveX/RxSwift.git", .revision ("002d325b0bdee94e"))
Once the dependency has been added to our project, when we build it we’ll see that a new section (“Swift Package Dependencies”) appears in the side navigation menu, indicating the dependencies that we have added to our project (in this case, RxSwift).

Platform Settings
In the Package.swift file, we can also indicate which platform or operating system our project is specified for. For example, if we want that our Swift package to only be used for iOS 12+ operating systems, we can indicate it as follows:
let package = Package(
    name: "MyLibrary",
    platforms: [.iOS(.v12)],
    products: [
      ...
The different supported platforms, as shown in the Apple documentation are:
- iOS
- Linux
- macOS
- tvOS
- watchOS
We can also define more than one platform. For example:
let package = Package(
    name: "MyLibrary",
    platforms: [.iOS(.v12), .macOS(.v10_15)],
    products: [
      ...
Add Code to Our Swift Package
Once we’ve configured the project, we can add code. Remember — classes and methods that we want to use in projects that import the Swift package must be declared as public. Once we’ve finished the project and have uploaded it to a repository (such as GitHub or GitLab), we can download it and include it in other projects.
How to Add a Swift Package to Our Application
To add the Swift package that we have created to an application, we simply do the following (as long as we’re using Xcode 11):
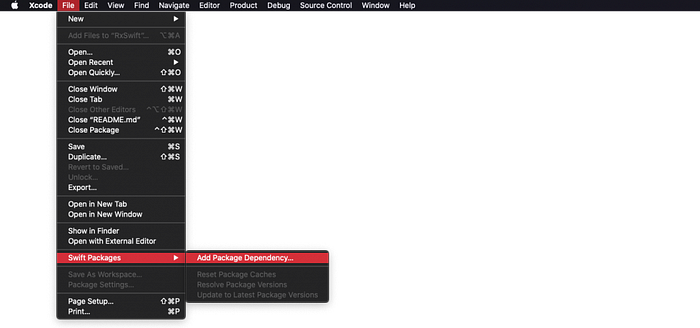
- From the top menu we access File > Swift Packages > Add Package Dependency:
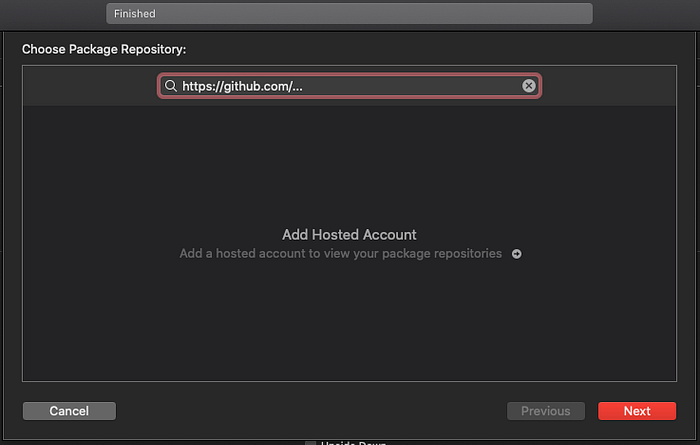
- In the window that appears, we add the project URL and press “OK” (this will download the Swift package to our project):
- Wherever we want to use it, we simply have to import them:
#import MyLibrayConclusion
With the addition of Swift Package Manager to Xcode 11, it has become very easy to create and add dependencies to our projects. This opens up a new way of, for example, modulating our applications — going from monolithic applications to applications made up of modules — and helps us to share code more easily between projects.

