How To Use Docker in an Amazon EC2 Instance
Use an Amazon Machine instance as you would on-premise
It works on my machine! Great, but how do we make it work in the cloud? Well, Docker solves exactly that problem.
This article is perfect for people who are migrating their application to the cloud or are on their cloud learning journey. At this point, you usually have one application (or more) running somewhere using Docker.
In a previous article, we saw how to migrate such a Docker image to the Amazon cloud — more specifically, to Amazon ECR.
In this article, we will take it one step further. We are going to look at the following three things:
- How to install Docker.
- How to install docker-compose.
- How to pull Docker images from Amazon ECR.
By the end of this article, you will have everything in your EC2 instance available to work with Docker, just like it would work on a Linux computer.
Curious? Then let’s get started.
How To Install Docker
Installing Docker is pretty easy on an Amazon Linux 2 Amazon Machine Image (AMI). If you haven’t started your instance yet, look at this guide to get one up and running.
Installing Docker consists of five small steps.
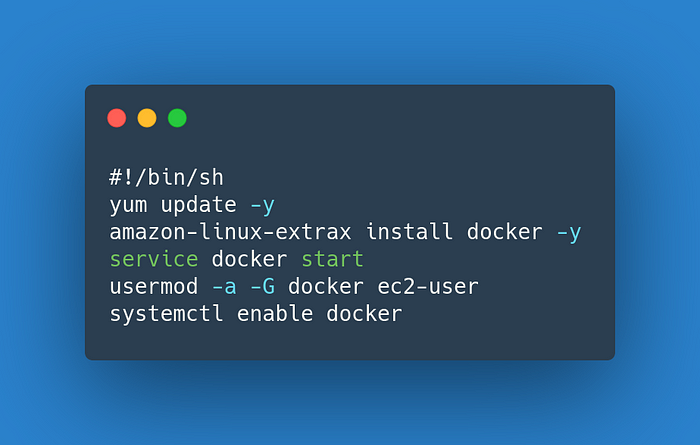
First, you have to update the installed packages and package cache on your instance. Usually, this is an unnecessary step because you will have just started an instance, but it is just a best practice.
Note: The -y option is needed because the commands often prompt you to answer yes or no. This takes care of that by responding yes.
sudo yum update -ySecondly, you have to install Docker as a package. The following command is recommended by Amazon, but you could still do it using yum as well:
sudo amazon-linux-extras install docker -yNow we have Docker as a service. The third step is to start the Docker service:
sudo service docker startNow, we arrive at the fourth step. This one is rather important and often forgotten. To be able to use Docker commands without using sudo, you have to add ec2-user to the docker group:
sudo usermod -a -G docker ec2-userNote: If you want to make sure the system picks up these Docker permissions, you can log out and log in again, but they worked out of the box for me.
Verify the installation by running any Docker command (e.g. docker info should work just fine).
And that’s it. Docker is now installed and ready to be used.
But there is one more subtle detail. Every time your Amazon AMI is rebooted, you want the Docker service to remain up and running. Therefore, we have one final command to use:
sudo systemctl enable dockerFinally, you can also list these commands in the user data when starting up a Docker AMI so you don't have to run them after launching a new machine.
You can fill in user data in Step 3 when launching an AMI:

You don’t need to use sudo inside user data.
Note: User data is executed only once when the AMI launches, so you’ll have to start a new, clean AMI to test your user data. My advice: Test every command first in an AMI and launch a new fully configured AMI afterward.
How To Install Docker-Compose
Personally, I think docker-compose is a very convenient tool to work with. If you have a few Docker images, you quickly get tired of entering everything via the command line. This is where docker-compose comes in. It allows you to configure all the images in one place.
That’s why I also install docker-compose in my EC2 instance nowadays. It allows me to do all the configuration from a file. You can download this file in your container in several ways (e.g. via Git).
An application consisting of multiple containers can easily be started with the command docker-compose up -d and stopped with docker-compose down.
You have to install docker-compose to use those commands. This is done in three steps.
In the first step, you download the latest version of docker-compose (in this case, 1.28.2):
sudo curl -L "https://github.com/docker/compose/releases/download/1.28.2/docker-compose-$(uname -s)-$(uname -m)" -o /usr/local/bin/docker-composeIn the second step, you make it executable. You can do this the standard Linux way using chmod:
sudo chmod +x /usr/local/bin/docker-composeIn the last step, you’ll find out that docker-compose is not on your path yet, so you can create a symbolic link (or symlink) to make it work:
sudo ln -s /usr/local/bin/docker-compose /usr/bin/docker-composeWhen you’ve done all that, you can choose to append those commands to your user data (without sudo) as well.
Great, now you’ve got docker-compose as a tool available inside EC2!
How To Pull Docker Images From Amazon ECR
One of the first things you’ll probably try is to pull a Docker image from Amazon ECR.
Well, if you don’t configure anything, it will fail. There are two things you need to fix to make that work.
Firstly, in Step 3 of launching an AMI, select an IAM role. You’ll need at least read access to ECR to pull Docker images from a private repository. It is good practice to limit it to read-only access if you’re only pulling from ECR.
If you are planning to also push Docker images, it would look like the image below:

Secondly, you’ll need to log into AWS inside your EC2 container. The command looks like this. Don’t forget to replace the region and registry URL. You can also look it up in your ECR repository when visiting it from the Amazon Administrator Console.
Note: You can append the command to your user data as well, but you’ll have to re-execute it from time to time because the login will expire.
aws ecr get-login-password --region eu-west-2 | docker login --username AWS --password-stdin XXXXXXXXXXXX.dkr.ecr.eu-west-2.amazonaws.comConclusion
And that’s it!
In this article, we successfully set up an EC2 Amazon Machine Image with Docker, docker-compose, and access to Amazon ECR. You’ve also seen that you can list these commands inside user data to configure the machine at launch time.
This allows you to work exactly as you would on-premise, but now inside the cloud.
If you have any questions, don’t hesitate to ask them in the comments section!
Interested in personal training or coaching? Mail me at info@kwal-it.be or visit our site for our other services.
