How to Transform a Monolith Application Into a Microservices Architecture
A step-by-step guide to migrating your monolith application to a microservices architecture
Let’s use a startup company that has been operating for many years as an example. Their primary goals were to build the platform and expand the company.
The development team continued to add new features and services on the same code base. After several years of constant expansion, their code base became too big and showed limitations.
The following problems began happening:
- Impossible to run the main test suit because it’s too big. Also, it takes too much time to run and validate the code.
- Scaling is difficult since a single application handles each request.
- Too many dependencies that must be updated and fully tested before going live make it impossible to upgrade the Framework, the language version, or the operating system.
- Difficult to meet deadlines because developers are unable to understand the product.
- Development speed becomes very slow and can’t handle all dependencies.
- The team has too many developers, and none of the development machines can handle the product.
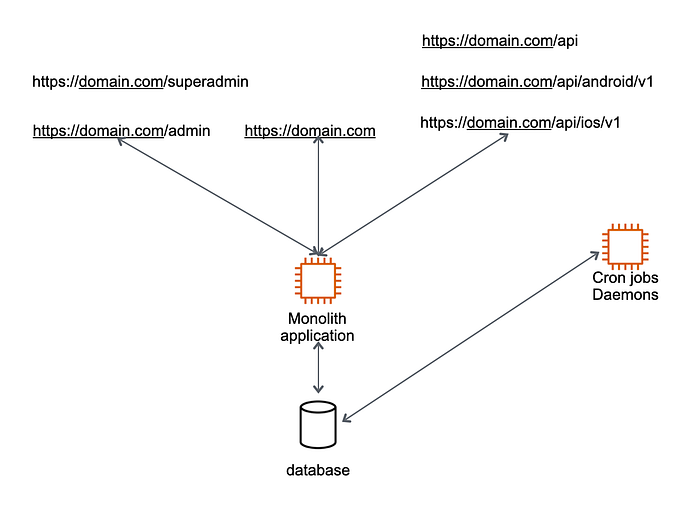
To demonstrate how a monolithic application may be converted to a microservices architecture, I have constructed the sample architecture shown below:

Although the application can offer multiple services, we must restrict our scope for the sake of this post.
The Beginning of This Incredible Journey
In phase one, you can split your application into multiple projects without rewriting the code base and, most importantly, without disturbing your customers/users.
Before we start migrating to new applications. Remember the following saying:
Stop feeding the monolith
Please keep reading if you do not understand what it means.
Next time, whenever you add a new code to your monolith, remind yourself and your team to avoid feeding your monolith.
If you are ready, let’s start.
For example, you have a code repository called “monolith-repo” used on the monolith server, where you serve all types of requests and run backend jobs.
Step 1: Move Your Cron Jobs and Daemons to a New Server
I have chosen this because it’s internal, and nobody gets disturbed if we move all backend jobs to the new server.
Go to your project directory.
cd monolith-repoCreate a branch from the “main” branch and give the name “cron-jobs-and-daemons.”
git branch cron-jobs-and-daemonsYou should see two branches in your project:
git branch
main
cron-jobs-and-daemons
Check out this new branch.
git checkout cron-jobs-and-daemonsIt’s time to separate the code base from “monolith-repo.” To do that, create a new private repository in GitHub and give a name of your choice. I call it “backend-jobs.”
Once you have a new repository, push your “cron-jobs-and-daemons” branch from “monolith-repo” to this new repository.
git push https://github.com/tanvir/backend-jobs.git cron-jobs-and-daemons:cron-jobs-and-daemonsThe above command creates a new branch, “cron-jobs-and-daemons,” in the new repository and pushes all code in it.
git creates “main” as the default branch, with nothing in it. Merge “cron-jobs-and-daemons” branch into the main.
Create a copy of your “monolith-repo” project in your dev machine and give the name “backend-jobs.”
cp -R monolith-repo backend-jobsAt this point, both repositories are the same, and there is no difference in the code.
Go to your new project.
cd backend-jobsThis project is connected to your old monolith repository, but we can change it to a new repository in the .git/config file.
vi .git/configChange GitHub’s origin from the old repository to the new repository. Once the project is connected with a new origin, you are ready to use this new repository.
Remove the “main” branch and fetch it again to see if it’s connected. If your main branch is empty, then you are connected. Otherwise, you might need to do some configurations.
git branch -D main
git fetch origin main:main
git checkout main
Now, merge your “cron-jobs-and-daemons” to the “main” branch of a new repository.
Now that you have a better understanding of the concept, we have created a smooth workflow to merge our code from one repository to another. If anything subsequently has to be merged, we can do it with ease.
Please make sure that the “main” branches of “monolith-repo” and “backend-jobs” are identical at this point because both projects will now take a different development path.
I know it feels strange, but remember that we aim to “Stop feeding the monolith.”
If you successfully set up this workflow, you will have taken a step toward stopping the feeding of a monolith.
All backend jobs will be added in the “backend-jobs” repository, and you will keep adding other functionality in “monolith-repo” for now.
Once this is ready, the next challenge is to deploy in production and move all jobs to this new server without disturbance or downtime.
If you are using the cloud, create an image of your monolith application to launch a new server. This process will give you 100% of the same configurations you can trust.
Once the backend jobs server is up and running, you probably need to fix the database security group. But before you do, stop all your cron jobs and daemons from a new server because they run on your old server. When you fix the database connection, it will start performing tasks.
Now you have full control of your new server. Nothing is running, but you are ready to start moving your first job. Hurray!
Advice: Take a break and keep a fresh eye on everything.
It’s time. Start with the smallest and easy job. Deactivate the first job from the old server and start on the new server.
Do not move the second job until the first is confirmed. Even if it’s the same server, don’t trust it’s working. Do your proper testing and confirm the moving job is working.
Once your first task is working, you are prepared to go on to the next one, and so on, until all of your jobs have been migrated.
Congratulations! By doing this, you have established a workflow in your organization to move into a microservice architecture. I know it’s not a microservice but one step closer to moving there.
After this transition, the application architecture will look like the following:
We have moved to two different applications without creating new code or adding new expertise or technology to the team.
Time to celebrate!
One more thing to discuss before we move to the next application.
Let’s imagine you switched to a new server, but a few jobs were still waiting to be deployed. The issue is that a pull request was made on the old “monolith-repo,” where those jobs were developed.
Remember the workflow we have established above. As soon as the pull request gets merged in the main branch, you can merge the main branch to the “cron-jobs-and-daemons” branch and push it to a new repository, as we have done before.
As soon as your code gets pushed to a new repository, you can create a new temporary branch, “merge-main-and-cron-jobs-and-daemons,” to create a stable state of it. Once it’s merged successfully, you can merge it in your main branch and deploy it in production.
You see how flexible this workflow is. You can start developing new features and also be able to merge code from old branches without stopping the continuous development and deployment.
Step 2: Move Your Super Admin Functionality to a New Application/Server
This application is internal because there is no harm to our customers if something goes wrong. Internal users might get affected, but let’s keep our promise to move this application to a new server without disturbing the workflow.
We need to follow the same step as above but with extra steps since this web application has routes for all other applications. At this point, I will strongly recommend removing route definitions to access other applications routes than super admin.
After this transition, the application architecture will look like the following:
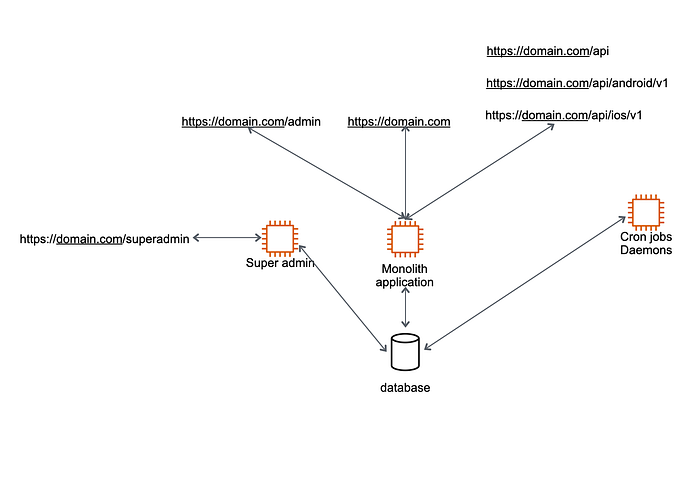
If you’ve come this far, I’m assuming you understand the reason behind this approach to divide the application servers so we can stop adding new code to our monolith application.
Step 3: Now It’s Time To Move All Other User Applications Into Their Own Repositories and Servers
The first two steps were to give you experience before you touch the user-specific applications that are more business-critical than the rest.
Now, follow all the steps you have learned above and create extra domains for each application.
For example:
domain.comadmin.domain.comapi.domain.comandroid-api.domain.com/v1
ios-api.domain.com/v1
Of course, you will prepare and roll out these applications one by one with great care.
If you think your user is shared between the admin and other applications, then use a shared login cookie between the applications. This way, your user has to log in once to access other applications.
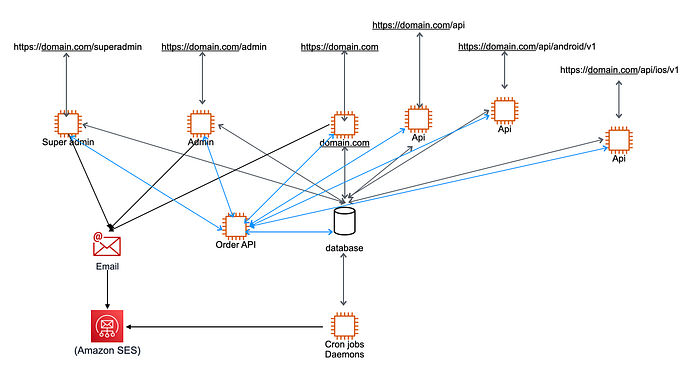
The final architecture of your applications will look like the following before we start building real microservices.
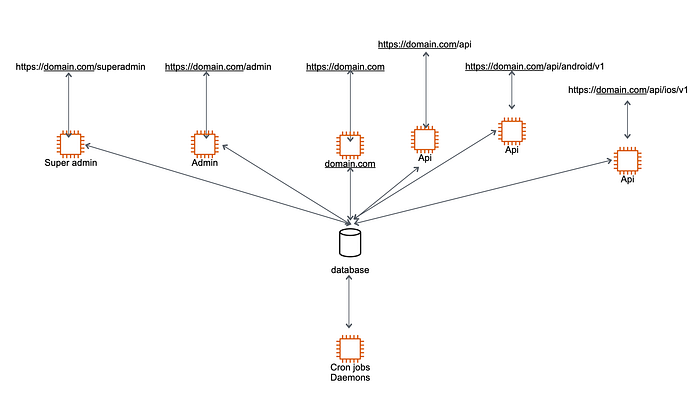
After this, your monolith-repo is no longer used, and you can archive or make it read-only in your GitHub account.
Congratulations! You have successfully “Stopped feeding the monolith.”
You now have several options to choose from. Each option has pros and cons of its own.
(Optional) Step 4: Clean Up All Repositories
At this point, you have replicated your monolith application in all dedicated repositories. Now you can create a plan in your development workflow to assign a certain number of resources and remove all extra code irrelevant to the application.
Your monolith application has now been duplicated across all specific repositories. The unnecessary code in the application may now be removed, and you can establish a plan in your development workflow to allocate a specific quantity of resources.
For example, the admin repository does not need to have code of API, super admin, and backend jobs. Remove all of that slowly, and deploy it on the production server.
You can follow the same steps for all other applications to keep what it needs.
Because you are adding only the necessary code, this step will assist you in improving the performance of your applications and simplify development.
(Optional) Step 5: Upgrade Your Applications to the Latest Framework, Programming Language Version, and Linux Distributions
Now all applications are slim and easy to upgrade. Test suit runs faster because it is smaller and tests the relevant application quickly.
All the above five steps might take a lot of time for your development team; however, it happens while you are developing other features in your product and continuously growing your business.
At this point, you have established a good workflow of development that can lead to independent microservices because you can see that database is the bottleneck of architecture. It can not scale if the business grows too fast.
Depending on your resources and company growth rate, you can do steps 4 and 5. Otherwise, you can directly move to Step 6, where we will introduce independent microservices in the architecture.
Step 6: A Road to Microservices Architecture
Most applications have some common functionality that can easily be identified and moved to independent microservices.
I always divide microservices into two categories: external and internal.
External: Microservices that communicate with external services to perform specific tasks like sending emails, payment gateways, video encoding, etc.
Internal: The second type of microservices performs tasks internally for the platform, like user API, order API, player API, etc.
There are always arguments about which type of microservices are easy to build and integrate with the platform. I always say that external services are easy to target.
For example, email service is the first one because it does not have dependencies on databases or anything else. I will call it “Message API.”
You can build this as a REST API or serverless app. You can move your sending email logic to this API and integrate it with all your applications that send emails to the users.
This microservice will communicate with external email services like AWS SES, Postmark, or any other service you use. It will help you to encapsulate your dependency on its own microservice.
Your application architecture will look like this after the first microservice:
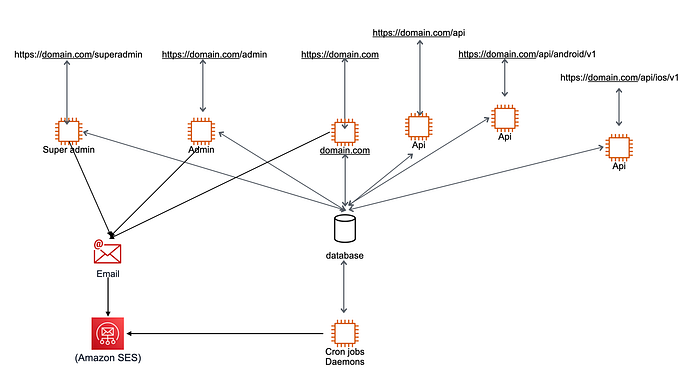
You should celebrate with your team when the first microservice goes live because you have established a workflow where you have started to transform your monolith architecture to real microservices.
Now follow the same path, build other external microservices, and integrate them within your applications.
Internal microservices always require extra work because we must split the database and solve other dependencies. Here I can recommend two paths to split the database and its relevant API.
It depends on your team to decide which path to follow. I will explain both to you in this article:
- API first and database later
- API and database split at the same time
The goal of this exercise is that all applications will perform as frontend applications, and everything will come through an API.
For this purpose, we need to split our database and build new APIs to feed frontend applications.
Solutions 1: API First and Database Later
We need to identify a business model that can live independently without being dependent on something else. For example, a basic Order API with add, update, and delete orders from the system.
Since we have split the monolith application into multiple applications where order functionality might get replicated in multiple applications. It means we have a lot of duplicate code to perform the same task. Now it’s time to solve this problem.
We will introduce Order API and move all logic into the application. It will be a lot of copy-paste code to the new API.
Here’s Order API’s endpoints:
POST /ordersGET /orders/{order-key}DELETE /orders/{order-key}
Now you can integrate Order API in all your applications where these actions are happening and remove the duplicate code.
As you can see, the architecture is growing, and APIs are beginning to pay off. Although an Order API’s communication with the monolith database has to be fixed. Let’s address this problem right away.
We are trying to separate the relational database, which is difficult to detach from active applications and might have order relations in multiple tables as foreign keys.
There is currently no direct connectivity with the Order table since all orders go through the new Order API. To prevent direct queries to the Order table, we must ensure that all relations retrieve data through Order API endpoints before we move the Order data into a separate database.
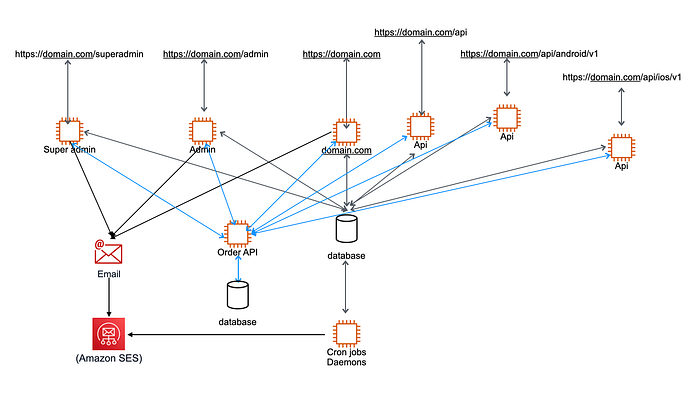
Order Database as an Independent Microservice
We need to create a new database and migrate all your existing orders to it.
Since it is a production application where orders are continuously coming, how can you sync all the latest orders to a new database without losing them?
You can accomplish this goal with AWS’s excellent Data Migration Service. Create a data migration task that syncs data continuously between the new database and the monolith.
Your Order table is now the same between the new database and monolith.
The last step is to connect to the new database and disconnect your API from monolith.
As soon as Order API starts using the new database, all coming orders will be added to the new database instead of monolith.
Time to celebrate!
You have your first independent Microservice running on your platform.
Each microservice might require some extra steps, but if you follow my basic guidelines, you can achieve your goals.
Solution 2: API and Database Split at the Same Time
If you think solution 1 is too slow and you can do it in one go, then develop your Microservice API and split the database simultaneously.
What is next?
You can keep creating new microservices and integrating them with frontend applications until you’re done.
You can plan to develop your modern frontends in the latest frameworks once your frontend apps no longer directly communicate with the database and everything from the API.
Thank you for reading this article.
I hope you have learned something from this article. If you have questions, please feel free to ask.

