How To Integrate Dialogflow With GPT-3
Creating a virtual mental health assistant from scratch

Dialogflow — Google’s Natural Language Understanding platform is a popular tool that makes it easy to design and integrate conversational user interfaces into your applications. You can use Dialogflow to build chatbots, voice assistants, and other agents that can simulate human conversations at scale.
GPT-3, on the other hand, is OpenAI’s largest language model, infamous for its capability to generate impressive outputs, often fooling humans into thinking it was written by a human. For instance, the model can generate question and answer pairs, descriptions, and even blog posts. The model is so advanced that it can even beat professional copywriters in a contest.
The previous paragraph about GPT-3 was generated by GPT-3 by completing my given prompt.

Since GPT-3 can generate high-quality outputs, developers can use it to create chatbots, content generators, and many other applications in the realm of Natural Language. In this article, we’ll explore how to leverage the power of GPT-3 and harness it inside our Dialogflow application. For this tutorial, I will create a virtual mental health assistant that can talk freely with its users and provide a safe space to express one’s feelings. Let’s get started.
Step 1: Create Your OpenAI Account
You’ll have to sign up and create an OpenAI account to receive your API Token. Don’t worry; it’s free. You just have to verify your phone number, and you’ll receive $18 worth of free credits, which gives us more than enough requests to experiment and play around with the model. Once you create your account, you can log in and check out the Playground from the dashboard.
Step 2: Set Up Your Dialogflow Agent
Create a new Dialogflow Agent that will integrate with GPT-3. Give your agent a name, and we’re set. For this project, we will only use the default Welcome and Fallback intents provided.

Step 3: Configure the Welcome and Fallback Intents
The default welcome intent is triggered whenever the user greets the bot with “Hi.” The Fallback intent is triggered whenever the bot doesn’t understand the user input. Since we have not added any new intents in our bot, all user utterances other than “Hi/hello” will trigger the default fallback intent. We can use this fallback intent to communicate with GPT-3 by making API calls within our webhook fulfillment. For now, delete the default response in the welcome intent and enable the webhook call for its fulfillment.
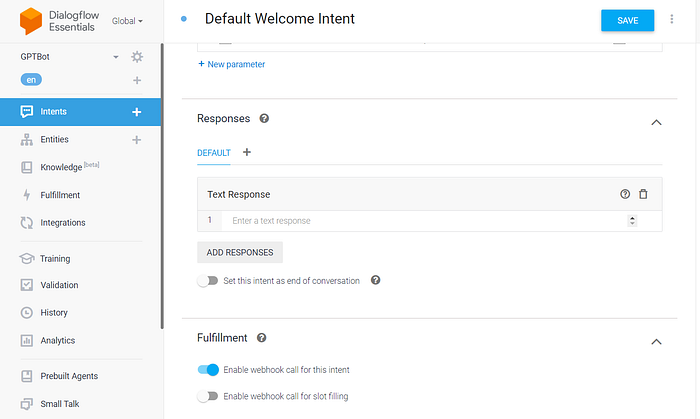
For the Fallback intent, enable the webhook call for fulfillment to call the GPT-3 API and respond based on the user’s query. In case the API fails or takes too long (longer than five seconds) due to a cold start, we add a default response, “Can you say that again,” so that we can capture the user utterance and call the API again in case of failure.

Step 4: Writing the Webhook Fulfillment
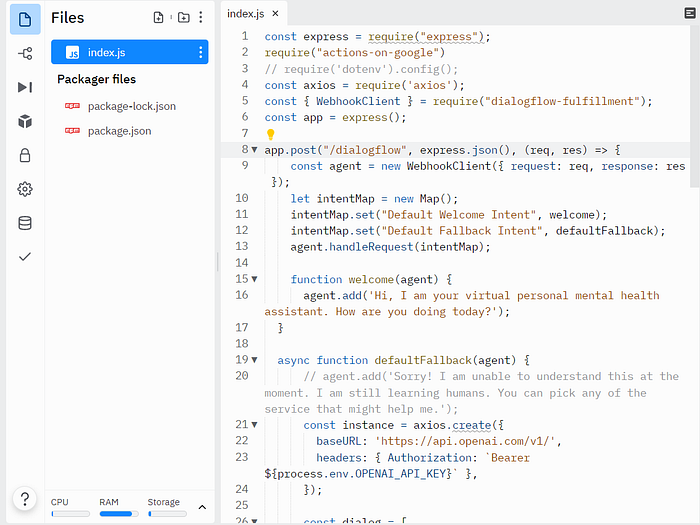
To create our virtual mental health bot, we need to use Webhook calls for our fulfillment in Dialogflow to add our custom logic to the intent. For that, we have to create our own Fulfillment API to handle the Dialogflow user requests and fetch the response generated from GPT-3. I will use Node.js and Axios for my server but feel free to use any other framework. Let’s get coding.
We are adding handler functions for the Default Welcome & Fallback intents, which will execute whenever the intents are triggered. Importantly for the fallback intent handler, we create a function queryGPT — which takes the user’s utterance and makes a POST request to the GPT-3 completions endpoint. The function sends the AI response back to the user and awaits another query. Simple, eh?
EDIT: A lot of people have reported that the above code snippet is not working, so here is the same webhook in Python FastAPI!
Let’s take a look at the prompt
GPT-3 generates text based solely on the input prompt fed to the model. Finetuning this input prompt is crucial to getting good results with GPT-3. This has spawned a new field of research called Prompt Engineering, which aims at producing optimum results. To create our mental health assistant, here’s the prompt I chose:
“The following is a conversation with an AI assistant that can have meaningful conversations with users. The assistant is helpful, empathic, and friendly. Its objective is to make the user feel better by feeling heard. With each response, the AI assistant prompts the user to continue the conversation naturally.”
Step 5: Hosting the Webhook API
Now we have everything we need. It’s time to host our API so that it can be accessed over the internet by Dialogflow. We can use many free Cloud service providers like Netlify or Vercel to host our APIs. But since this isn’t a production app and just for demo purposes, I used Repl.it to host my Node server. To get started, just sign up to repl.it, create a new node project, and paste the above Webhook fulfillment code.
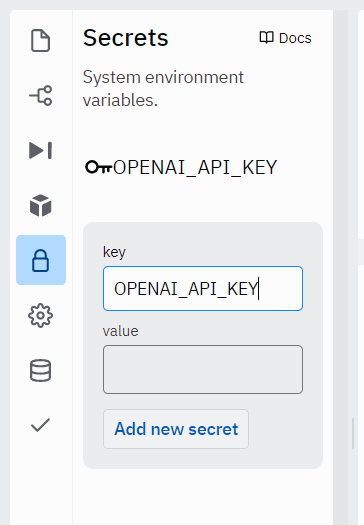
To query the GPT-3 API, you will require its access token, which you can find from the ‘View API Keys’ in your OpenAI dashboard. NEVER reveal your keys directly in your code. Always use environment variables to store secrets. Copy your API token, head over to the Secrets tab in your Repl, and paste it as the value for a new environment variable “OPENAI_API_KEY,” and save.
Now your code can safely access the API token and request GPT-3! Hit Run and the server is deployed. You will then find the published endpoint URL for your server.
Final Step: Update the Webhook URL in Dialogflow
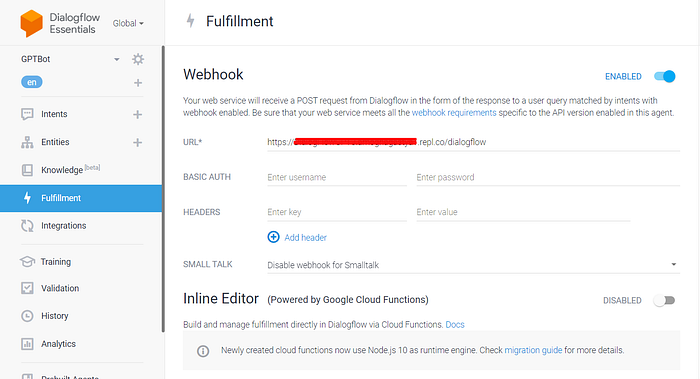
The last step is to enable the Webhook Fulfillment in Dialogflow and paste the URL of our endpoint in the Repl server, and hit save. Make sure to add "/dialogflow" at the end your repl URL to hit our POST endpoint.
And that’s it! Your Dialogflow Agent should now be integrated with GPT-3 via the fallback intent. All that’s left to do is test your mental health assistant.
The Results
You can test this bot on your own here: https://amagastya.com/gpt3


Conclusion
As you can see, it’s not perfect, but the bot works for the most part. The bot can hold a meaningful conversation with the user and even displays signs of care and empathy.
Remember that we have not added any intents, and the entire conversation is handled by just GPT-3. Achieving this result with Dialogflow would be nearly impossible as we could never predict exactly what the user might say, so it would be a huge challenge to think of all possible intents.
However, with GPT-3, we can handle these sorts of complex, open-ended conversations, making these generic open-domain situations a great use case for large language models, as they can easily simulate and maintain human conversations.
Note that by changing your input GPT-3 prompt, you can create cool and quirky experiences with your bot. I hope this inspires you to create your own bot experience and have fun with it.🙂
And so, I’d like to end this post with a short poem:
I hope you enjoyed creating your own GPT-3 powered virtual assistant. Stay tuned for more!
Want to connect? Follow me on Linkedin at — https://www.linkedin.com/in/amoghagastya/ and at https://amagastya.com
Also read by me—

