Create NFTs Using Solidity With Open Zeppelin and Publish It on IPFS
View it on OpenSea
NFTs and digital collectibles are growing popular as the web3 space continues to make significant advancements in the blockchain arena. The enormous popularity of NFTs like Cryptokitties and Bored APE pushed investors to purchase ERC721-compatible digital collectibles.
In this article, we will guide you through the procedure of creating your first ERC-721 (NFT) contract on Solidity with Open Zeppelin.
Developing a Smart Contract with Solidity and deploying it on the blockchain might sound daunting at first: solidity, security, gas optimisation, developer environment, and gas fees, are only some of the things you’ll need to go through to host your code on the blockchain.
Tools like the OpenZeppelin Wizard that offers developers click and write functionalities to create composable and secure smart contracts in no time, used with Web3 developer tools like Alchemy, make the experience of writing a deploying code on the blockchain easy, fast, and reliable like never before.
In this tutorial, you’re going to learn how to develop and deploy an ERC721 (NFT) smart contract.
Tech Stack
- Alchemy
- OpenZeppelin
- Remix
- Ethereum Goerli
1. Open Zeppelin
First of all, let’s go to OpenZeppelin, then on the Wizard tab, click on ERC721. All NFTs are ERC721 tokens.
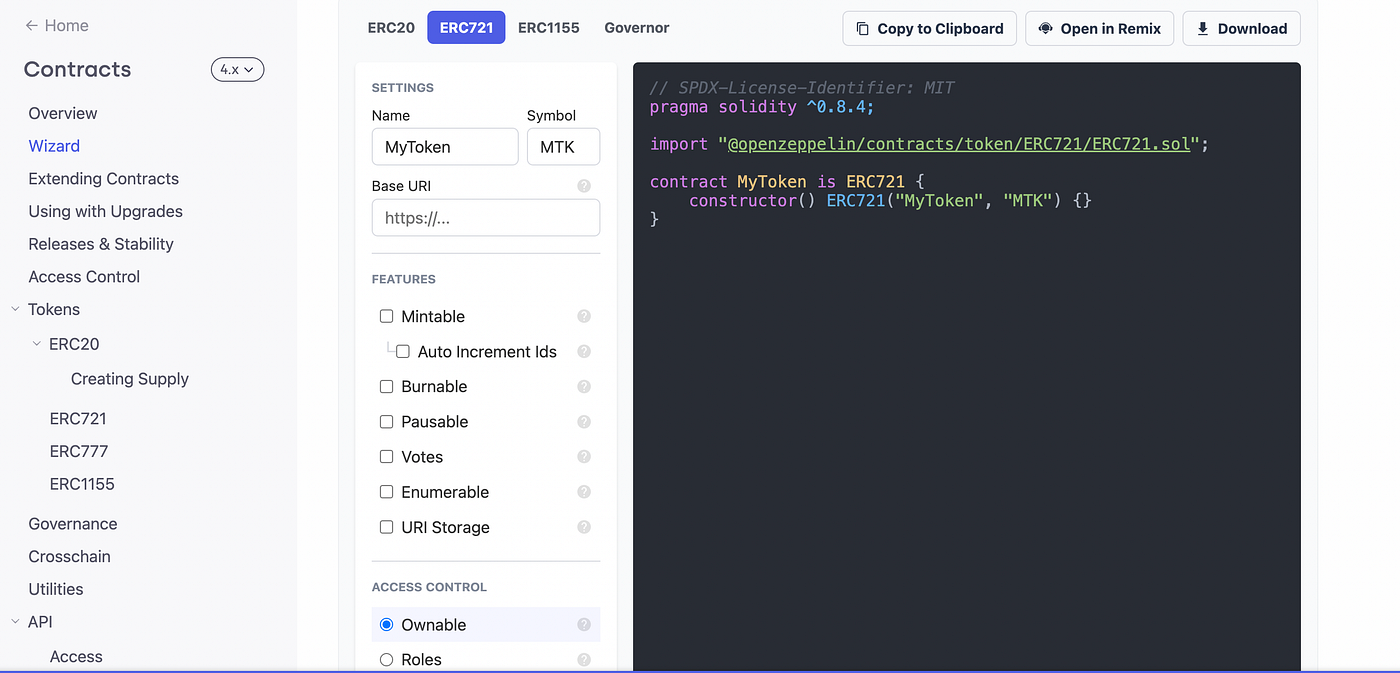
We want our tokens to be Mintable, have Enumerable and URI Storage as the features. Name your token as per your wish and also enter the desired symbol.

2. Remix IDE
Now, click on the Open in Remix button in the upper right-hand side corner. It will open the Remix IDE and will have the code written. You can change the compiler version to 0.8.4.
Here, is the updated code, be sure to change it in Remix. We need to remove the Ownable part of the solidity program as we want that people other than ownable can also mint our NFTs. Also, we have added MAX_SUPPLY as 5000 so that the NFTs are limited.
3. Alchemy- Create app
Next, we need to sign up for Alchemy. Click on Create App and name your app whatever you wish. I named it Namzz nft. Then click on View Key and copy the HTTPS address.

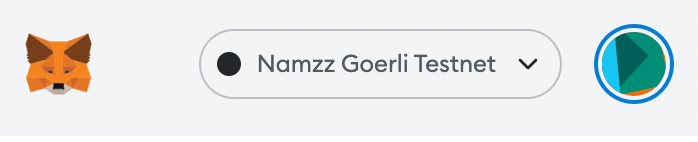
4. Metamask- Add Network
Further, we need to create our network on Metamask by clicking on Add Network. Name the testnet as per your wish. I named it Namzz Goerli testnet. Paste the https URL that we copied from alchemy. Add ID as 5 for Goerli and enter ETH as the symbol. Click on Add Network button.
You can get some test Ethereum from the Goerli faucet. Here is the link. Login with your Alchemy account and enter your address. You will get the test ether within seconds!
5. Compile and Deploy the NFT Smart Contract on the Goerli Testnet
On Remix, go to Deploy and select Injected Web3 as the Environment. It will get connected to you network automatically. You will get the address of your metamask along with the balance ether. Select your smart contract in the Contract Tab and click on Deploy.
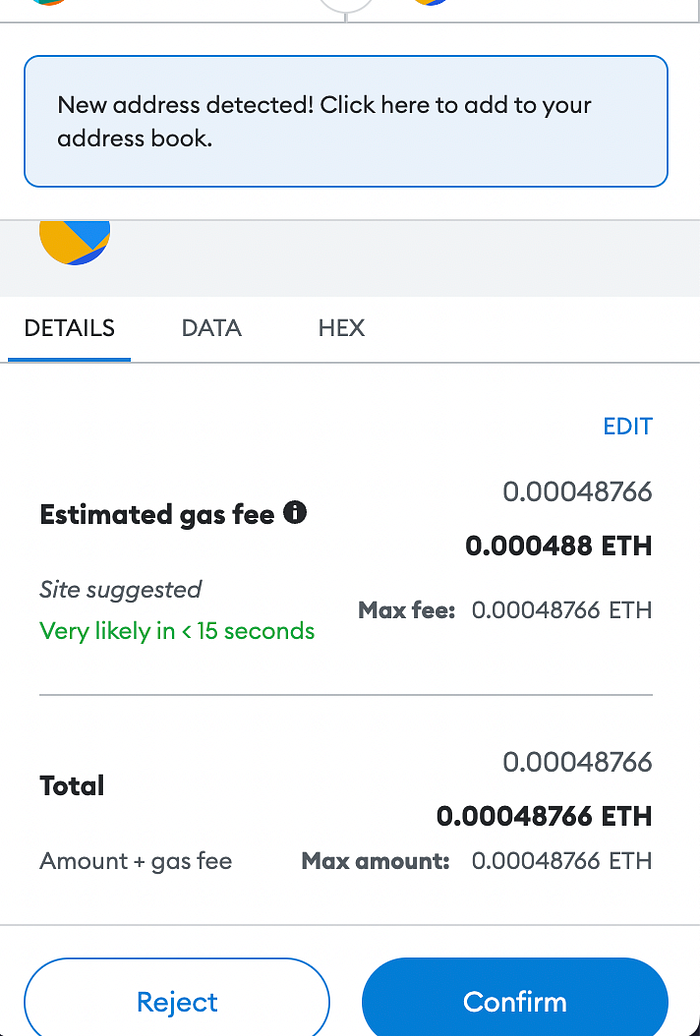
It will show a metamask popup asking you to pay the fees. Click on Confirm and wait for 10 seconds. It will add the deployed contract in the Remix!
6. Formatting the NFT Metadata
For OpenSea to pull in off-chain metadata for ERC721 tokens, the contract will need to return a URI pointing to the hosted metadata. To find this URI, OpenSea, Rarible and other popular marketplaces will use the tokenURI method contained in the ERC721Uristorage standard.
Head over to OpenSea developer doc and copy the metadata structure. Paste it in json online editor and edit the description according to your wish. According to the OpenSea documentation, the NFT Metadata should be stored in a .json file and structured as follows:
7. Creating and Uploading the Metadata on IPFS
Now that we have a brief understanding of what will be contained in your NFT metadata, let’s learn how to create it and store it on IPFS- Inter Planetary File System.
Go to Filebase, and make an account there. Verify your email and login. Now, we need to click on create bucket, the bucket name being in small case letters, I named it namzz-nft. Select IPFS and create. Now upload the image you want to make as the nft. Click on the image and copy the IPFS Gateway URL. Enter this link in the image section of JSON file.
Save the JSON file in the name of metadata.json and upload it on Bucket in FileBase.

Click on your file and copy the IPFS CID.
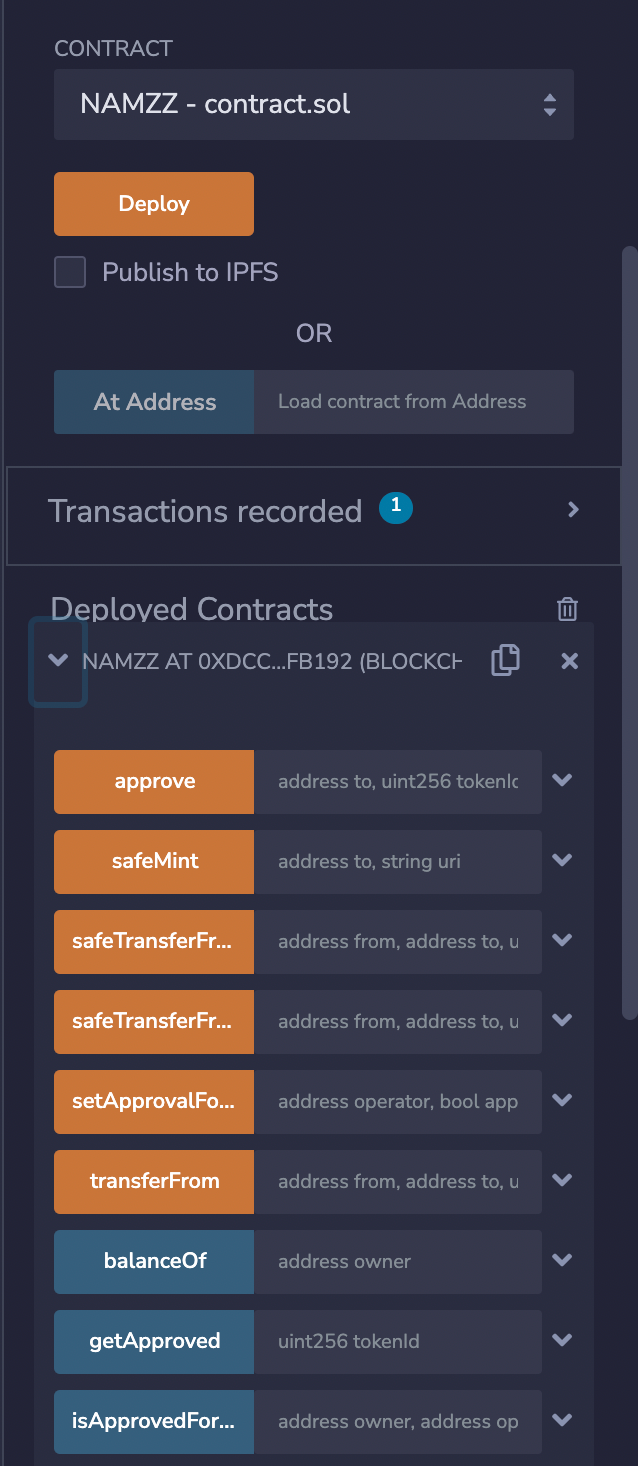
8. Mint Your Goerli Testnet NFT
Then head on over to Remix. Orange methods are methods that actually write on the blockchain whereas Blue methods are methods learning from the blockchain.
Click on the safeMint method dropdown icon and paste your address and the following string into the uri field:
ipfs://<your_metadata_cid>Clicking on transact will create a Metamask popup prompting you to pay the gas fees. Click on “sign” and go on minting your first NFT!
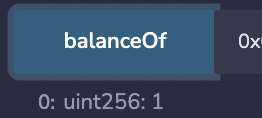
Enter your address in the balanceOf button and enter your address. Run it — it should show you have 1 NFT.
Do the same with the tokenUri method, inserting “0” as the id argument — it should display your tokenURI.
Great! You just minted your first NFT! 🎉 Now it’s time to move to OpenSea to check if the metadata is read.
9. View the NFT on OpenSea
Navigate to testnets.opensea.io and log in with your Metamask wallet. Then click on your profile picture, you should see your newly minted NFT there. If the image is not yet visible, click on it, and click on the “refresh metadata” button.
Sometimes OpenSea has hard times recognizing testnet metadata — and could take up to 6 hours to see it.
Congratulations, you have successfully created, modified, and deployed your first smart contract. Minted your first NFT, and published your image on IPFS!
Thanks for reading.