Getting Started With Firecracker
Secure and fast microVMs for serverless computing.

You may have heard about Firecracker, a new open source virtualization technology that is built for serverless computing. Firecracker is a virtual machine monitor that runs on top of KVM. The following diagram shows how does it work:
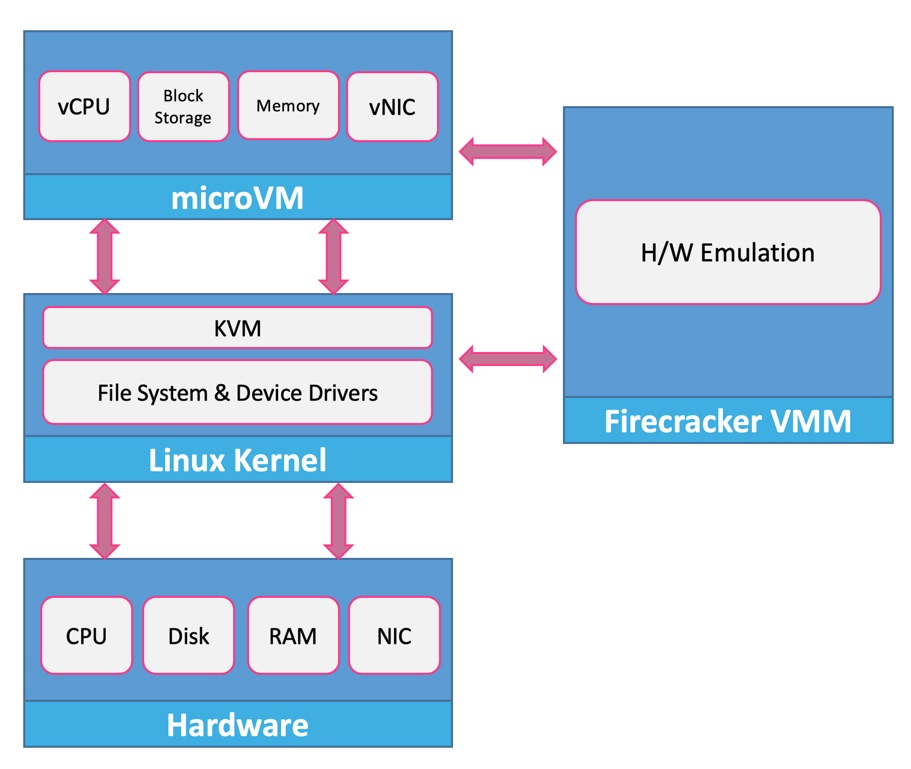
Firecracker is a great fit for serverless computing, where you need to run a lot of small, single-purpose, and short-lived microVMs.
In this article, we will show you how to install Firecracker on your Linux machine and run your first microVM.
Prerequisites
To follow this tutorial, you will need:
- A Linux machine with KVM installed. You can check if KVM is installed by running the following command:
$ lsmod | grep kvm- The latest version of Firecracker. You can download it from the Firecracker releases page.
- The getting started kernel and root filesystem. You can download them following the getting-started steps.
Installing Firecracker
Firecracker is distributed as a static binary. You can download the latest version from the Firecracker releases page. Once you have downloaded the binary, you can install it by running the following commands:
$ sudo setfacl -m u:${USER}:rw /dev/kvm
$ release_url="https://github.com/firecracker-microvm/firecracker/releases"
$ latest=$(basename $(curl -fsSLI -o /dev/null -w  %{url_effective} ${release_url}/latest))
$ arch=`uname -m`
$ curl -L ${release_url}/download/${latest}/firecracker-${latest}-${arch}.tgz | tar -xz
$ mv release-${latest}-$(uname -m)/firecracker-${latest}-$(uname -m) firecracker
Running your first microVM
Now you can run your first microVM, it is like running a regular Linux machine. You can run a microVM by running the following commands:
$ export kernel_path=$(pwd)"/hello-vmlinux.bin"
$ export rootfs_path=$(pwd)"/hello-rootfs.ext4"
$ firecracker --api-sock /tmp/firecracker.socket
$ curl --unix-socket /tmp/firecracker.socket -i \
    -X PUT 'http://localhost/boot-source' \
    -H 'Accept: application/json' \
    -H 'Content-Type: application/json' \
    -d '{
        "kernel_image_path": "${kernel_path}",
        "boot_args": "console=ttyS0 reboot=k panic=1 pci=off"
    }'
$ curl --unix-socket /tmp/firecracker.socket -i \
    -X PUT 'http://localhost/drives/rootfs' \
    -H 'Accept: application/json' \
    -H 'Content-Type: application/json' \
    -d '{
        "drive_id": "rootfs",
        "path_on_host": "${rootfs_path}",
        "is_root_device": true,
        "is_read_only": false
    }'
$ curl --unix-socket /tmp/firecracker.socket -i \
    -X PUT 'http://localhost/actions' \
    -H  'Accept: application/json' \
    -H  'Content-Type: application/json' \
    -d '{
        "action_type": "InstanceStart"
    }'
The first command starts the Firecracker process. The second command configures the kernel image and the boot arguments. The third command configures the root filesystem. The last command starts the microVM.
Adding a network interface
Ok, now you have a running microVM, but it is not very useful. You can add a network interface to your microVM by running the following command:
$ curl --unix-socket /tmp/firecracker.socket -i \
    -X PUT 'http://localhost/network-interfaces/eth0' \
    -H  'Accept: application/json' \
    -H  'Content-Type: application/json' \
    -d '{
        "iface_id": "eth0",
        "guest_mac": "AA:FC:00:00:00:01",
        "host_dev_name": "tap0"
    }'
This command adds a network interface to the microVM and must be executed before starting it.
The guest_mac is the MAC address of the microVM.
The host_dev_name is the name of the tap device on the host. You can create the tap device by running the following commands:
$ sudo ip tuntap add dev tap0 mode tap user $USER
$ sudo ip addr add 172.16.0.1/24 dev tap0
$ sudo ip link set tap0 up
$ sudo sh -c "echo 1 > /proc/sys/net/ipv4/ip_forward"
$ sudo iptables -t nat -A POSTROUTING -o eth0 -j MASQUERADE
$ sudo iptables -A FORWARD -m conntrack --ctstate RELATED,ESTABLISHED -j ACCEPT
$ sudo iptables -A FORWARD -i tap0 -o eth0 -j ACCEPT
Then, once VM is booted, set up the network inside the guest as follows:
$ ip addr add 172.16.0.2/24 dev eth0
$ ip link set eth0 up
$ ip route add default via 172.16.0.1 dev eth0
Snapshot you microVM
A snapshot is a copy of the microVM memory and the guest’s storage at a given point in time. You can use snapshots to boot a microVM faster.
Let’s say you have a microVM that is configured and running. You can create a snapshot of the microVM by running the following commands:
$ curl --unix-socket /tmp/firecracker.socket -i \
    -X PATCH 'http://localhost/vm' \
    -H 'Accept: application/json' \
    -H 'Content-Type: application/json' \
    -d '{
            "state": "Paused"
    }'
$ curl --unix-socket /tmp/firecracker.socket -i \
    -X PUT 'http://localhost/snapshot/create' \
    -H  'Accept: application/json' \
    -H  'Content-Type: application/json' \
    -d '{
        "snapshot_path": "mem_file_path",
        "mem_file_path": "snapshot_path",
        "version": "2.0.0"
    }'
$ curl --unix-socket /tmp/firecracker.socket -i \
    -X PATCH 'http://localhost/vm' \
    -H 'Accept: application/json' \
    -H 'Content-Type: application/json' \
    -d '{
            "state": "Resumed"
    }'
These commands pause the microVM, then create a snapshot of the microVM and finally resume it. The snapshot_path is the path to the snapshot file.
The mem_file_path is the path to the memory file. The version is the snapshot version. You can restore the microVM from the snapshot by running the following command:
$ curl --unix-socket /tmp/firecracker.socket -i \
    -X PUT 'http://localhost/snapshot/load' \
    -H  'Accept: application/json' \
    -H  'Content-Type: application/json' \
    -d '{
        "snapshot_path": "snapshot_path",
        "mem_file_path": "mem_file_path",
        "enable_diff_snapshots": false,
        "resume_vm": false
    }'
This command restores the microVM from the snapshot and resumes it. The enable_diff_snapshots is a boolean that enables or disables differential snapshots.
Run containers on Firecracker
You’re maybe wondering if you can run containers on Firecracker. The answer is yes, you can run containers on Firecracker.
Firecracker-containerd
To do so, we need to use firecracker-containerd. firecracker-containerd is a daemon that manages the Firecracker microVMs that run containers. You can install firecracker-containerd following the instructions
Firecracker-containerd relies on containerd, the following diagram shows how firecracker-containerd works:
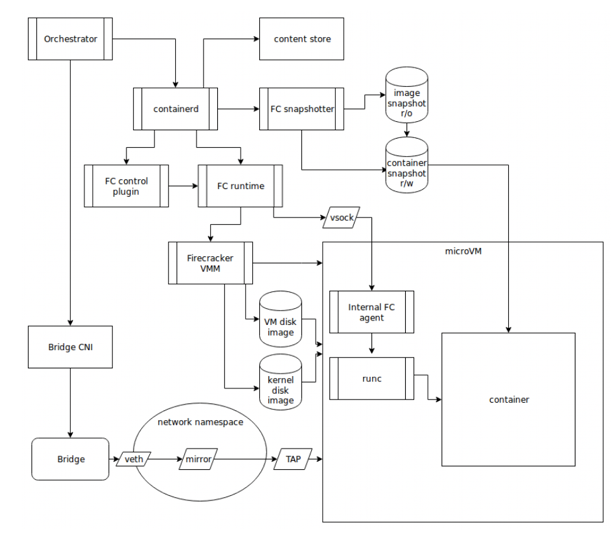
To sum up, firecracker-containerd creates a microVM for each container.
The microVM is configured with a root filesystem and a kernel image. The root filesystem contains an agent which is able to manage containers using runc. The microVM is started by containerd-shim. The containerd-shim is a process that is started by containerd. Thanks to the vSock, the containerd-shim can communicate with the agent inside the microVM. The agent is able to manage containers using runc. The agent is also responsible for managing the container lifecycle. With this architecture, you can run containers on Firecracker and benefit from the security and performance of Firecracker. Plus, you can use microVMs inside Kubernetes.
Running a container
Now you can run a container by running the following command:
$ sudo ctr run --runtime io.containerd.firecracker.v1 -t docker.io/library/alpine:latest test shThis command runs a container using the firecracker-containerd runtime. The `-t` flag is used to allocate a pseudo-TTY. The `docker.io/library/alpine:latest` is the image to use. The `test` is the name of the container. The `sh` is the command to run inside the container.
Connecting to the container
Now you can connect to the container by running the following command:
$ sudo ctr t exec --exec-id test shThis command connects to the container. The ` — exec-id` is the name of the container. The `sh` is the command to run inside the container.
Conclusion
In this article, you have learned how to use Firecracker. You have also learned how to run containers on Firecracker. I hope you enjoyed this article. If you have any questions, feel free to ask them in the comments.

