Generate High-Quality Image Using Stable Diffusion WebUI
I will guide you through the process of installing Stable Diffusion WebUI and teach you the basic skills to generate high-quality images

Introduction
In this blog post, I will guide you through the process of installing Stable Diffusion WebUI and teach you the basic skills for generating high-quality images. I hope this article can help you get started with these powerful AI tools.
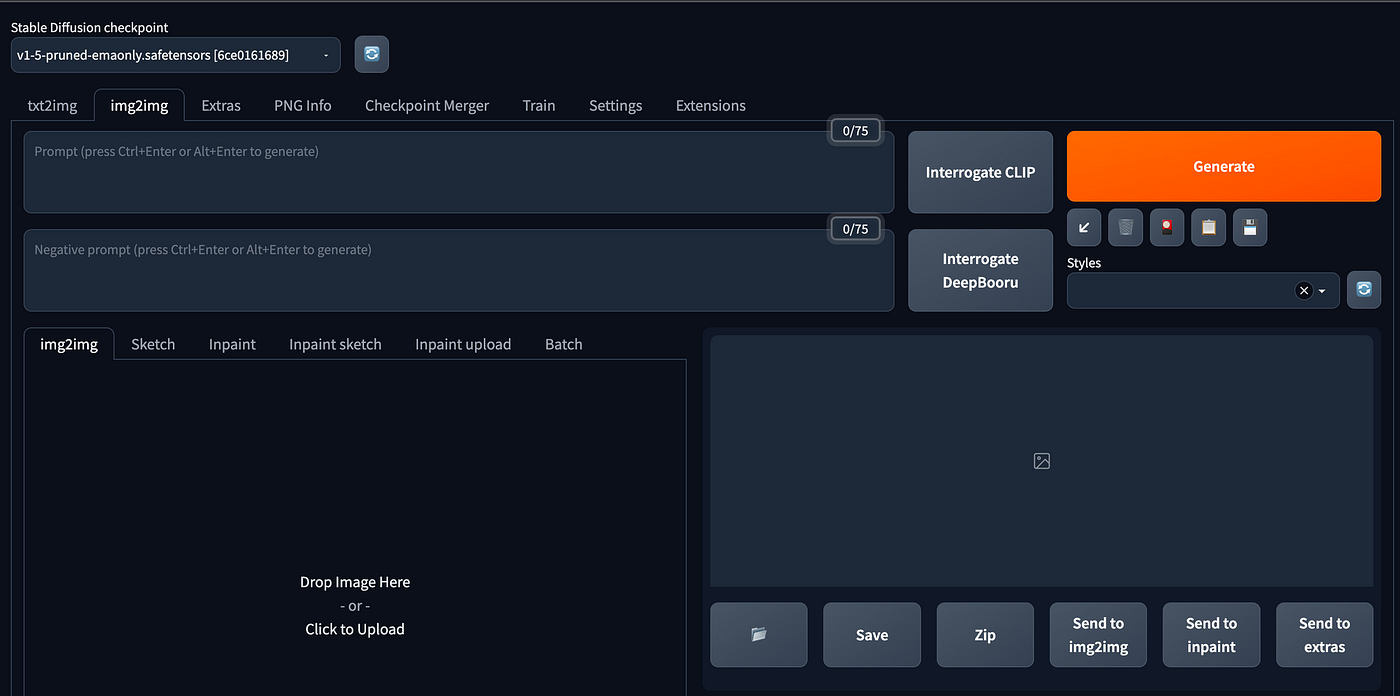
Stable Diffusion WebUI (Link) is a browser interface based on the Gradio library for Stable Diffusion, it provides you with a user-friendly graphical interface for interacting with stable diffusion.
It looks like this:
Disclaimer: This blog reflects the my personal views only, not representing my employer or company.
Prerequisites
Before we begin, make sure you have the following:
- A Linux system (we will use Ubuntu 22.04 LTS in this guide, but the steps should be similar for other Linux distributions)
- Root or sudo access to the system
- An active internet connection
You may use your own GPU machine. As for me, I am more familiar with EC2, so I am using:
- AWS EC2 Ubuntu 22.04 amd64 server in Tokyo
- g5.2xlarge
- 300GB gp3
Step 1: Installation of WebUI on EC2
Update Security Group
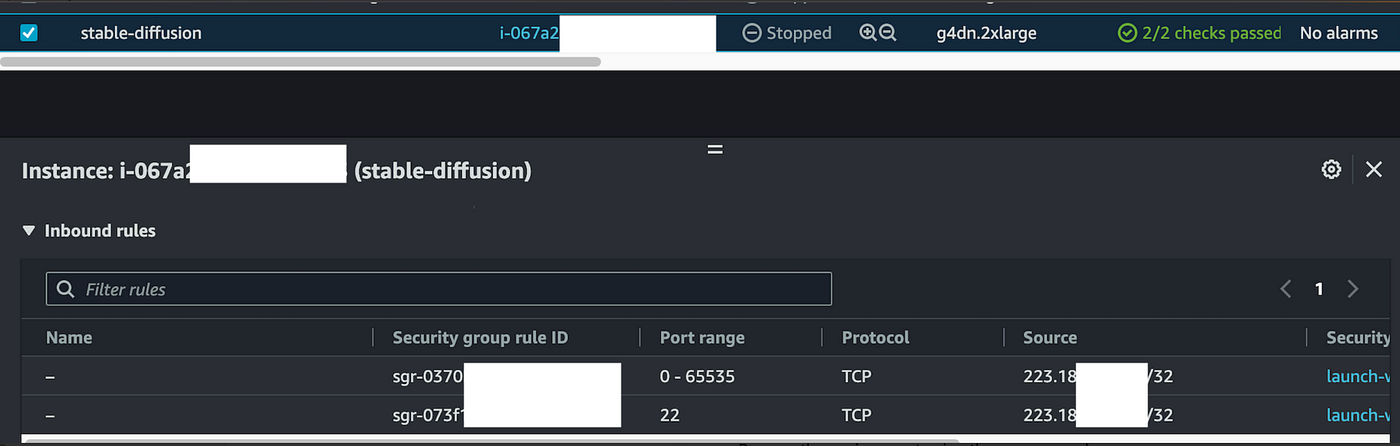
Remember to update your EC2 Security Group, and allow your IP to SSH port and WebUI port on EC2.
For security reasons, It would be great if you allow ONLY your own IP.
Connect to your Instance
You may use SSH tunneling so that you can visit your local IP to access webUI.
Install GPU Driver
Prepare the environment using these commands.
sudo apt-get update -y
sudo apt-get upgrade -y linux-aws
sudo reboot
sudo apt-get install -y gcc make linux-headers-$(uname -r)
If you see the following screenshot, just hit ok.

Follow this guide to install the correct GPU driver for your instance. Here are the commands I have used for your reference:
sudo apt-get install linux-headers-$(uname -r)
distribution=$(. /etc/os-release;echo $ID$VERSION_ID | sed -e 's/\.//g')
wget https://developer.download.nvidia.com/compute/cuda/repos/$distribution/x86_64/cuda-keyring_1.0-1_all.deb
sudo dpkg -i cuda-keyring_1.0-1_all.deb
sudo apt-get update
sudo apt-get -y install cuda-drivers
sudo apt install python3-pip
pip install torch
You may also use this Python script for testing whether Cuda is installed successfully:
import torch

print(torch.cuda.is_available())
print(torch.cuda.current_device())
If you install the CUDA driver successfully, you will see this result:
ubuntu@ip-172-31-13-187:~$ python3 cudatest.py
True
0
Installing WebUI
After launching the EC2, than you can connect into your EC2 using SSH, and we can start installing Stable Diffusion and WebUI. Here is a reference guide.
First, update your system to ensure that all packages are up-to-date, then install the dependencies:
# Debian-based:
sudo apt update
sudo apt upgrade
sudo apt install wget git python3 python3-venv python3-pip- To install in
/home/$(whoami)/stable-diffusion-webui/, run:
/bin/bash
sudo su - ubuntu
bash <(wget -qO- https://raw.githubusercontent.com/AUTOMATIC1111/stable-diffusion-webui/master/webui.sh)
Step 2: Start Stable Diffusion WebUI
Start the WebUI by running the following command:
cd /home/$(whoami)/stable-diffusion-webui/
./webui.sh
There are extra options you can use when running ./webui.sh
./webui.sh [--listen] [--xformers] [--share]— listen, means exposing a port, if you need a load balancer to forward traffic to EC2 instance, add these options— share, it will create a DNS url to access your instance— xformers, add this if you want to installxformersfor stable diffusion
This will start the web server on the default port (7860). If you are using — listen, then you can access the WebUI by opening your favorite web browser and navigating to http://YOUR_EC2_IP_ADDRESS:7860.
You may skip the “Access the WebUI without listen and share options” and start playing.
Access the WebUI without listen and share options
I personally would prefer using SSH tunneling to access the EC2 instance, — listen and — share have some conflicts with extension installation.
So here is the ssh tunnel command.
ssh -L 127.0.0.1:7860:127.0.0.1:7860 -i "stable-diffusion.pem" ubuntu@XXXXXXXXXXXX.compute-1.amazonaws.comYou can access the WebUI by opening your favorite web browser and navigating to http://localhost:7860.
Step 3: Install Checkpoints

Understanding Pre-Trained Models
At the core of image generation, we find pre-trained models, often referred to as checkpoint files. These models consist of pre-trained Stable Diffusion weights designed to produce either general visuals or images within a specific genre.
The types of images a model can generate are determined by the data used during its training process. For instance, if a model has never encountered a cat during training, it won’t be capable of generating a cat image. Similarly, if the training data consists solely of cat images, the model will exclusively generate cat visuals.
Popular Pre-Trained Models
There are several well-known pre-trained models available for image generation, including:
- SD v1.5
- Deliberate
- Anything V4
- Anything V5
- Open Journey v4
Each model is tailored for different purposes and genres, so it’s crucial to choose one that aligns with your specific needs and goals. You can also find out different models on the CivitalAI website.

Installation Checkpoints
We will use RPG Checkpoint in this tutorial, visit this model page, right-click on the Download button, then click “Copy Link Address”:

The model needs to place at models/Stable-diffusion folder, so go to your EC2 terminal and run the following command:
cd ~/stable-diffusion-webui/models/Stable-diffusion
wget --content-disposition THE_LINK_YOU_COPIED
After downloading it, hit reload in the top left-hand corner.

You will able to check the RPG checkpoint.
Step 4: Download VAE File
When using Stable Diffusion models for generating images, we often use a tool called Variational Autoencoders (VAEs). VAEs can help the model handle noise, smooth blending, and save space and time, etc.
Let’s install the VAE to the WebUI. Usually when the checkpoint page will suggest what kind of VAE files can be used. For example, in RPG checkpoint it suggests we use vae-ft-mse-840000-ema, so we can visit: https://huggingface.co/stabilityai/sd-vae-ft-mse-original/blob/main/vae-ft-mse-840000-ema-pruned.ckpt
Hit “Copy Link Address” on the “download” link

Go back to EC2 instance terminal:
cd ~/stable-diffusion-webui/models/VAE
wget THE_LINK_YOU_COPIED
Step 5: Start Generating Image!!
Prompt
The diffusion model works in a way that it starts with random noise and gradually transforms it into a coherent image representation, guided by input from the user in the form of writing prompts or textual descriptions.
Put this in Prompt
hoto of the most beautiful artwork in the world featuring soft lustrous male hero, ((epic heroic fantasy muscular men rugged wet wounded hero angry looking with long hair and long beard and fierce looking in a dynamic posture dying on the floor, fantastic location, majestic cluttered environment)), full body 8k unity render, action shot, skin pores, very dark lighting, heavy shadows, detailed, detailed face, (vibrant, photo realistic, realistic, dramatic, dark, sharp focus, 8k), (weathered damaged old worn leather outfit:1.4), (intricate:1.4), decadent, (highly detailed:1.4), digital painting, octane render, artstation, concept art, smooth, sharp focus, illustration, art by artgerm, (loish:0.23), wlop ilya kuvshinov, and greg rutkowski and alphonse mucha gracias, (global illumination, studio light, volumetric light), heavy rain, particles floatingFor more prompt guidelines, you may reference this
- RPG User Guide v4.3 here
Negative Prompt
It refers to textual inputs that guide the AI to avoid generating certain features or elements in the resulting image.
Put this in Negative Prompt:
flower, facial marking, (women:1.2), (female:1.2), blue jeans, 3d, render, doll, plastic, blur, haze, monochrome, b&w, text, (ugly:1.2), unclear eyes, no arms, bad anatomy, cropped, censoring, asymmetric eyes, bad anatomy, bad proportions, cropped, cross-eyed, deformed, extra arms, extra fingers, extra limbs, fused fingers, jpeg artifacts, malformed, mangled hands, misshapen body, missing arms, missing fingers, missing hands, missing legs, poorly drawn, tentacle finger, too many arms, too many fingers, watermark, logo, text, letters, signature, username, words, blurry, cropped, jpeg artifacts, low quality, lowresOther Parameter
Steps: 20, Sampler: DPM++ 2S a Karras, CFG scale: 7, Seed: 4141022542, Size: 512x728, Model hash: e04b020012, Model: rpg_V4
Final UI

Than you can hit “Generate” button now.
Result
As you can see, the image quality is very high. If you are interested, you can go to CivitalAi and download additional checkpoints to try out!


Step 6: Terminate your Resource
- Remember to terminate the EC2 instance that you have recreated for stable distribution.
Further Reading
Here are some more resources for reference:
Models and CheckPoints
- More explanation about models
- Not Safe For Work (NSFW) — It includes lots of models trained by the community. Be careful, as it includes quite a few pornographic images.
- Hosting loads of open sources models.
Prompts
- More for anime with different effects — https://docs.qq.com/doc/DWHl3am5Zb05QbGVs
- Prompt and Image library — https://lexica.art/
- Another Prompt and Image library — https://www.krea.ai
- Prompt Builder — https://promptomania.com
Conclusion
In this blog post, we covered the installation process and basic usage of Stable Diffusion WebUI, prompt, and negative prompt. These powerful tools allow you to easily generate high-quality images using different models for different purposes.
In the next blog, I will introduce ControlNet and explain how to use it to transfer style from one image to another.
You can also connect with me on LinkedIn.