From Functions to Python Package
Learn from the scratch about how to convert your functions into packages and distribute
Coding in Python is fun but what makes it even more fun is the availability of Packages suited for different purposes. For example, availability of scientific calculation and Machine Learning packages is what has made Python the most popular language in Data Science and Analytics. In this post, we will get an introduction to the world of Python packages and see how we can build our own packages.
In my previous post about Python modules, Use Modules to Better Organize your Python Code, I discussed how we can better organize our codes using Python Modules. In this post we will take the next step and learn how we can better organize our Python modules using Package.
What and Why?
Python packages are collections of modules. If Python modules are considered as the homes of functions and variables then packages are the homes of modules.
❓ But if we can organize our codes using modules then why bother to use packages?
As we already know the codebase tends to grow. With the growing code base, you will very likely group your functions into multiple modules based on the types of tasks they perform. As the number of modules grow, a natural progression is to find a way to organize the modules based on a common group they fall into. And a set of modules organized in a directory form can easily be turned into Python Package in order to make the module usage and maintenance streamlined.
Packages are a way of structuring Python’s module namespace by using “dotted module names”. — Source: Python Tutorial
Once a package is installed, we can easily access to the modules stored in different directory levels using a dot notation.
An Example Scenario
Before getting into our discussion about packages, let’s think about a scenario so that it’ll be easier to put our learning into context. Let’s assume that we are working on a project where we get user names separated by a specific character stored in a long string. We need to break them down and assign them with unique numeric IDs so that they can be stored in a database in the future. So our tasks are to:
- Break the input string into a set list of names,
- Then assign unique IDs to these names.
To perform these tasks we will build a couple of functions, store them in a couple of modules, and eventually will wrap them inside a Python package. It’s definitely an overkill to build a package for such a trivial project but for our learning purpose let’s assume it’s a good idea for now.
Two Modules
Let’s create a couple of modules: stringProcess, idfier.
stringProcess: A module that will help us process strings. Currently, it contains just one function calledstringSplit()that takes a string and then splits it based on the selected separator.idfier: A module that will help us create unique IDs. Currently, it contains only one function calledrandomIdfier()that takes a list of name, assign them with randomly generated unique IDs, and save them as a dictionary.
Create two separate .py files with the codes below and name the files by the module names. Also, make sure to save them in the same directory where you are running your script or notebook.
Useful Module Properties for Package Building
We have discussed general module properties in our last post. Here we will discuss some additional properties that will come in handy in our discussion about package development.
Module Initialization
Once a module is imported, Python implicitly executes the module and have it initialize some of its aspects. One important aspect to notice is that:
A module initialization takes place only once in a project.
If a module is imported multiple times, which is not necessary but even if it happens i.e. inside a module used, for the subsequent imports, Python remembers the previous import and silently ignores the following initializations. You can see this feature in action in the following example. Where we see that when we import idfier and stringProcess modules twice but they only print out the messages once during the first initialization and don't produce any message during the subsequent imports.
import idfierimport idfierimport stringProcessimport stringProcessidfier is used as a module
stringProcess is used as a module
Private Properties in Modules
You may want to have variables inside your Modules that are only intended for internal use. By nature these are considered private properties. You can declare such properties i.e. variables or functions, by one or two underscores (__).
But adding underscores is merely a convention and doesn't impose any protection per se.
⚠️ Unlike other languages like Java, Python doesn’t impose any strict restrictions on accessing such private properties. Adding underscores gives other developers a note that the properties are only intended for internal use.
__name__ Variable
Modules are essentially Python scripts. When Python scripts are imported as Modules, Python creates a variable called __name__ and stores the name of the module in it e.g. when we import our idfier module, the __name__ variable contains the value - idfier in it. On the contrary when a script is directly executed, the __name__ variable contains __main__ as the value.
For demonstration, let’s add the following simple if-else condition inside the stringProcess.py file and check out how we can use the __name__ property.
name = "stringProcess"if __name__ == "__main__":print(name, "is used as a script")else:print(name, "is used as a module")
In the code cell below we called stringProcess module both as a script and a module. See how two methods produce two different messages.
🛑 Remember, to restart your Jupyter notebook or re-run your script before running the following code block otherwise you wouldn’t see the outcomes properly. Remember the rule of Python initializing a module only once?
%run -i stringProcess.pyimport stringProcessstringProcess is used as a script
stringProcess is used as a module
💡 So how would this __name__ variable be of any help?
__name__ variable can be a very useful feature to run some primary tests on codes inside the module script. Using this variable’s stored value, you can ask Python to run some tests during the development mode when you are actively working with the script and ignore them while they are used as modules in a project. We will see a demo of this functionality a bit later.
Improving idfier
Now based on our newly known properties of the module, let’s improve the module — idfier.
- Improving
randomIdfier(): Currently this function generates a random integer between 1000 to 9999 and assigns it as a value. But since this number is generated randomly there's no guarantee that the numbers will be unique. But for our purpose, we need it to create unique numbers to be used as IDs. To ensure uniqueness, let’s add awhileloop to check for duplicates and re-generate random numbers unless it finds a unique one. - Using
__name__for Automated Test: We will add a test code block and wrap it inside aif-elsecondition so that it will run the test only when the value of__name__ == "__main__", or in other words the modules scripts are directly run. This simple test will check if the length of unique ID values equals to 2 when we runrandomIdfier()with an input of string containing two names. - Adding Short Descriptions: We have used
""" """(docstring) to add short descriptions for the code blocks.
import idfier as idfidf.randomIdfier(['name1', 'name2'])idfier is used as a module{'name1': 6571, 'name2': 7469}
- Execute
idfier.pyas a script. Can you guess the output? - Try changing the code inside so that the test fails. They execute it again.
Python’s Search for Module
So far we have left our modules in the same directory with our project script. But in real projects, we would like to keep our modules and packages in a separate location. So to mimic that, let’s copy our two modules to a different folder, and let’s call this folder Silly_Anonymizer.
❓ So how do we add this location to our Python project?
Python maintains a list of locations or folders in
pathvariable fromsysmodule where Python searches for modules.
It searches the locations inside sys.path in the order they are stored in the list starting with the location where the script's execution happens.
import syssys.path['C:\\Users\\ahfah\\Desktop\\Curious-Joe\\content\\post\\2202-04-02-oop-python-package',
 'C:\\Users\\ahfah\\AppData\\Local\\Programs\\Python\\Python39\\python39.zip',
 'C:\\Users\\ahfah\\AppData\\Local\\Programs\\Python\\Python39\\DLLs',
 'C:\\Users\\ahfah\\AppData\\Local\\Programs\\Python\\Python39\\lib',
 'C:\\Users\\ahfah\\AppData\\Local\\Programs\\Python\\Python39',
 'c:\\Python_Envs\\pcap02',
 '',
 'c:\\Python_Envs\\pcap02\\lib\\site-packages',
 'c:\\Python_Envs\\pcap02\\lib\\site-packages\\win32',
 'c:\\Python_Envs\\pcap02\\lib\\site-packages\\win32\\lib',
 'c:\\Python_Envs\\pcap02\\lib\\site-packages\\Pythonwin']
We can add our custom module location to this list and make sure that Python knows where to find the module. The Silly_Anonymizer module directory is located here on my workstation: C:\Users\ahfah\Desktop\Anonymizer\Silly_Anonymizer. Let's add that and check that out.
sys.path.append('C:\\Users\\ahfah\\Desktop\\Anonymizer\\Silly_Anonymizer\\')sys.path[len(sys.path)-1]'C:\\Users\\ahfah\\Desktop\\Anonymizer\\Silly_Anonymizer\\'
🛑 Note the double backslashes. Backslashes are used to escape other characters so we need to use double backslashes to have Python understand that we are looking for a literal backslash.
Building a Package
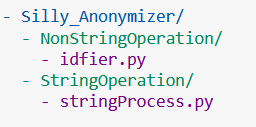
Putting our modules inside Silly_Anonymizer is the first direct step towards making a Package. Let’s create two sub-directories inside Silly_Anonymizer— NonStringOperation and StringOperation, so that in the future if we have more modules we can store them based on their types of tasks - manipulating strings, or manipulating non-string operations. For now, let's move our two modules inside these two sub-directories: idfier.py inside NonStringOperation, and stringProcess.py inside StringOperation. So the folder structure should look like this:
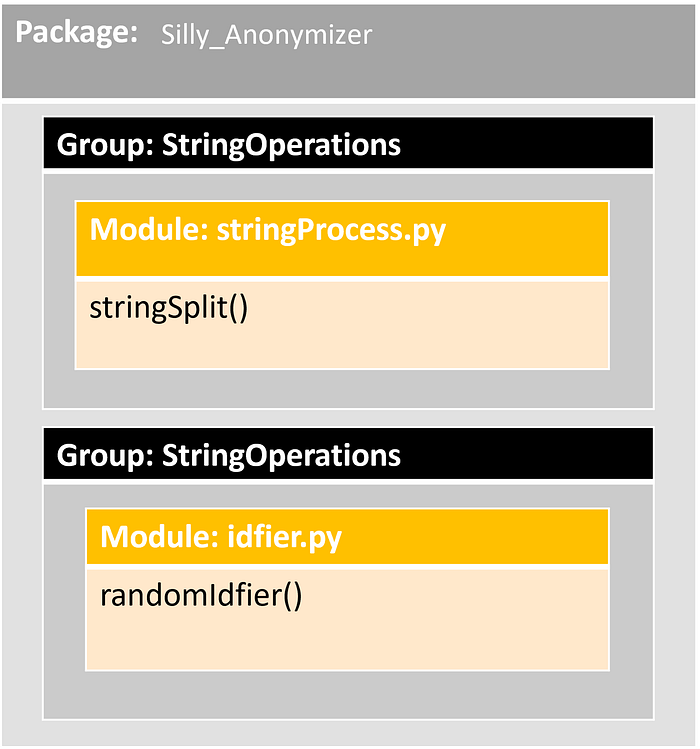
Looking at the Silly_Anonymizer directory as our package shows us the directory structure of the Python package!
A concrete view of the function, module, and package relationship for our Silly_Anonymizer package is as follows:
Initializing a Package
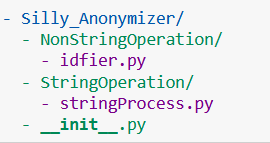
Like Modules, Python Packages also need an initializer. To do that we need to include a file called __init__.py in the root directory of Silly_Anonymizer. But since a Package is not a file we can't do that as part of a function and hence this separate file is used for initialization. It can be left empty but it needs to be present at the root directory of a module directory to be considered as a Package.
So after adding __init__.py the Anonymizer folder should look like this:
🛑 Note, that you can have __init__.py in other sub-folders too depending on if you need any special initialization for them or just want to consider them as a sub-package. Which we will do later on in our package too.
Importing a Module from Package
Once we have __init__.py file in our module's home directory, we are ready to use it as a Package. To import a module from a Python package we need to use a fully qualified path from the root of the package. In our case, for the module - stringProcess the import would look as follows:
import Anonymizer.StringOperation.stringProcess as sp> stringProcess is used as a module
sp.stringSplit(string="Arafath, Samuel, Tiara, Nathan, Moez", separator=",")> ['Arafath', ' Samuel', ' Tiara', ' Nathan', ' Moez']
💡 Python can also read packages from the compressed locations.
Python packages can be imported from zip folder too. If you notice the output from sys.path you may already find some zip folders in the list. That's because Python treats the zip folders as regular folders.
🛑 Try zipping Simmy_Anonymizer into a zipped folder Silly_Anonymizer.zip and try to import it.
Publishing a Package
We have built our package and it’s ready to be used locally. Now let’s talk very briefly about how we can make it available for others to use. For this purpose, we will use PyPi. Python Packaging Index or PyPi is the most commonly used repository to host Python packages.
⚠️ A Word of caution
The steps for package publishing explained here is the bare minimum requirement to publish a package. Use it as the stepping stone and then explore the official documentation to understand the nitty-gritty of package publication. I will add a couple of resources as references.
Preparation
To make our package ready for upload, let’s add the following files to the directory where our module directory is located:
Add a Git Repository for Silly_Anonymizer
Create a remote repository in GitHub, or any other distributed version control solutions, and add the Silly_Anonymizer package to the repo. You can check mine here.
Add a readme.md file
A README file give the users a description of the project. In our case, it will describe the users, what the Silly_Anonymizer package is about, how to use it and so on. Check the GitHub repo for a sample readme file.
Add a setup.py file
This is the main file required to successfully prepare a package for PyPi upload. This file contains some basic instructions that ensure that this local directory is prepared properly for the upload to PyPI. Check out the sample file in the GitHub repo.
The information in the setup files facilitates the package development, hosting, and maintenance. The three absolute minimum required properties are name, version, and packages. For detail about these and all the parameters checkout the official documentation.
With these files included the file directory should look like this:

Building the Distribution Package
PyPi distributes Python package source codes wrapped inside distribution packages. Two of the commonly used distribution packages are source archives and Python wheels. To create to source archive and wheel for our package we will use a package called twine and run python setup.py sdist bdist_wheel.
This should create two files in the newly created directory called dist - a source archive (.tar.gz file) and a wheel (.whl file). Checkout the source archive file to make sure all the source codes are populated inside it.
Quick Check
We are ready to push our package to PyPi. Before pushing it to PyPi, let’s run twine check dist/* to quickly check if the package will properly render in PyPi. If everything goes properly, you should see PASSED printed on the screen after running the check.
Upload
PyPi has a test version of it, which we can use for learning and testing purposes. We will use the PyPi test to host our package. Before doing that, make sure you register in PyPi test.
Once you are registered, run twine upload --repository-url https://test.pypi.org/legacy/ dist/*. Enter your username and password once prompted.
🛑 If you have followed the article so far, you will not likely be able to upload the package with the same name as I have already uploaded it. Give it a different name and re-build the package.
🛑 Use Test PyPi search to find out if your package name is available.
That’s it! You should see the location of your newly created Python package on your console. Checkout mine here.
What’s Next?
In this post, I tried to take someone from the functional understanding of writing Python functions to build his/her first Python package. Before ending by reiterating what was stated earlier, this article is by no means a detailed tutorial on how to build a package for production. In a production code, it’s imperative that you add rigorous testing. Also, it’s unlikely that you’d build a package without any dependencies! I didn’t cover either of these, so make sure you learn about them.
As promised, here are a couple of resources that you can use to supplement your understanding:
I like writing about Data Science and the tools used in DS. Here are a few stories you may enjoy:

