Flow Navigation With SwiftUI 4
Implementing the new NavigationStack programmatically and without NavigationLink

Having just revisited this navigation for SwiftUI 3 here (which updated the original approach for SwiftUI 1 here), Apple has since rethought navigation with the new NavigationStack as part of the latest SwiftUI 4 release. This is great news… and covers most of my previous suggestions!
Previously, NavigationView required explicitly defining navigation “edges” and the use of multiple flags which could lead to confusion. The new approach uses a stack creating a non-UI representation of the existing navigation and works beautifully with our previous programmatic approach without many changes.
This approach initially started with a review of a multiscreen onboarding flow with SwiftUI. As with all multiscreen data entry flows, they often represent an interesting problem of how to decouple data, view, and navigation logic.
So, what makes a great multiscreen data entry flow? Here’s what I came up with. For want of a less grand term, I’ll call it my “screen flow manifesto.” I use the “screen” here rather than view because we are explicitly referring to whole-screen navigation.
- Screens should have no “parent” knowledge nor be responsible for navigating in or out.
- Individual view models for every screen.
- Overall flow control logic is separate from UI implementation and is testable without UI.
- Flexible and allow for branching to different screens in the flow.
- As simple as possible but composable and scalable.
Navigation Requirement
So onboarding may be simple, perhaps two or three screens asking the user some simple personal information. A “next” button would move the user forward in the flow.

However, what’s usually more typical is a more complex flow with branching. Maybe the user isn’t ready to share all those details yet or perhaps more details are needed depending on previous responses. So, maybe this is more representative:

Initial Implementation
As mentioned previously, we will be using NavigationStack. This can be bound (2-way binding) to a navigation path. In our first implementation with just a 3-screen flow, we are going to useNavigationPath() which is a type-erased sequence. We will add the navigation path to a navigation-focused view model and pass this around (more later).
Within NavigationStack we define a root view (in our case a VStack with text and a button). This also contains navigation destination modifiers that trigger the actual navigation. Any appending to the navigation path will point SwiftUI to the appropriate new view for the new screen based on the type and execute a push animation.
In this implementation, we use a view model called FlowVM that controls the navigation flow (different from screen view models). This view model contains the navigation path allowing us to trigger the actual navigation outside of the views (manifesto points 1 and 3).
In our example, adding an integer to the navigation path will push aContentView2 to the stack, and adding a string to the path will push a ContentView3. Now simple manipulation of only the navigation path (which is a sequence) will directly affect navigation giving us full programmatic control. Here lies the beauty (and covers manifesto point 4)!
- Push: Append a particular type.
- Back to root: Reinitialize the navigation path.
- Back 1 screen: Remove the last value.
We can also go back to multiple screens withremoveLast(x).
You’ll also note we no longer need to useNavigationLink at all. NavigationLink is still an available option in SwiftUI 4 but its main use is in view-to-view navigation — something we want to avoid here!
View Models and Binding
On to manifesto point 2 — separate view models for each screen. Usage and implementation of view models may differ here and I’ve heard concerns about the overuse of the MVVM design pattern in SwiftUI. It certainly isn’t a term used in anything official from Apple.
What I want is a non-UI representation of the view so I can cleanly encapsulate non-UI logic, unit test it without the view, and of course, easily bind to the view (both ways). It also should be specific to the view so the view can be moved around and is not dependent on anything external (i.e., composable — manifesto point 5). It is the interface of the view to the rest of the application. I call this a view model.
Within SwiftUIObservableObject (which is actually part of Combine) makes for a good view model that enables two-way view binding. The newer approach with @StateObject creates a stable view model which is lazily loaded only when needed.
Note also that in this version of a view model, UI events are also passed into the view model from the view, and any view-specific logic (e.g., network calls) may be triggered from there (usually calling down to an API layer for example).
We also have the flow view model (FlowVM) to manage the screen-to-screen navigation. It does not know the views and is designed to be testable. It itself may require API calls to determine the path to follow. Note this is similar to a “coordinator” but to me is considered a model of the navigation and therefore I’ve used the term “view model.”
Each screen then also has individual view models as well. These screen view models handle the UI events and screen logic. Ultimately (upon completion of all screen logic after a “next” tap for example), we pass the control back from the screen view models to the flow view model to ultimately decide on where to navigate.
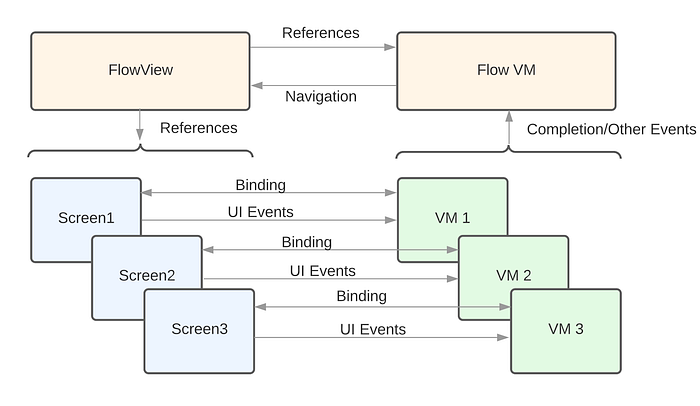
For completion, eventing back from the screen view models back “up” to the flow view model, we can use a variety of techniques. Delegates and call-backs are all valid implementations but I like to use Combine’s PassthroughSubject passing back a reference to the screen view model itself.
So the screen view model and the view would like something like this:
And wired in the flow view model to listen to the completion events as follows using a sink and storing that in a subscription. You’ll notice the factory function to create the screen view model is handled here which also added the event listening. This factory function is called by the flow view in screen view initialization.
The sink calls a method directly to handle any logic (and navigation) and stores the subscription in a set attached to the view model (which can be used for all subscriptions).
Bringing It Together
In our first implementation of the navigation stack, we used NavigationPath and rather non-sensical types (integers and strings) to drive the navigation. As each screen is now represented with a view model we can actually drive the navigation by adding the view models themselves to the path.
We could add the view models directly to NavigationPath and create multiple navigation destination modifiers for each view model type. However, this type erased sequence offers only limited inquiry capability (for example — cannot easily inquire on what screen is currently shown).
Instead, we can bind the navigation stack to a simple enum array that contains an associated value of the view model. Now the path is an array we have maximum control and introspection of its current state. The only requirement here is that the array is Hashable, which in turn requires the view models to be Hashable. A little extra work here, but straightforward.
Check out the repo for full code. This also includes examples of backward navigation (including back to root or screen two, etc) and Hashable conformance.
The “maximum control” also allows us to handle some interesting situations that I don’t recall being able to do in UIKit. You can change a previous screen to be something else entirely (navigationPath[0] = ... ) and now the back button goes to a different screen. Or weirdly removing a screen previous screen deeper in the stack (e.g. navigationPath.removeFirst() ). This will programmatically navigate backward with the first screen removed from the stack. Perhaps the last one is non-sensical but I like the way SwiftUI worked as I expected even in these odd situations. Well done Apple!
Testing
A big part of our design is to improve testability and allow for unit tests of the navigation flow independent of the UI (manifesto point 3). Now with view models, this is easily done. Here’s an example:
We are able to trigger a “next” button tap and then check the navigation logic has been triggered — all without actual UI.
Note though this is obviously a simple implementation. If the view models had API calls, we would have to think about some injection to mock those out. In addition, this is obviously not a UI test.
We may also want to add some UI tests (perhaps using snapshot testing) — but this is beyond the scope of this article.
And Finally…
I hope this has made sense! After 4 versions, this iteration of SwiftUI’s push navigation is the approach we’ve been looking for. This should now have answered most of the concerns of the community at large (as well as my previous suggestions here).
Any improvements? Right now, there is no obvious path to creating custom push navigation. An additional larger thought is to create a single, converged navigation API for both push and modal navigation. Apple — your clock starts now! 😁
The full code can be found at https://github.com/nickm01/NavigationFlow. Enjoy!
