FullStack Web3 — Everything You Need to Know
We learn exactly how web3 / blockchain / smart contract applications work in the front end using HTML and JavaScript. We then go through 6 different ways you can connect your Metamask, Phantom, or other blockchain wallet address to your front end. We’ll look at popular Nextjs / React packages to make your development lifecycle 100 times easier.

You’ve just built an amazing web3 application with solidity, rust, or maybe vyper, and you tell your non-developers friends “to interact with it, you just need to call these functions I’ve written with your backend scripts.”
And to your surprise, none of them knew what you were talking about.

In this article, we’ll learn exactly how web3 / blockchain / smart contract applications work in the frontend using HTML and JavaScript.
Next, we’ll then go through six different ways you can connect your Metamask, Phantom, or other blockchain wallet address to your frontend.
Finally, we’ll look at popular Nextjs / React packages to make your development lifecycle 100 times easier.
So, let’s get started.
Introduction
In order for web3 to be approachable to the masses, we need to have user-friendly frontends and websites. There are a few challenges that full stack software engineers run into when approaching this problem in the blockchain space.
- How do I connect Metamask to my UI? (Or Walletconnect, Phantom, etc.)
- How do I execute a transaction with my smart contract from a website?
- What are the tools the best of the best are doing?
So, in asking myself this problem and trying to figure out what to recommend to developers, I ended up looking at nearly ALL the most popular solutions. So in this article, we are going to:
- Understand what is going on in the browser when we want to interact with or send a transaction to a blockchain.
- We look at six of the most popular methods to connect to our web3 applications
- Give code examples and show what all the biggest players in the space use, so you can use the same tools!
If you’d like to see what some professional frontends look like right now, you can take a look at the Aave or Uniswap website.
Excited? Me, too. Let’s go.
How to Connect my Smart Contract to Metamask
Or another wallet in the browser, like Phantom, Walletconnect, etc.

Most “backends” to your web3/blockchain applications are going to be built with a framework like Hardhat, Brownie, DappTools, Anchor, or Foundry (or if you believe in the heart of the cards the Remix tool ). Our frontends are going to use anything and everything you’ve learned in traditional web2 space. HTML, JavaScript, CSS, and frameworks like NextJS, React, and Angular.
So if you’re familiar with traditional web development, you’ll be ahead of the game!
What Goes on in the Browser With Metamask
Now, if you want to follow along with this, please install Metamask. You can watch this video for a more in-depth follow-along.

Now, in your browser, right now, right-click the screen and hit “inspect” or “inspect element,” and you’ll see something like this:

This will show all the code that the website is using to render what you see on the screen. Then, if you hit sources in the top bar you’ll see something like this. (If you can’t see sources, you can hit the >> button to show more options.)
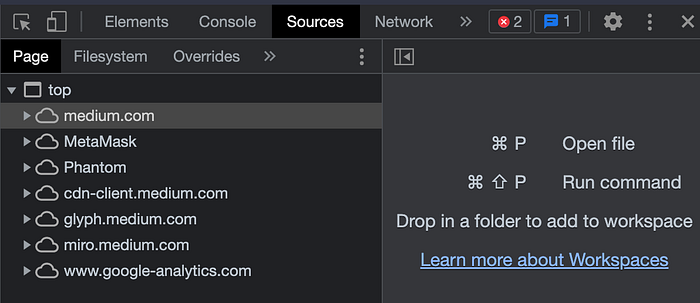
If you have Metamask installed in your browser, you’ll see a “Metamask” file on the left. If you have Phantom installed, you’ll see a “Phantom.”
These browser add-ons/plugins do something interesting, they automatically “inject” themselves into your browser and show up as a part of the website you’re on. This gives the website the opportunity to interact with them.
There is an object in every browser called the window object. We can see this object by clicking on the console tab, (similar to how we clicked on sources ) we drop into a JavaScript console, where we can write JavaScript and interact with JavaScript objects.
Let’s go ahead and type window and see what we get.
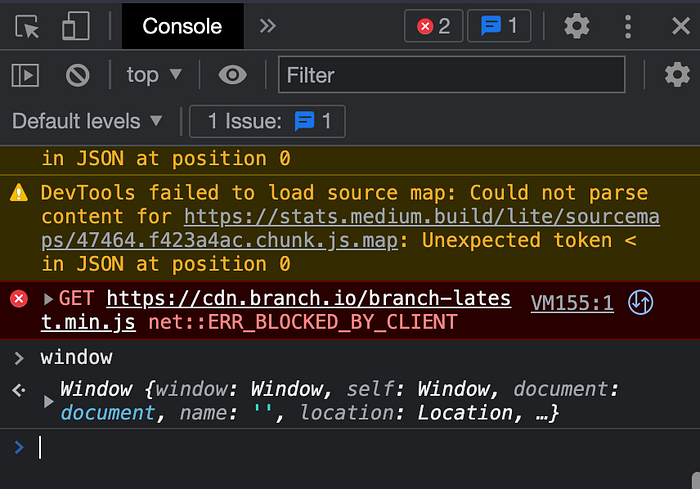
Awesome! We see the JavaScript window object in our browser. Now, since we have a Metamask source, this should mean we have an ethereum attribute attached to our window object. Type window.ethereum and see what you get (or window.solana if you have Phantom).
You’ll see an object response! If you didn’t have Metamask, you’d get an undefined. Each browser wallet will add its own attribute to the window object, and you can usually find it in their documentation. Here is the Metamask documentation talking exactly about window.ethereum .
Note: In prior versions, this was
window.web3it has since been changed towindow.ethereum
This is what’s known as our blockchain provider or our blockchain connection window.ethereum will be our provider. So why do we need that?
Blockchain Connection / Provider
Whenever we want to read data from a blockchain, call a function, or make a transaction, we need to connect to the blockchain network. If we send a transaction, we need to send the signed transaction to one blockchain node so that it can send it out to all the other blockchain nodes in the network. You can learn more about blockchain 101 in lesson 0 of this FreeCodeCamp video.
You might have used an RPC URL from Alchemy, Infura, or Moralis Speedy Nodes in your blockchain applications before. These are all “node-as-a-service” providers, and give us an HTTP endpoint to send requests to a blockchain node. The same happens with cryptocurrency wallets, our Metamasks have a connection to a blockchain node built-in. In fact, if you go to your Metamask “networks” tab, you can see the exact RPC URL your Metamask is using!
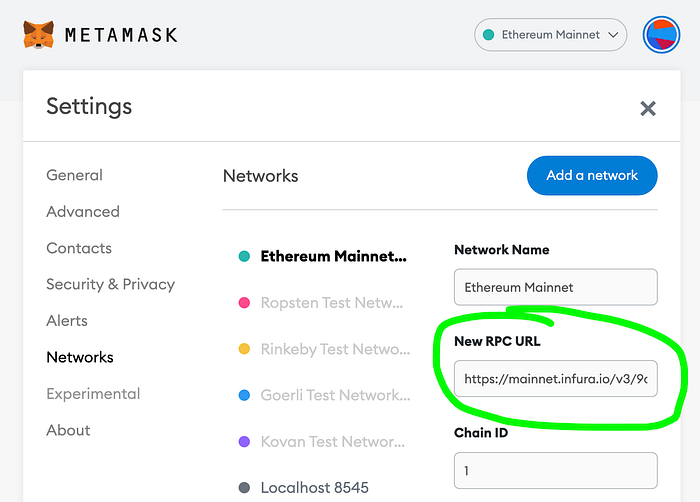
Boom! So whenever we do something with our Metamask, we make an API call to this RPC URL.
Connecting to a Cryptocurrency Wallet with HTML and JavaScript
Now, we are going to first show how this is all done in HTML and JavaScript, and then we will move on to our Nextjs/React examples. I have a full example of connecting to a cryptocurrency wallet using HTML/JavaScript in my Github here, and a list of all examples also in my GitHub.
First, let’s create a standard HTML document, and we will get it a Connect button.
<!DOCTYPE html>
<html>
<head>
<title>Javascript Test</title>
</head><body>
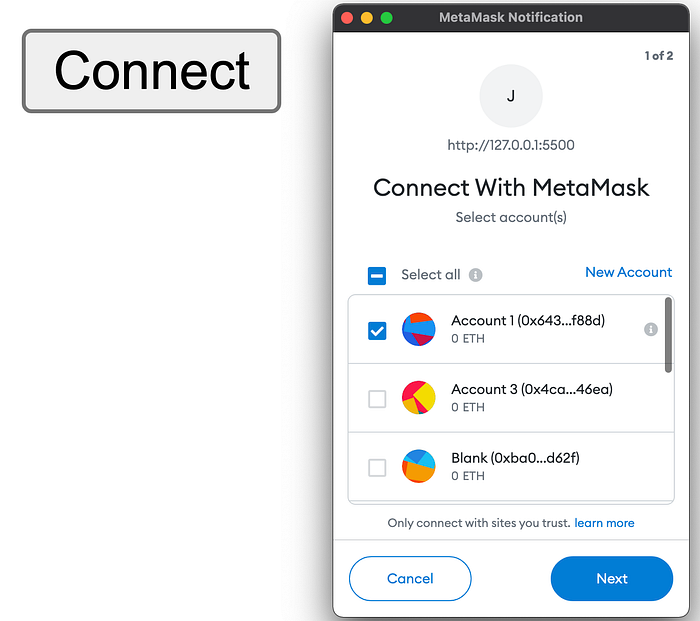
<button id="connectButton">Connect</button>
</body>
</html>
We can add some functionality to our button by adding a script tag and creating a JavaScript function that looks for the window.ethereum and if it finds it, it makes a request to connect.
And that’s all you need! The eth_requestAccounts comes directly from the Metamask documentation. If you were to name this index.html and run this in a browser, your metamask would pop up asking to connect.
Sending a Transaction
Now that we’ve connected our Metamask, it’s time to send a transaction. This is where we can use packages like ethersjs and web3js to connect our provider and then send a transaction. Typically, some sample JavaScript to execute a function / send a transaction in JavaScript would look like this:
const etheres = require("ethers")contractAddress = "0x5FbDB2315678afecb367f032d93F642f64180aa3";
const abi = // some big javascript ABI here...const provider = new ethers.providers.JsonRpcProvider(/* alchemy or infura */)
const wallet = new ethers.Wallet(/* Private key */, provider)const contract = new ethers.Contract(contractAddress, abi, wallet)
const contractWithSigner = contract.connect(wallet)
const transactionResponse = contract.someFunction()
The only difference for sending transactions in a browser is that we change the provider to be our window.ethereum and our wallet will now come directly from our provider . Since our metamask is both our provider and wallet (or signer) our code will look like this.
const etheres = require("ethers")contractAddress = "0x5FbDB2315678afecb367f032d93F642f64180aa3";
const abi = // some big javascript ABI here...const provider = new ethers.providers.Web3Provider(window.ethereum)
const signer = provider.getSigner();const contract = new ethers.Contract(contractAddress, abi, signer)
const contractWithSigner = contract.connect(wallet)
const transactionResponse = contract.someFunction()
You’ll notice, only the two lines in the middle changed, instead getting our wallet from the window.ethereum and our signer comes from our provider (aka metamask).
Now there is an issue here. Our browsers can’t understand require (and sometimes import has issues) so we can add some packages to help us out.
Since I don’t want this to turn into a frontend-focused blog, I’ll not just point you at my html-js-ethers-connect example which shows us how to run the rest of the example yourself. You’ll just need the following installed:
Then, you can follow the instructions in the README.md to get setup and do a full example with pure HTML and JavaScript for sending transactions in the browser!
And boom! You’ll have a working minimalistic frontend with your smart contracts!
Top 5 Best Frontend Web3 Setups
In no particular order. This could probably be it’s own blog…
Now, let’s get into giving you the tools you need for a full stack application. For each of these setups, I’ll include:
- How to set them up
- Minimalistic Demos
- Real-World Examples
So you can pick which one suits you the best! We are working with NextJS for all of these because ReactJS is the most popular frontend framework on the planet right now, and NextJS is built on top of it, and in my opinion is much more user-friendly than raw ReactJS. However, you could 100% work with Angular, Svelte, or otherwise.
You can find all my minimalistic code example full-stack-web3-metamask-connectors repository, which links out to all the demos.
Setting up a basic NextJS project
To get started, all of these projects are going to start with a basic nextJS project. You’ll need Node, Git, and Yarn installed to move forward. You can additionally follow along with the nextjs getting started documentation.
Run the following:
yarn create next-app full-stack-web3
cd full-stack-web3
And you’re done! You now have a basic setup. You can run yarn dev now to see what your current website would look like. And finally, just to delete all the “stuff” that it starts you out with, go into your index.js file, and delete everything so it just is:
export default function Home() {
  return <div>Hi</div>;
}
And now your frontend will just say “Hi.”
Setting up a local hardhat blockchain and contract
Now, since we are going to be testing executing functions, we are going to need a blockchain to send transactions to, and a smart contract to work with. I’ve already got one set up for you located at my hardhat-simple-storage GitHub. To set this up you can follow the README.md or run the following in a different terminal than the one running your frontend:
git clone https://github.com/PatrickAlphaC/hardhat-simple-storage
cd hardhat-simple-storage
yarn
yarn hardhat node
This will give you an output that will start a local blockchain, give you some temporary fake private keys, and deploy our SimpleStorage contract which has a store function that we are going to use. It takes a uint256 _favoriteNumber as input, and stores the number to a public variable. You can view the contract in the SimpleStorage.sol file.
Setup your metamask with our local blockchain
Now, we’ll want to connect our Metamask to our local fake blockchain. Why? So that we can send transactions and test quickly. This resembles a real blockchain, but this one we have control over. You could use a testnet if you like and skip this, but you’ll have to wait a long time for transactions to process, which no one wants.
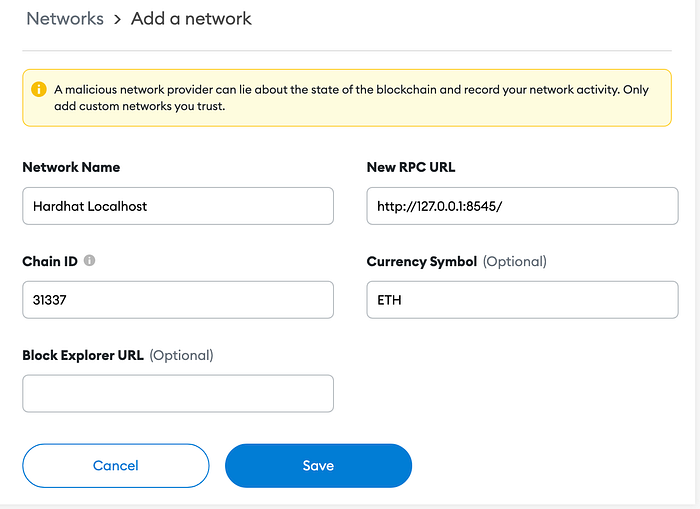
Where the blockchain node is running, you’ll see an output like: Started HTTP and WebSocket JSON-RPC server at http://127.0.0.1:8545/ . This is going to be our RPC URL similar to Alchemy.
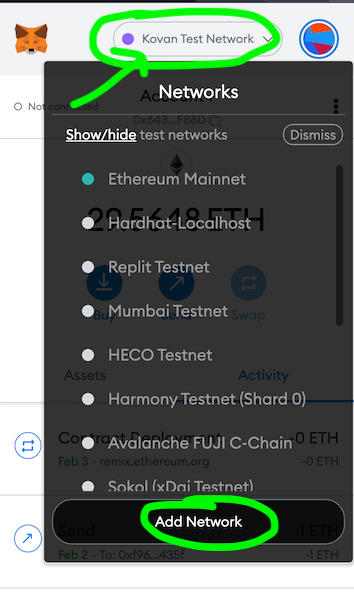
Now, in a Metamask without any real funds associated with it (please don’t ever use a Metamask with real funds for developing. Create a new browser profile or download another browser with Metamask) hit the networks button at the top, and “Add Network.”
Set it up like you see below and hit save. Then make sure you switch to that network (select it in the networks dropdown).
Now, hit the big circle in the top right, and hit “import account.”
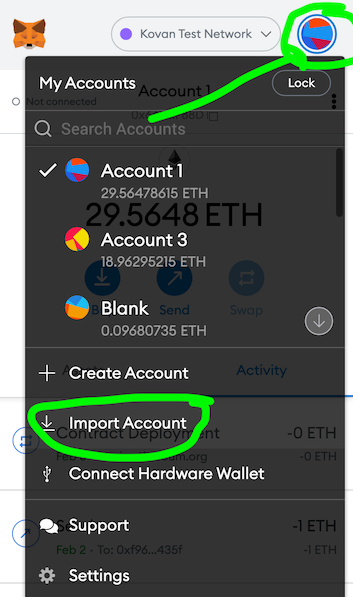
And add one of the private keys from the output of the yarn hardhat node command. You should now have an account, be on a local network, and have some fake test ETH. Your Metamask should look something like this:

And we are ready to go :)
Important note: If you ever run into an issue with your
noncebeing off, or transactions not sending properly. In your metamask while your imported account from hardhat is selected, go to the circle in the top right -> settings -> advanced -> reset account. This will remove the nonce issue.
Raw Ethers Setup

The simplest way to get started is just to use some of the tools you’re already familiar with, like Ethers. We can literally copy-paste what we did in our HTML setup into our index.js file.
For this, we added some extra functionality for us to display “Please install Metamask” or “Connected” when connected or the user doesn’t have Metamask. You’ll also see commands like useState and useEffect. These are known as React Hooks, and you can learn all about them from this Fireship video or the react docs. Although this app would work OK without them, we just wouldn’t be able to save the state of the application between renders.
Pros:
- Most granular control of our UI using Ethers
Cons:
- We have to write a lot of our own code, including Contexts.
- Is hard to support more than just Metamask connections (yes, there are other ways to connect to wallets!)
Real-world examples
Also, in future examples, I’m going to import the abi from another file, so it doesn’t clog up the article.
Web3Modal Setup
One of the other most popular ways to connect EVM-based blockchain applications to wallets is with Walletconnect. All of the examples I’m going to show (including the raw Ethers one) can connect to Walletconnect (and should!), so our Web3Modal setup isn’t the only one that can do this. One fantastic tool that members of the wallet connect team created was this Web3Modal tool, which allows us to have a framework to connect to ANY provider, including Ledger, WalletConnect, Torus, Coinbase Wallet, and more!
We just need to import the package, and our index.js might look like this:
You’ll see, we set up some providerOptions to tell our frontend what wallets we want to support, and what chains we want to support. We need to set a NEXT_PUBLIC_RPC_URL which points to another RPC_URL to connect to a blockchain. If we use walletconnect, we actually don’t use the built-in blockchain nodes of our users' metamasks.
Pros
- Easy to integrate multiple wallets
- Ethers is nice
Cons
- Still no built-in contexts
Real-World Examples
And if you’re looking to see some cutting-edge front-end use of Web3Modal, blockchains, and more, be 100% sure to check out Scaffold-ETH. It is an amazing learning tool by Austin Griffith that you can use to deconstruct some best practices.
Moralis

Now Moralis (or more specifically, react-moralis) is the first package to include context managers, which are INCREDIBLY helpful. They allow our whole app to share state easily between components, which is necessary since we need to pass around Metamask authorization.
Moralis was created by Ivan on Tech and team, to not only help developers connect to Metamask, but also help with any other backend systems a full-stack app might need. Etherscan and Opensea are both examples of web3 applications that still need backends and databases. Why? Because oftentimes you want to add a ton of functionality that would cost too much gas to do on-chain!
So you’ll still want to have your smart contract do all the main work, but Moralis can do all the work around it. Here is what our code for Moralis might look like:
You’ll see Moralis come with powerful hooks like useWeb3Contract that make getting state and interacting with our contracts even easier, and without the need for ethers! Instead of us writing our own connect function, Moralis comes with a function to do that for us as well with enableWeb3 .
Additionally, in our _app.js we’ll need to wrap our whole app with a Context provider, and we can do that like so:
import "../styles/globals.css";
import { MoralisProvider } from "react-moralis";function MyApp({ Component, pageProps }) {
  return (
    <MoralisProvider initializeOnMount={false}>
      <Component {...pageProps} />
    </MoralisProvider>
  );
}export default MyApp;
Morlais has built-in optionality to set up your frontend with a database as well, however, if you just want to use the hooks and functions, you can set initializeOnMount to false, and only set up a server if you want in the future!
Pros
- Context provider
- Minimalistic built-in functionality for interacting with smart contracts
- Optionality to include a backend for an even more feature-rich frontend
Cons
- Have to manually add your own wallets
Real-World Examples
Web3-React

Uniswap Engineering Lead Noah Zinsmeister and friends have built an amazing package called web3-react. This is one of the most widely used packages by top projects like Uniswap, Aave, and Compound. It also contains a context manager and a number of incredibly powerful hooks for you to just get started and get going, and some web3 wallet built-in connections.
Here is what your index.js might look like:
And our _app.js :
As you can see, we still use ethers to interact with our smart contracts, but we use hooks to enable our Metamask and any other wallet providers that we’d like!
Pros
- Context provider
- Minimalistic built-in functionality for interacting with smart contracts
- Built-in wallet connections
Cons
- Not as easy wallet setup as web3modal
- Need to write or use your own hooks to interact with your smart contracts.
Real-World Examples
useDapp
Ethworks is the team behind popular tools like waffle, which is one of the most popular testing frameworks that's even used by hardhat. They’ve done it again and made a framework similar to moralis with all the hooks and tools for building a frontend, and including a context provider.
Here is what our index.js might look like:
And our _app.js
We pass a config to our application that can include supported blockchains and other features for connecting. Similar to Moralis, useDapp comes with functions activateBrowserWallet to activate metamask / browser wallet and hooks like useContractFunction to interact with our smart contract (you don’t have to use ethers!).
Pros
- Context provider
- Minimalistic built-in functionality for interacting with smart contracts
Cons
- Not as easy wallet setup as web3modal
- No optionality for a built-in database
Real-World Examples
Summary
I know this was a long one, but that’s what I do, I make sure to go through everything and make sure I know what’s going on to give you the best guides in the space.
Happy coding!

