Dockerize Laravel-Vite + React Application in Your Development Environment
With artisan commands, composer commands, npm commands, cron jobs, queues, database, and redis cache containers

Table of Contents
1. Introduction
2. Prerequisites for this guide
3. Set up git
4. Download and install docker and docker-compose
5. Clone laravel application and create root folders
6. Create .env, .env.example and .gitignore files
7. Docker compose yaml file
8. Main containers
9. Utility containers
10. Configuring Vite asset bundler and InertiaJS
11. Starting your containers
12. Pushing code to github
13. Resources/Links
14. Conclusion
1. Introduction
This guide will show you how to set up a Laravel-React stack development environment using Docker and incorporate some extra utility containers to round off your setup.
The setup is operating-system agnostic, with no dependencies besides Docker and Docker Compose. It can run on all the major operating systems, such as Microsoft’s Windows, Apple’s macOS, and Linux, as long as Docker and Docker compose are installed.
This setup lets you mix and match the versions of your services per your preference by just editing a line or two. For instance, you can combine PHP 7.4, 8.0, 8.1 or 8.2 with Laravel 7, 8, or 9 as you see fit.
We will containerize a Laravel 9 application and allow it to communicate with other main/utility containers forming a complete dockerized development environment.
The tables below show the services (containers) we’ll be running in our Docker environment. I have grouped them into two (main containers and utility containers).
- Main containers — run continuously once started and often restart on failure unless stopped.
- Utility containers — these containers run commands for customization and optimization of the whole application. The containers get destroyed after running the commands.
2. Prerequisites for This Guide
- You should be conscious of the need to build containers and how they work.
- Familiarity with ReactJS and an understanding of how Laravel works are needed.
Now let’s dive into the code and docker commands.
3. Set up Git
To use Git on the command line, you need to set up Git on your computer. You will use Git for cloning the Laravel 9 application. Towards the end of this guideline, I will show you how to push the whole setup code to a GitHub repository using Git.
Set up Git by following this tutorial if it is not configured on your local machine.
4. Download and Install Docker and docker-compose
Download and install Docker from here. You can use either the Docker Desktop client or the Docker CLI client. Download and install docker-compose from here.
5. Clone Laravel Application and Create Root Folders
Go to a folder where you want to have your project stored locally and make the following folder/subfolders in the list below. You can open your project folder from Visual Studio IDE (VS Code) and do all your folder and file creations.
- docker/logs
- docker/mysql
- docker/nginx
We will use docker/logs folder to store container logs, docker/mysql to store mysql data and docker/nginx for NGINX configuration files. If these folders are not set up, data generated as the containers run gets destroyed every time they restart.
From the root of your project folder, clone the Laravel repository into a folder called src using Git. On VS Code, toggle the terminal and paste the below command.
git clone https://github.com/laravel/laravel.git srcNOTE: Delete the .github and .git folders within src. .github contains laravel's default GitHub actions while .git has Laravel’s repository details. We will create a new git repository from our project directory's root. We will also create custom GitHub actions in a later tutorial.
6. Create .env, .env.example and .gitignore files
Copy .env.example from the src folder to the root of your project directory. This file is just an example of what might be in the .env file. You can version this file.
In the same directory, create a .env file. Your application’s configuration variables will be stored here. This file may have different values for different servers and different developers when working as a team on a project. It should, therefore, not be versioned.
Create a .gitignore file and add the following code:
.env
docker/logs/*
docker/mysql/*
7. Docker Compose YAML File
Compose is a tool for defining and running multi-container Docker applications. With Compose, you use a YAML file to configure your application’s services. Then, with a single command, you create and start all the services from your configuration. — Docker Compose
Our docker-compose.yml file structure looks like this:
version: '3'networks:
  laravel:services:
  ... services go here
The version: '3' refers to the Docker compose version. Compared to version 2, version 3 is Swarm compatible; hence, you won't have to change anything if you decide to use the Docker Swarm orchestrator later.
A network called laravel is configured under networks: section. Containers that join this network will be reachable by other containers on the network. They are also discoverable at a hostname identical to the container name.
services: represents instances of images, for example, database service, Redis service, PHP service, etc.
Create a docker-compose.yml file in the project's root directory and put the following code in it:
Don’t worry about the details in this file; we will go through them in later sections of this guideline.
The project’s folder structure now looks like this:

8. Main Containers
8.1. NGINX service
Set up the container that will serve as the web server itself. It will receive HTTP requests from end users and send them to the PHP container that will process our Laravel code.
Here’s the NGINX service code:
Breakdown
build— Defines configuration options that Compose applies to build a Docker image.context— Defines the path to our Nginx dockerfile.dockerfile— This is the Dockerfile used for creating the Nginx image and is resolved from the context.args— Defines build arguments i.e.nginx.dockerfileARGvalues, as seen in the next section.restart— Defines the container's restart policy.container_name— Defines the container name.ports— Maps the host machine's port to the container's port.volumes— Mounts the project directory contents to the containers/var/www/htmldirectory and the.envfile to the container's location/var/www/html/.env. Any project content change made on the host machine will reflect in the container and vice versa.depends_on— This defines a dependency on another service to be running before building this service.networks— The service will directly communicate with other services within thelaravelnetwork.
nginx.dockerfile
The context of this file is the docker folder of the project. Below is our nginx.dockerfile file. It is based on the nginx:stable-alpine image, which is very lightweight, only ~5MB in size.
In the above dockerfile, we are copying the default.conf file from our project's nginx directory to the container's directory. It will override the default Nginx configurations.
Below is our default.conf file:
The configuration that allows the Nginx container to pass requests to PHP FPM (FastCGI Process Manager) is fastcgi_pass php:9000 . These requests are passed to the container called php through port 9000 .
8.2. PHP service
Unlike Apache web server, Nginx has to use PHP-FPM as a separate process to handle PHP client requests.
Below is the PHP service section:
Breakdown
Here we are using a custom dockerfile called php.dockerfile. The container_name is php and this container is only reachable internally by other containers through the port 9000.
php.dockerfile
The context of this file is also the docker folder of the project. Below is our php.dockerfile file. It is based on the alpine image (it is lightweight) php:8.1-fpm-alpine.
8.3. Mysql service
For our database container running Mysql, we’ll use DockerHub’s MariaDB official image directly in our docker-compose.yml file. It comes preconfigured and is supported by the community using best practices.
Here is what it looks like:
In this service, we have to define the environment variables: ${DB_DATABASE}, ${DB_USERNAME}, and ${DB_PASSWORD}. They are defined from the .env file that we had created earlier. Below is an example .env configuration.
DB_CONNECTION=mysql
DB_HOST=mysql
DB_PORT=3306
DB_DATABASE=laravel
DB_USERNAME=laravel_user
DB_PASSWORD=%6larav31
Typically, in Laravel, the DB_HOST is usually configured to be the database IP address i.e DB_HOST=127.0.0.1. However, in this case, we will use the mysql service name i.e DB_HOST=mysql.
The MySQL service can be accessed by other containers internally through port 3306 which has been exposed to the host machine at port 3307.
To avoid losing database data on container restart, the volume ./docker/mysql is mounted to /var/lib/mysql within the container. Mysql data will therefore persist in the host machine within ./docker/mysql directory.
8.4. Redis service
We will add a Redis service based on redis:alpine image to get Redis to work. The service will look like the one below:
We also need to update our .env file to use this redis service for queue and session management. Update the following sections of the .env file. We are using our Redis service name as the redis host, REDIS_HOST=redis.
QUEUE_CONNECTION=redis
SESSION_DRIVER=redisREDIS_HOST=redis
REDIS_PASSWORD=null
REDIS_PORT=6379
8.5. Cron jobs service
This service will be based on php.dockerfile that we had created earlier.
Here is the service file:
We use the schedule:work command instead of schedule:run running in the foreground and invoke the scheduler every minute. The entrypoint command executes when the container runs.
8.6. Queues service
This service is also based on php.dockerfile. The service configurations will look like this:
The entrypoint of this service will run the Laravel command php artisan queue:work. This command runs Laravel's base queue service, which processes all queued jobs. It is the default way of processing queues in Laravel. You can also set up Horizon and use it instead.
Horizon provides a beautiful dashboard and code-driven configuration for your Laravel-powered Redis queues. When using Horizon, you will update the entry point to entrypoint: ['php', '/var/www/html/artisan', 'horizon'].
8.7. Mailhog service
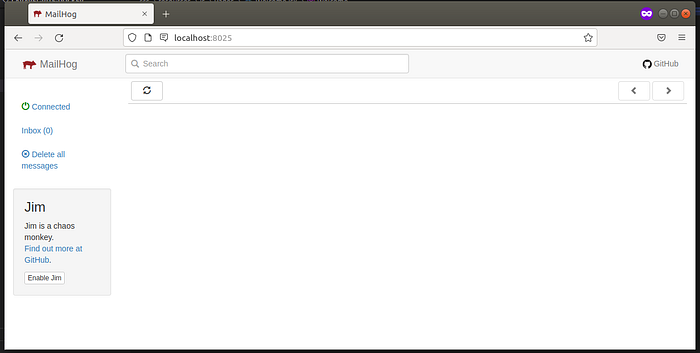
Mailhog is an excellent tool for confirming if your mailing works as expected in a development environment. It has a web-based user interface from where you can check your emails.
This service is based on mailhog/mailhog:latest image. It is not an official image, but the Mailhog team supports it, so you're in good hands. Unlike official images where the image repository is specified like so {repository}:{tag}. Here we have to identify the user as well, {user}/{repository}:{tag}.
By default, Mailhog stores logs. These aren’t useful to us, so we’ll set the logging driver to none.
Port 8025 is for connecting to the user interface dashboard, while the port 1025 is for connecting to the mailing server. You can access the dashboard via http://localhost:8025 on your host machine.
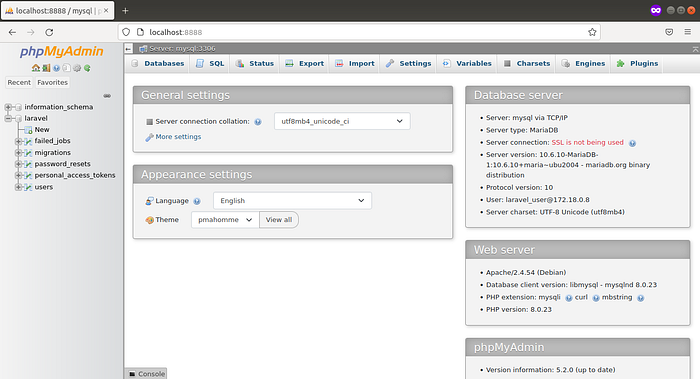
8.8. PhpMyAdmin service
PhpMyAdmin will provide us with a GUI for managing our database without having to access it via shell/terminal. The following are its service configurations:
This service is based on phpmyadmin:5.2.0 which is a preconfigured official docker image.
The environment variables ${DB_HOST}, ${DB_USERNAME}, ${DB_PASSWORD} and ${DB_PORT} will be picked by Compose automatically from our .env file. This service depends on mysql hence the database needs to be running before spinning up our GUI. The host machine uses the port 8888 to connect to our interface. You can access the PhpMyAdmin dashboard via http://localhost:8888.
9. Utility Containers
When starting docker containers using the command docker-compose up, all the services in the docker-compose.yml file will be started. However, you should only run utility containers when needed.
To start only the main containers, we use the command docker-compose up build nginx. It will ensure that only the containers that nginx service depend on will start. These are the containers listed in the depends_on section of nginx service.
We will also use profiles to lock utility services such that they only start if the individual profile has been activated or when running the particular service using docker-compose run service_name.
When running utility containers, the command docker-compose run --rm is used instead of docker-compose up. And service/container arguments are tacked on the end. The run is used to run a one-time command against a service and --rm removes a container after running a command. If you need to connect to other docker containers, use the --service-ports option. For example docker-compose run --rm --service-ports service_name argument.
9.1. Migrate-seed service
This service runs migrations and seeders. It is also based on php.dockerfile.
The entry point of this service will run the commands php artisan migrate and php artisan db:seed sequentially when the container starts.
Running laravel-migrate-seed command
docker-compose run --rm laravel-migrate-seed9.2. Composer service
Composer is a dependency manager for PHP. Composer service is used for running composer commands. It uses a custom dockerfile called composer.dockerfile whose context is the docker folder of our project.
Here is the service configuration:
composer.dockerfile
This dockerfile is based on the composer:2 image, an official prebuild composer version 2 docker image file.
Running composer commands
Composer commands are started using the command docker-compose run --rm and tacking composer arguments on the end. Check out the table below for examples:
9.3. Artisan service
This service runs Laravel artisan commands. It is based on php.dockerfile.
Running artisan commands
Like composer commands, artisan commands are started using the command docker-compose run --rm and tacking artisan arguments on the end. Below are examples:
9.4. Npm service
We will use this service for running npm commands. It is based on the official node:alpine docker image.
Running npm commands
NPM commands are also started using the command docker-compose run --rm and tacking npm arguments on the end. However, when running npm run dev, communication needs to be established between this npm container and the PHP container for hot-reloading to take place. We, therefore, include the --service-ports option in our command.
Examples of npm commands:
10. Configuring Vite Asset Bundler and InertiaJS
As from Laravel 9, developer experience has improved by introducing Vite, a frontend asset bundler. Previously, Laravel was using webpack as its default asset bundler. In this guide, we will use Vite for integrating ReactJS into Laravel.
InertiaJS will help us contain the React and Laravel stack in one project. You can think of it as the glue sticking our frontend and backend stacks together. Install InertiaJS by typing the below command in your terminal:
docker-compose run --rm composer require inertiajs/inertia-laravelLet’s install inertia middleware within our project using the artisan command below:
docker-compose run --rm artisan inertia: middlewareHead over to src/app/Http directory, then within Kernel.php file, add the following line in the $middlewareGroups[] array within its web[] array.
'web' => [
  // ...
  \App\Http\Middleware\HandleInertiaRequests::class,
],
For our routes to be recognized in the front end while rendering it with JavaScript instead of blade, we will use a special package called ziggy. Let’s install it using composer.
docker-compose run --rm composer require tightenco/ziggyFor we are going to create a single-page application (SPA), we need to set up a blade entry-point for our application's UI.
Let’s create a new blade file app.blade.php. It will be our entry-point blade. Put the following code in the file:
@vite() and @viteReactRefresh are telling the Laravel app that Vite is compiling our assets (JS and CSS files) and that we will use JSX for our front end. The CSS file can also be called from this file by adding the line @vite('resources/css/app.css'). However, it is ideal to call it from the resources/js/app.jsx file and call this file in blade , as shown above.
Setting up React frontend
We will use the npm container to install our frontend dependencies.
Run the following command on your terminal:
docker-compose run --rm npm i react react-dom @inertiajs/inertia @inertiajs/inertia-react jsconfig.json @inertiajs/progressThe above command will install React, react-dom, inertia frontend dependencies, inertia progress bar for page loading, and a jsconfig.json file.
Next, we’ll add the vite plugin for React.
docker-compose run --rm npm add @vitejs/plugin-reactGo to the src/resources/js/app.js file, and add the following script below the import "./bootstrap" statement. Then rename the file to app.jsx. As you can see app.css gets imported from this file.
Finally, we need to tell Vite we are using React and specify our entry-point file. We will put our configuration in src/vite.config.js, a file installed in Laravel 9 by default. Let's head there, modify and add the following lines:
The input: "resources/js/app.jsx", line specifies our JSX entry point. The server settings specifies the npm container address and service port. The npm container is accessible through the port 3000 as seen in our docker file.
Creating a welcome page and welcome route
Let’s now create the route for our welcome page. Head to the file src/routes/web.php and add the following lines to make Laravel aware of the route to our welcome page.
Route::get('/', function () {
   return inertia('Welcome');
}
Then we will create our frontend welcome page. Create a new folder Pages and add a Welcome.jsx file to the src/resources/js/ directory. Put the following code in the file.
export default function Welcome () {
    return (
        <>
            <div>Hello Docker Multiverse!</div>
        </>
    );
}
11. Starting Your Containers
Running migrations
Create database tables by running the following command:
docker-compose run --rm laravel-migrate-seedIt will create default database tables that come configured in Laravel migration files.
Starting main containers
To start the main containers go to the root of your project directory and run the following command:
docker-compose up --build nginx -dWe are running the above command instead of just docker-compose up --build -d because we want only to start the main containers. Our nginx container depends on all the other main containers; hence it will start them first.
The -d argument runs the command in Daemon mode silently without outputting logs on your terminal.
After the docker images building, the containers will come online one by one.
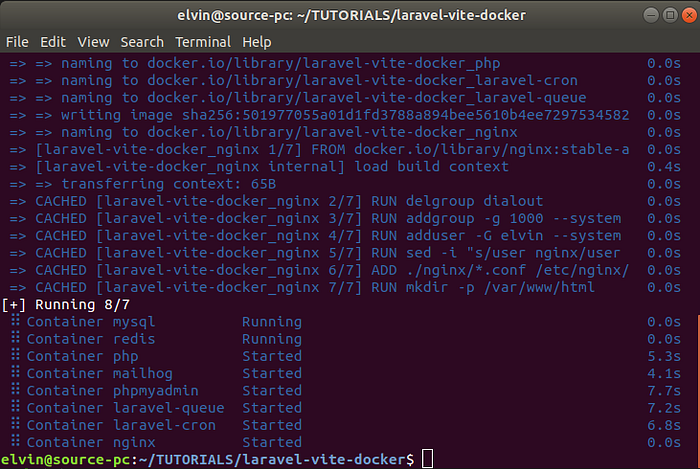
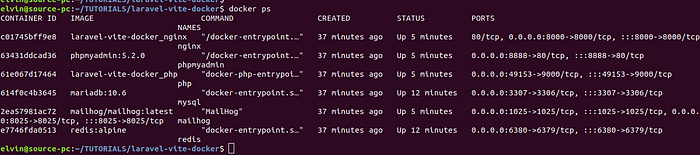
You can check out the running containers by running the command docker ps on your terminal, as shown in the image below.
Laravel application configurations
Install PHP packages using composer by running the following command:
docker-compose run --rm composer installLet’s wrap up our application config by setting the application key and clearing any cached config files. We can achieve this by running the following commands.
docker-compose run --rm artisan key:generate
docker-compose run --rm artisan optimize
Our local application code gets mounted in artisan and composer containers when the containers start. Therefore, running the above commands will update both the containers’ code and the code local to your machine as if you run the commands locally.
Running React frontend
We will run our React frontend in development mode with hot-reloading enabled using the following command.
docker-compose run --rm --service-ports npm run devNote: Ensure that you update your application’s .env file to reflect the correct APP_URL. The exposed port determines the specified URL in our nginx service. In our case, we are using port 8000.We will update APP_URL to APP_URL=http://localhost:8000.
Let’s now check out our application:
Insert any of the following URLs in your browser.
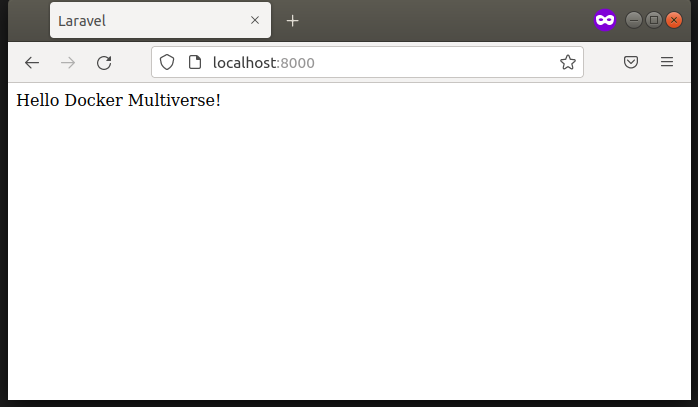
Application — http://localhost:8000
The src/resources/js/Pages/Welcome.jsx page should render.
Mailhog — http://localhost:8025
PhpMyAdmin — http://localhost:8888
12. Pushing Code to GitHub
To be able to track the project, we will push it to GitHub.
Creating local repository
- Go into our project’s parent directory.
- Type
git init. - Type
git add .to add all the relevant files. Files specified in.gitignorewill be ignored. - Type
git commit -m “first commit”.
Connecting repository to GitHub
- Go to GitHub.
- Log in to your account.
- Click the new repository button in the top-right and initialize an empty repository.
- Click the “Create repository” button.
- Copy the repository’s URL.
- On your terminal, at the root of your project’s directory, type the below commands and replace the repository URL with yours.
git remote add origin https://github.com/username/new_repo.git
git branch -M main
git push -u origin main- You can finally add a LICENSE file and a README file for describing the project. You can do this directly from GitHub or by creating the files locally and pushing the changes to GitHub.
13. Resources/Links
GitHub — Laravel 9 plus React project with preconfigured Docker setup.
Conclusion
I hope this has been a helpful guide. Thank you for reading!

