Docker for Front-End Developers
Being a front-end web developer is difficult sometimes, and yet we usually love it. Front-end development today almost has too much to offer — sometimes it gets overwhelming thinking about what to learn next. Docker was one such technology for me. Although it has been around for quite a while, I was reluctant to use it. Want to know what I thought? Spoiler: I love it.
Introduction

“Docker is the only independent container platform that enables organizations to seamlessly — build, share and run any application, anywhere.” — via Docker’s website
Docker’s mantra is: Build, Ship, and Run. In simple terms, it’s a cross-platform tool intended to ease the pain of building, sharing, and deploying apps.
Why Docker?
Before investing time into yet another tool, it’s fair to ask why do we need Docker in the first place? What problems does it solve?
Wouldn’t it be great if we, as developers, could just focus on developing the applications rather than spending hours solving a silly versioning issue while installing/running the application on the first day we join a company?
Wouldn’t it be great if it took just a single command to build and run our whole project?
Docker solves the following pain points:
- Development/production parity
- Different environments for running applications across different operating systems
- Decoupling infrastructure from application development
- Onboarding a new developer becomes quite easy
- App isolation — DDoS attack limits to one container, load balancing
- Debugging capabilities
Docker Architecture

- Client-server architecture
- Client command-line interface (CLI) talks to the Docker daemon (server)
- Daemon builds, runs, and manages Docker objects
- Daemon and Docker client communicate using Rest API via Unix sockets or network interface
- Docker registry stores Docker images
Docker engine
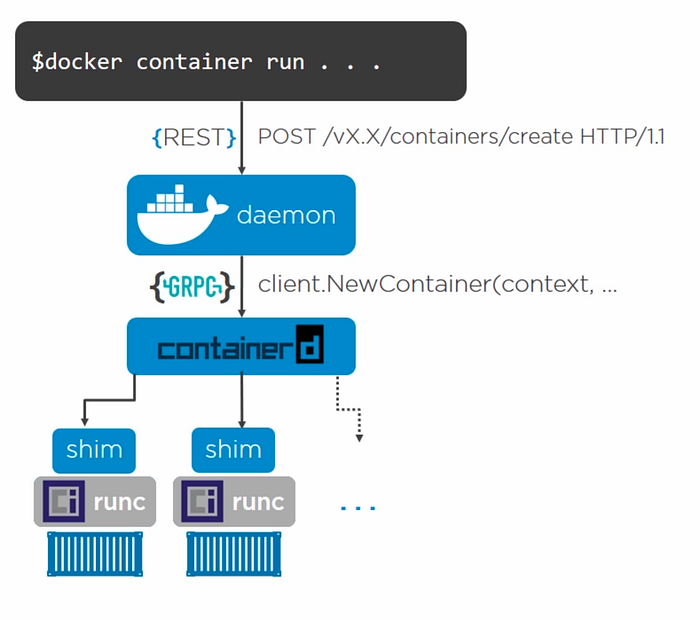
- Docker CLI client makes a REST API call to the Docker daemon server
- Docker responds to the request and spins up a container by passing the message through gRPC protocol to the
containerdprocess containerdmanages images and lifecycle of the containers: stop, pause, start, deletecontainerdforks the instance ofruncfor new containersruncprocess exits after creating containershimbecomes the parent of the running container
Docker vs. full virtualisation
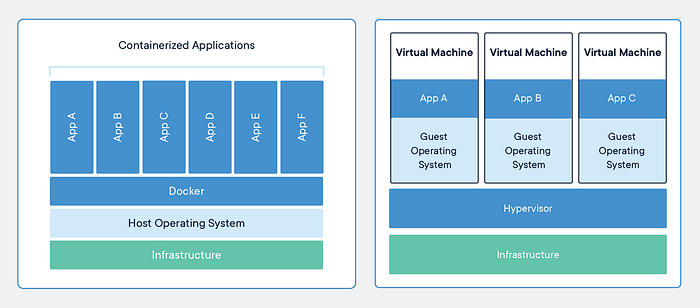
The virtualisation technology used by Docker is a type of virtualisation called an OS-level virtualisation or Container-based virtualisation, which is in contrast to the emulated or full virtualisation done using VirtualBox or VMware.
Full virtualisation runs the guest OS on top of the host OS fully. There’s a system-resource overhead and, hence, you’ll experience slow performance.
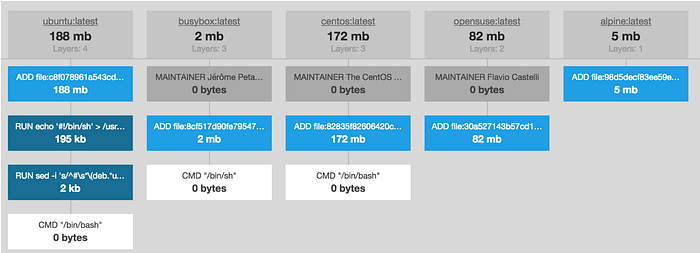
In container-based virtualisation, a portion of the existing host OS is used to run your application in isolation. These portions are called containers and are very lightweight, which means we can run multiple of them. Each of them will be running an OS, containing the essential bare primitives without the kernel code or UI.
For example, running a Ubuntu container in Docker would be just around 188 MB (compared to 800 MB in its full glory). The reduced size can be partially attributed to dropping the code for Ubuntu Kernel and the Ubuntu UI. All the commands running inside that container would be relayed over the host OS by Docker. This makes docker really light and performant.
Docker Images
- Read-only template for creating containers
- A bunch of files and a manifest
- Build-time construct
- Can’t delete image until all its containers are deleted
- Built using Dockerfile
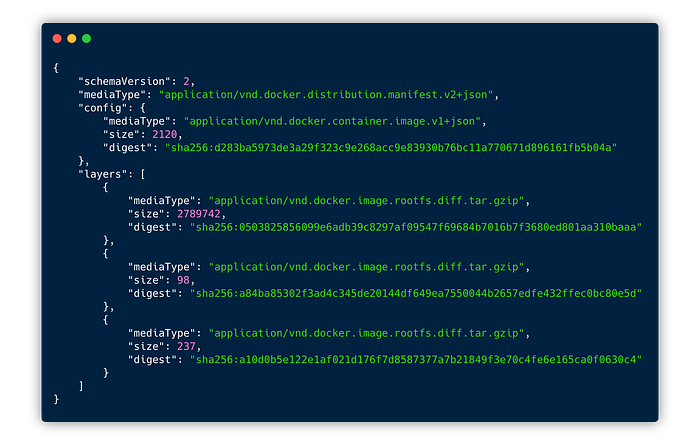
- Multiple layers: Each layer is an extension to the previous layer
- Each layer has app binaries, file systems, and libraries

The manifest file looks like this:
Docker Containers

- They’re the runtime constructs where our app runs in
- Containers add a runtime read-write layer on top of the image file system
- All changes done during runtime are made in the top writable layer
- These changes can be saved and committed to create a new image.
Containerising the App — Dockerfile
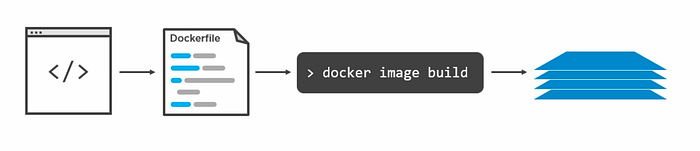
- Create Dockerfile for the application
- Build a Docker image using it
- Run the Docker image to run the container for the app
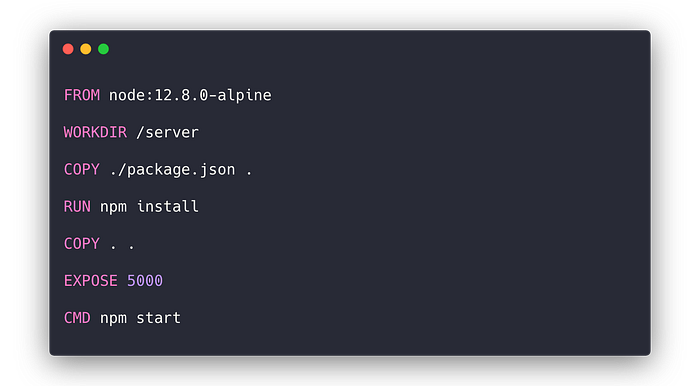
Explanation
- The
FROMinstruction is usually the very first instruction in the Dockerfile. It tells Docker which base image you want to build your custom image upon. We’re using Alpine, a very light-weight Linux distribution, with a node installed on top of it. WORKDIRis a very convenient way to define the working directory. It will be used with subsequentRUN,CMD,ENTRYPOINT,COPY, andADDinstructions.- The
COPYcommand simply copies the files or directories from the host system to the Docker image being built. - The
RUNcommand runs any shell commands while building the image and commits or adds its results (files) as a layer into the image. EXPOSEtells the users which ports our application will be running on when we run a container from this image. We can map to the host ports during the runtime.CMDinstructions tell which command to run when the container is started from this image. Unlike theRUNinstruction, it doesn’t execute during the image build step. So things like starting a server or a service would reside in it.
To build an image from the Dockerfile, run the build command as:
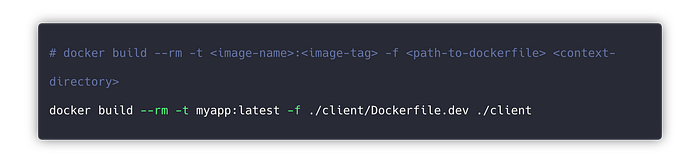
- The
--rmflag is meant to remove any intermediate containers that run due to anyRUNinstructions in the Dockerfile. They’re committed to the built image after a successful build. This flag ensures that they get removed in the end. - The
-tflag is used to specify the name and tag of the image being built. By default, iftagnameisn’t passed, the latest is assigned - The
-fflag is for specifying the path to the Dockerfile. This helps if the image has a different name than Dockerfile or it’s present in some directory other than the current one. - In the end, we need to provide the path to the context directory. This is important because everything from this context dir is copied or sent to the Docker daemon.
Tip: In the case of nested projects (such as Lerna), do not choose the root of the project to be a Docker context. It’ll unnecessarily copy the whole project, which takes a lot of time and space. Be specific about what you want to work on.
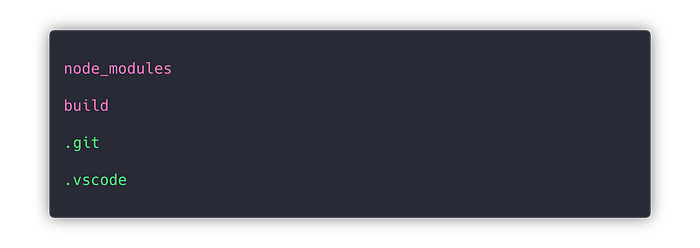
Also, you can choose which files not to copy from the Docker context to the daemon by using the .dockerignore file. This helps speed up build times and will create smaller image sizes as a result.
Running the container

The Docker run command is pretty simple to use. The -p flag is used to specify the port mapping. Here, the 3000 port of the container will be mapped to the 8080 of the host system. This means you’ll be able to access the application on localhost:8080 on your mac.
To view the list of running containers, run docker ps.

And, by the way, if you want to login into the shell of the running container, you can do that by using the Docker execute command with the -it flag. And you can pass the last ARG as the shell you want to use withsh.

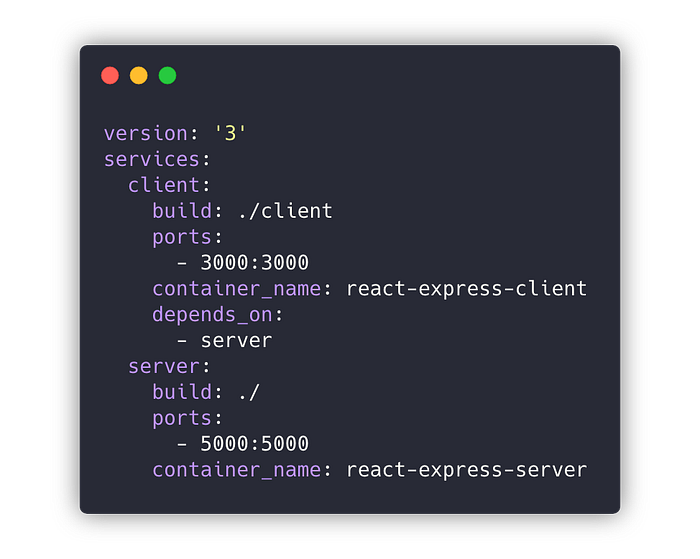
Docker Compose
- For defining and running a multi-container Docker application
- Commands used to start, stop, pause, etc. all containers at once
Docker Volume
- Preferred mechanism for persisting data generated by and used by Docker containers
- Mount/map directory or file from host to container
- Create a shared space or directory for containers

run command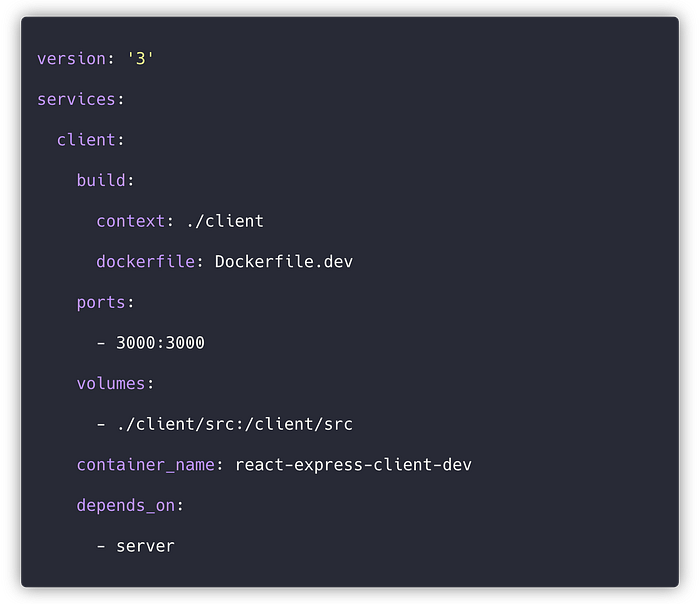
It’s quite useful when you are in the development environment and you’re running your application to use webpack-dev-server with hot reloading enabled. You can map the src directory of your app to the container that’s running the webpack-dev-server. By doing so, the contents of the src directory will be overwritten by any changes you make in it in your host machine, which will trigger the hot module replacement (HMR) process for hot reloading.
Demo
The working demo can be found on GitHub at: https://github.com/paramsinghvc/react-express-docker
Summary
There’s more to what we’ve learnt. There are plenty of options and flag to run/configure your builds and containers. Through this guide, we’ve learnt how to get up and running with Docker in your day-to-day projects. It’s as simple as adding a Dockerfile, building an image, and running a container out of it. Do check out the demo link I’ve added above to see how you can use it for development environment.

