Deploying an Angular App to AWS S3 With CloudFront Serving HTTPS
Your one-stop solution for deploying Angular apps to S3 and CloudFront, securely

I was tasked to deploy a new front-end application to AWS S3 serving HTTPS. To my surprise, there wasn’t one complete blog I could refer to, to successfully deploy my application to S3 with HTTPS using CloudFront.
I had to refer to a couple of different sources to complete the task. So, I would like to share my knowledge and experience in deploying a complete front-end application to S3 with CloudFront serving HTTPS requests.
I am assuming you already have your AWS account, an SSL certificate for the HTTPS, and a domain in Route53.
Creating an S3 Bucket
- Log in to AWS and go to S3 >> Create Bucket. Provide a bucket name, it should be unique. Set false to all the permissions because you are going to alter them later, just keep clicking next and you’ll create a new bucket.

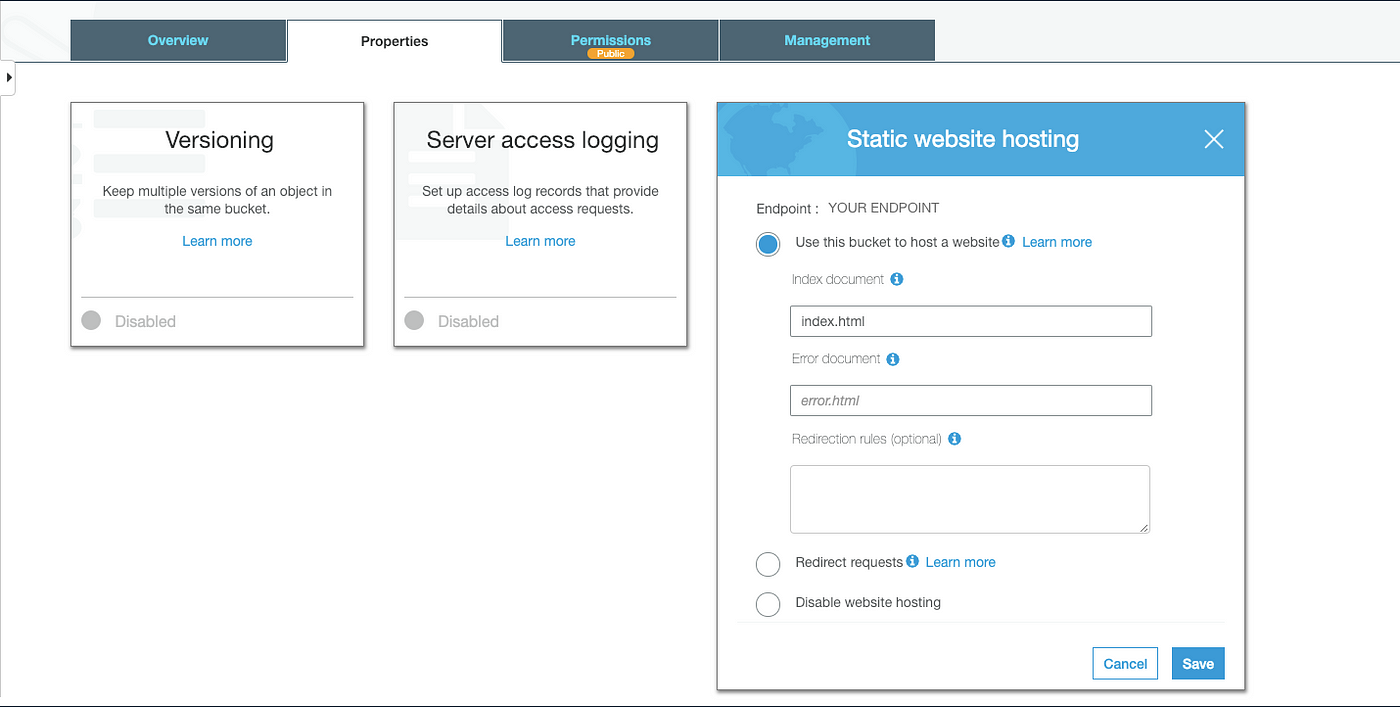
- Click on the bucket that was created and you should be taken to the bucket’s detail. Go to the Properties tab and go to Static Website Hosting and set use this bucket to host a website and provide your entry point file.
- Go to permissions >> Bucket policy and update the permissions with the policy generator which will generate the following JSON and save. This should give public access to your bucket.
{
    "Version": "2012-10-17",
    "Statement": [
        {
            "Sid": "Allow Public Access to All Objects",
            "Effect": "Allow",
            "Principal": "*",
            "Action": "s3:GetObject",
            "Resource": "YOUR_BUCKET_ARN/*"
        }
    ]
}
- Upload you build files to S3 and provide them public access.
You can access your website from the endpoint provided in Static Website Hosting.
Creating CloudFront Distribution for the Bucket
- Navigate to CloudFront >> Create Distribution >> Get started with Web. Select the origin domain main from the list. It should populate all the required fields and you need to make a few changes to the default.
- Change the view protocol policy to Redirect HTTP to HTTPS.
- Provide an alternate domain name (CNAME): www.yourwebsite.com
- Choose the SSL certificate or request one from AWS.
- Provide the default root object: It should be the file that will return when you visit your website, in most cases
index.html.

Save and grab a cup of coffee, it takes around 15 minutes to deploy the distribution.
Setting Up Route53 for an Alias to Your Endpoint
- Create record set: Provide an address where you’d like to access your website. Example: abc.com. The same as the CNAME in CloudFront distribution.
- Set Alias to Yes and select the created distribution under CloudFront Distribution. It should be deployed.
- Create record set.

Conclusion
After a couple of minutes, you can visit your app or website served with HTTPS.
You might run into an access denied error, where you would get the following error: “This XML file does not appear to have any style information associated with it”.
This is because of no default root object in CloudFront settings. If you need any help, you can comment below and I’ll get back to you.
