Deploy ML Models with AWS Lambda and Ephemeral Storage
So you are a machine learning engineer and want a simple and potentially scalable way to deploy your large machine learning model? In this post, I will present you with a relatively straightforward solution that leverages Lambda’s recent feature of adding Ephemeral Storage.
Rest assured that you won’t have to navigate the AWS console and manually click-birth all the resources. Instead, we will utilize both the AWS command line interface (CLI) and a modicum of infrastructure-as-code for the AWS cloud development kit (CDK). The latter makes it possible to define our services and their relationships without the need to manually craft complex CloudFormation Templates.
The infrastructure looks pretty modest:

Historically, Lambda hasn’t been the go-to option for ML-Ops due to its limitation in storing large models. However, this particular constraint has since been alleviated, as Lambda now allows for up to 10GB ephemeral storage (/tmp memory) that we can leverage for downloading and caching our model. Moreover, we can easily expose Lambda by attaching a Function URL that acts as an API.
The deployment comprises the following steps:
- ML Model: Create a machine learning model and upload it to a S3 bucket
- Lambda Function: Create lambda function code for inference
- Docker Image: Dockerize inference code and upload the image to the elastic container registry (ECR)
- Infrastructure: Create resources with CDK
Let’s get hands-on with a deep learning toy example. We will build and deploy a named entity recognizer (NER) using Flair. Flair provides a simple interface for using state-of-art models from Huggingface to solve a large range of NLP tasks.
Prerequisites
You need to have the following tools and frameworks installed:
- Python ≥ 3.8
- Docker
- AWS account with a 12-digit ID (e.g. 012345678901)
- AWS CLI, the command-line interface for AWS services
- AWS CDK CLI, the command-line interface for the AWS cloud development kit (CDK)
Setting up the Environment
Clone the repository, and install the dependencies:
git clone https://github.com/as-ideas/deep-lambda.git
cd deep-lambda
pip install -r requirements.txt
The repository structure is as follows:
deep-lambda/
|-- app.py
|-- tagger.py
|-- infrastructure/
|-- ...
We only need two Python files, tagger.py, which contains the deep learning code and app.py which defines the AWS lambda function.
The CDK code for our infrastructure is defined in infrastructure/lambda_stack.py.
1. ML Model
First off, let's write a simple NER tagger using Flair:
Running the above code downloads a pre-trained NER model from Huggingface, saves it to /tmp/my_ner_tagger.pt and outputs the following result:
python tagger.py

Span [1,2]: "George Washington"   [− Labels: PER (0.9985)]
Span [5]: "Washington"   [− Labels: LOC (0.9706)]
Simple enough. From now on let’s pretend that the saved model is some customized NER model that we want to deploy (here you can read how to fine-tune a pre-trained model with Flair).
In order to deploy our model we need it to reside within the AWS cloud. Therefore, we proceed by uploading the model to an S3 bucket via the command line interface (replace the region with your own):
aws s3api create-bucket --bucket deep-lambda --region eu-central-1 --create-bucket-configuration LocationConstraint=eu-central-1
aws s3 cp /tmp/my_ner_tagger.pt s3://deep-lambda-2/ --region eu-central-1
2. Lambda Function
In order to initiate the code by providing an AWS Lambda Function Stack it is required to define a lambda handler that serves as an entry point for the function. The lambda handler is responsible for receiving an event and generating a corresponding response.
Our tagging logic is invoked by the handler, which necessitates the prior loading of the model. We solve this by downloading and caching the model at the module level, leveraging lambda’s ephemeral storage on /tmp:
Note that the model is downloaded to /tmp which by default is mounted to the ephemeral storage, so it is possible to consume models as large as several GB.
3. Docker Image
Our Lambda will need to access some dependencies (e.g. Flair) that we will bake into a docker image.
A simple Dockerfile can be built from a Python lambda base image:
FROM public.ecr.aws/lambda/python:3.8 as base

FROM base

COPY requirements.txt .
RUN  pip install -r requirements.txt --target "${LAMBDA_TASK_ROOT}"
COPY app.py "${LAMBDA_TASK_ROOT}"
COPY tagger.py "${LAMBDA_TASK_ROOT}"

ENV PYTHONPATH="${LAMBDA_TASK_ROOT}"

CMD ["app.lambda_handler"]
That’s pretty standard — we just need to make sure that all the files are copied correctly to the Lambda-native location LAMBDA_TASK_ROOT, which is the given working directory. The path usually resolves to /var/task in the image.
Let’s build and tag the docker image (replace the 12-digit code with your own AWS ID):
docker build -t deep-lambda .
docker tag deep-lambda:latest 012345678901.dkr.ecr.eu-central-1.amazonaws.com/deep-lambda:latest
We now upload the image to the elastic container registry (ECR) via the command line interface:
aws ecr create-repository --repository-name deep-lambda
aws ecr get-login-password --region eu-central-1 | docker login --username AWS --password-stdin 012345678901.dkr.ecr.eu-central-1.amazonaws.com
docker push 012345678901.dkr.ecr.eu-central-1.amazonaws.com/deep-lambda:latest
That’s it. We successfully uploaded both our model and code to the AWS ecosystem. Now it’s time to provide the cloud infrastructure via CDK!
4. Infrastructure
Let’s write a simple CDK stack that defines the lambda function with access to the model bucket:
It is important to provide enough memory_size to the Lambda as well as a large enough ephemeral_storage_size. Moreover, we need to point the PYTORCH_TRANSFORMERS_CACHE directory to the /tmp directory to allow the Transformers library to cache the model tokenizers to the ephemeral storage.
Now we are ready to deploy our function:
cd infrastructure
pip install -r requirements.txt
cdk synth
cdk deploy deep-lambda-stack
That’s it, the lambda should be up and running. Let’s quickly check it out in the online console:
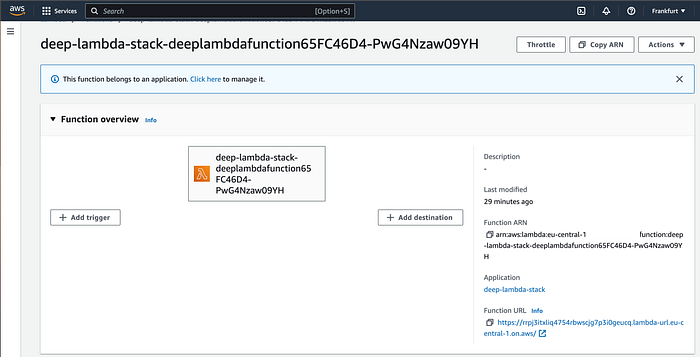
On the bottom right you can find out the Function URL. Let’s use it to invoke our Lambda with a simple request via curl:
curl -X POST -H "Content-Type: text/plain" -d "I went to New York last easter." https://rrpj3itxliq4754rbwscjg7p3i0geucq.lambda-url.eu-central-1.on.aws/

Span[3:5]: "New York" → LOC (0.9988)
Great! You can now fire more requests to the endpoint. It is important to keep in mind that the initial request may take a bit longer due to the cold start process, as the lambda initializes and retrieves the model from the bucket. However, subsequent requests should execute swiftly.
Deploying a model is as simple as replacing the current model in the S3 bucket and restarting the lambda function, which can be done via console or CLI. Updating the code requires that you push a new image to the ECR using the AWS commands earlier and then deploy the updated image to the Lambda function.
Limitations and Making the Solution Scalable
The presented solution is quite useful if you want to quickly deploy your model for a showcase or testing, but it is probably not robust enough to be used in a production system. I will address the biggest limitations below:
Limitation: Manual deployment, Solution: Add CI/CD Pipeline
Consider adding an AWS Codepipeline that automatically triggers upon code changes, pushes new images to the ECR, and redeploys your Lambda function.
Limitation: Security, Solution: Add API Gateway
If you need to control your API exposure, i.e. restrict the maximum number of requests or block certain IP addresses, you may want to connect an API Gateway to your Lambda.
Limitation: Scalability, Solution: Add Queues
If you want to process large amounts of data, it is not advisable to open lengthy requests to the Lambda function. A more robust solution would be to connect the Function to a command queue (SQS) and store the result in another queue or a S3 bucket. This approach is highly scalable and straightforward to monitor, making it the ideal choice for most ML use cases.