Deep Linking in Flutter With Firebase Dynamic Links
Improve user retention, engagement, and user experience using deep linking

Deep linking is used for promoting apps with social media campaigns or sharing data with other users to link to specific content within a specific app whether your app is already installed or not.
Firebase Dynamic Links provides a rich feature for handling deep linking for applications and websites. The best part is that Firebase deep linking is free, for any scale.
Latest update for the Firebase Dynamic Link

In this article, I will explain how to create and use Dynamic Links in Flutter. If you wish to learn more about Firebase Dynamic Links, you can check out the following video:
Firebase Dynamic Links handles the following scenarios:
- When a user opens Dynamic Links, if your app isn’t installed, the user is redirected to the Play Store or App Store to install your app.
- If your app installed and the app is not open in the foreground/background, then the app is opened on a device.
- If the app is in the foreground/background, then the user can get a dynamic link in the registered listener.
You need to follow the below steps for creating and receiving Dynamic Links.
1. Set Up URL Prefix in the Firebase Console
- Open the Firebase console and select your Firebase project in which you want to add deep linking.
- Create an Android and IOS app in the Firebase project.
- Open Dynamic Links from the side drawer’s Grow section.
- For creating a domain for the link, click on the Get Started button.
- Then, create a URL prefix. A URL prefix is a domain name that uses the dynamic links.
- Create a tab, add the custom, unique domain name of your app. For example, test.page.link. Here, the domain name is postfixed with
page.link. - Then, follow: Configure → Verify → Finish steps.

2. Configuration for an iOS App
- Open Project Settings in the Firebase console and select iOS application.
- Add the App Store Id of the application. You can find your App Store ID in your app’s URL. In the example below,
123456789is the App Store ID. https://itunes.apple.com/us/app/yourapp/id123456789. - If your application is not published yet, you can use another published app ID for testing purposes (Note: Don’t forget to replace this with another project ID when your app goes live).
- Add the Team Id. You can find your Team ID in the Apple Member Centre under the provisioning profile.
We need to add some configurations in Xcode. Follow the below steps.
- Under the Signing & Capabilities tab, you want to turn on an associated domain and add the domain to the list. Your domain name looks like this: applinks:test.page.link. Here,
test.page.linkis the URL domain that we have created in the Firebase console.
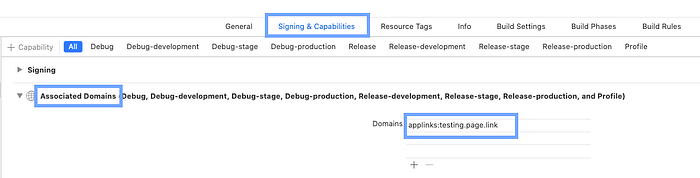
Note: Make sure that your provisioning profile supports the associated domain’s capability.
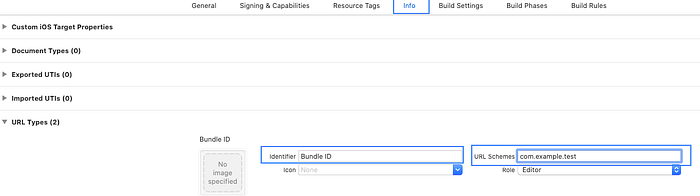
- In the Info tab of your project, create a new URL Type that will be used by the dynamic links.
- Add the Identifier field as Bundle ID and URL Schema as your bundle ID which will look like
com.example.test.
We can confirm that the Firebase project is properly configured to use Dynamic Links in the application by opening the apple-app-site-association file that is hosted on your Dynamic Links domain. For example:
https://test.page.link/apple-app-site-associationIf your app is connected, then the file contains a reference to your app’s App Store ID and bundle ID. For example:
{"applinks":{"apps":[],
"details":[{"appID":"1234567890.com.example.test","paths":["/*"]}]}}Note: There is no additional configuration required to use dynamic links in an Android app.
3. Add Dependency in a Flutter Project
You must include the plugin to use dynamic links. Add the firebase_dynamic_links plugin in the pubspec.yaml file.
dependencies:
  firebase_dynamic_links: ^0.5.0+11
4. Create Dynamic Links
There are four ways in which you can create Dynamic Links. Here, I will explain two ways to create links. For more details about other ways, refer to the Firebase documentation.
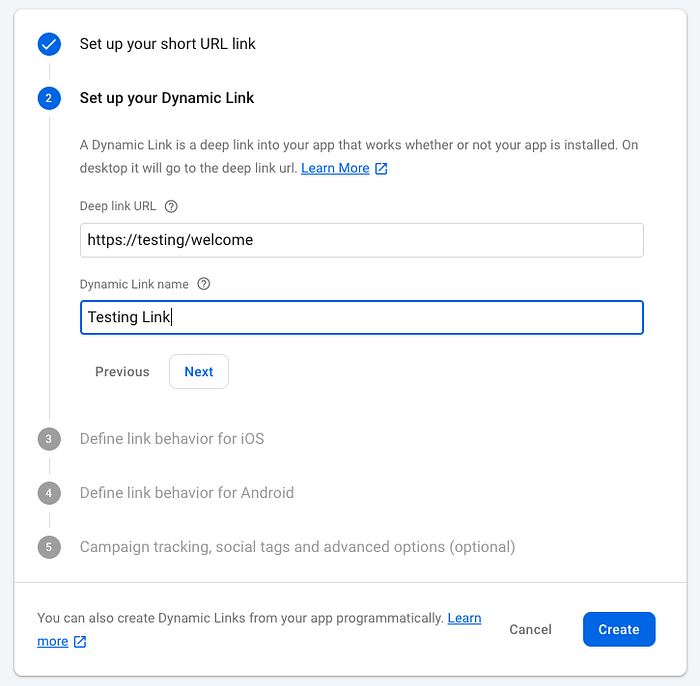
Create Dynamic Links using the Firebase console
- Select Dynamic Links from the side drawer’s Grow section then click on New Dynamic Link.
- Follow all the steps given in the below image. After that, you get a final link like this: https://test.page.link/FwrkDi.
Create Dynamic Links programmatically
You can create a link programmatically by setting the following parameters and using the DynamicLinkParameters.buildUrl() method. To create a short link, use the DynamicLinkParameters.buildShortLink() method.
You can pass multiple parameters like ?userId=1&category=education. If you do not want to pass parameters in the link then remove ?userId=1 from URL.
5. Receive Link in Application
Now, to get a link in the application, initialize Dynamic Links in your app’s main widget.
To receive a dynamic link, call the getInitialLink() method from FirebaseDynamicLinks which gets the link that opened the app (or null if it was not opened via a dynamic link). You need to add a two to three-second delay because sometimes, the link gets null when the app opens the first time.
Configure listeners for link callbacks when the application is in the foreground or in the background calling onLink.
And That’s It
We have seen how to create and receive Firebase Dynamic Links. I hope that you’ve been able to see the benefits of Firebase Dynamic Links from this and how super easy it is to get set up!

