How to Add Custom Fonts in SwiftUI
Make your iOS development more beautiful

If you’re reading this, you’re here for one of two reasons:
- Your designer gave you a design that uses custom fonts and you have no idea how to use them because you’re a back-end developer at heart and don’t care whether the spacing between the characters makes it more readable, or
- You are a developer that realizes you need to use custom typefaces to take your UI to the next level, but you have no idea of where to get started.
That’s where I come in!
I come from a back-end engineering past so I understand both sides of the spectrum. I’ve gone through the trials and errors to make learning how to use custom fonts as easy as possible.
So, let’s get rolling and create that custom font application so you can ship it to your CI/CD in no time!
Getting Your Fonts
Before we can add a custom typeface to the application, we need the .ttf (or .otf, but I will use the .ttf extension for the rest of this article) files that go along with that typeface.
To find fonts, I recommend going to Google Fonts and filtering by the number of styles (assuming you have the choice of the font. If your designer has already given you the typeface, just skip to downloading the font family).
The reason you want to have multiple styles is… well, I’ll leave it to the pros at Material Design to explain that to you.
Once you have your typeface selected, simply click on Download Family in the top-right of the screen. Just like that, you have your new typeface for your app!

Importing the Font Family
After you’ve downloaded the font family, you’re going to want to open your Xcode project and create a new folder called fonts.
I prefer to create a folder for each typeface that I’m using within the Fonts folder, but that’s up to you and whether you want to get chewed out by your manager at your next scrum meeting or not.

Once that is done, you want to take all the files that you just downloaded and drag them into the fonts folder (or the folder of the typeface name).
Make sure when the dialog pops up, that you select to copy files when needed. This will copy the files into the application bundle and will ensure that you’re not using a file pointer to the file on your local machine.
We then want to open the right-hand toolbar, click on the file logo, and make sure that the font has its target membership selected for our application.

After we import the files, we need to add the names of the custom fonts to the Info.plist. To do this, we go the info.plist file and create a new key-value pair, where the key is Fonts provided by application.
The value will be an array of strings, where each string will be the name of a .ttf file that we brought into the application. To ensure we have every font in the font family available to our application, we need to add the name of each .ttf file to the array!
The end result will look something like this:
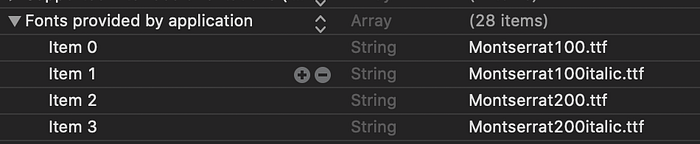
Phew, that took a long time, didn’t it. Maybe I’ll write a Python script to handle this for us in the future.
Getting the Typeface Name
The last thing that we need to do to use the custom fonts in our application is to get the name of the fonts.
Contrary to popular belief, the name of the typeface is not the name of the file.
For example, in the above photo, the file name is Montserrat100.ttf, but the actual font name is Montserrat-Light. To get these font names, use the function that I provided and call it in an onAppear lifecycle method in the root view of your application.
Once you’ve done this, run your application. In the terminal, all of the font names within your bundle will be printed.
We only need the names of the fonts that we imported, so scroll through until you find them, and copy and paste the array of strings into a notepad for later use.
Font Manager
Now that we have the names of the custom fonts, we can use them within our application on our text views!
Sweet, but let’s be a little more professional than just copying and pasting the name into the custom font modifier every time we need it. That approach is begging for massive errors in larger projects, so it’s important to establish good SWE practices early on.
To handle the managing of the font names, I created a struct called FontNameManager. The job for this struct is to simply manage the names of the fonts that are used within the application.
For each typeface that we use, we then create another struct within that FontNameManager struct and place static name constants, so we can use their values without creating an instance of the struct within our application.
You FontNameManger will look something like this:
Utilizing the Custom Fonts in Our Application
Now that we have the names of the fonts and the FontNameManager to control the use of font names, we can now use the typeface in our application!
To do this, all we have to do is use the custom font initializer for the Font struct provided by SwiftUI. This initializer will take two parameters: name and size.
For the name, you will use one of the font names within the FontManager that we just created. For the size, you will use the size that you/your designer came up with (e.g. the pt size in Sketch, Adobe XD, etc).
Example of using a custom font
As stated before, it would be good practice to create a struct called FontManager that would manage the custom fonts within your application.
For instance, if all headlines are Montserrat-SemiBold and have a size of 28, it would make sense to have a static variable in a FontManager struct that would define this custom font.
I’m going to leave that as an exercise for you to do, but I promise it will make debugging so much easier if you use abstraction to your advantage!
As we all know too well, there is nothing worse than a project with random hardcoded strings and integers throughout it. Help your peeps out and just abstract those values, please.
Thank You
Thank you for taking the time to read this post.

