How To Make a React Component Editor with Live Preview
Swift Playgrounds eat your heart out

Have you ever wondered how those live react editors like codesandbox and codepen work? If you ever used semantic react or react styleguidist you should know you can interact with their examples right in the browser with live preview.
This weekend I finally put the pieces together and created a simple working solution. This article is an overview of the experiment. If you’re not sure what we’re building I recommend you scroll to the bottom of this article and interact with the embedded codesandbox demo first.
OK, let’s dive right into it.
Challenges that we have to overcome:
- Transpiling JSX/ES6 in the browser.
- Some sort of module resolution, so we can import modules into the editor.
- Some way to parse and modify JavaScript code.
Packages used:
@babel/standaloneto transpile JSX/ES6 in the browser.acornto parse JS into AST (don’t worry for our use case the AST manipulation is really simple).escodegento convert the modified AST back to JS code.debounceandobject-pathfor their respective usage.
The Strategy
It’s surprisingly simple. Here are the steps:
- Transpile the JSX/ES6 code
- Find a JSX expression statement from the transpiled code body. We’ll dive into this later when we cover the AST processing part.
- Modify the JSX expression so that it’s wrapped in a
rendercall. - Create a new wrapper function which contains the code generated so far from the above steps and all the dependencies passed as arguments.
- Call the function created in step four whenever code changes
Confused? No worries, let’s take an actual sample to demonstrate the point.
Let’s say we start with the following code:
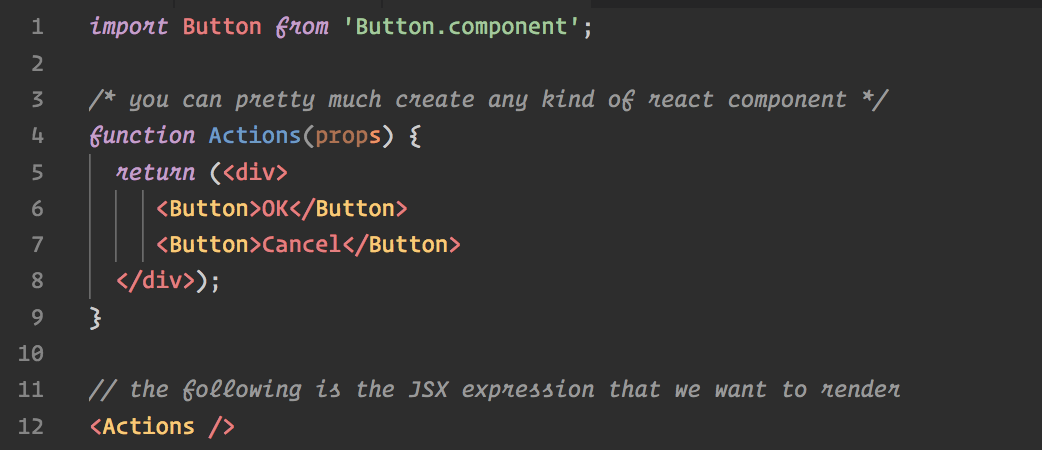
How can we make this code be rendered to an arbitrary DOM element on our webpage?
Our task now is to transpile the above code, resolve the required button component, and render the JSX at line 12.
Here’s the transpiled version:

Here’s what we want to generate dynamically:
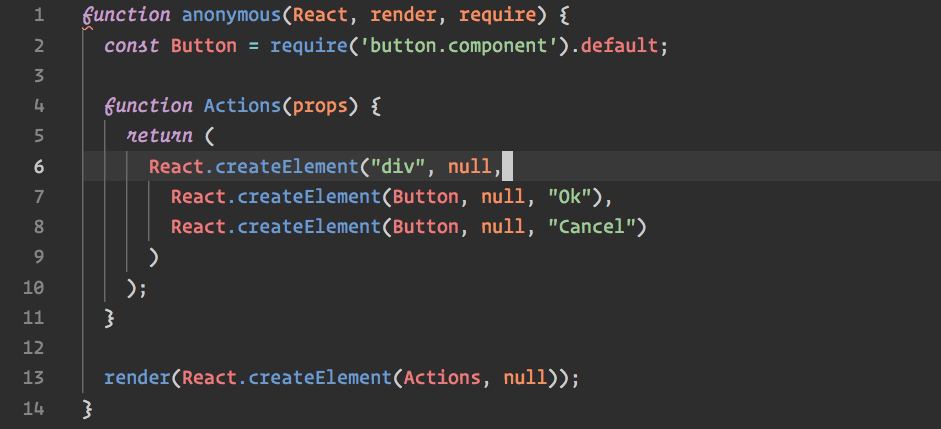
Once we are able to generate the above function, we can call it with React module object, a render function and module resolver function as argument (in that order).
Also, note that we’ve wrapped the 10th line of the transpiled code with a invocation of render function.
I hope you got the picture now. Lets look at some code:
import React from "react";
import ReactDOM from "react-dom";
import ObjPath from "object-path";

import * as Acorn from "acorn";

import { generate as generateJs } from "escodegen";
import { transform as babelTransform } from "@babel/standalone";

function isReactNode(node) {
    const type = node.type; //"ExpressionStatement"
    const obj = ObjPath.get(node, "expression.callee.object.name");
    const func = ObjPath.get(node, "expression.callee.property.name");
    return (
        type === "ExpressionStatement" &&
        obj === "React" &&
        func === "createElement"
    );
}

export function findReactNode(ast) {
    const { body } = ast;
    return body.find(isReactNode);
}

export function createEditor(domElement, moduleResolver = () => null) {
    function render(node) {
        ReactDOM.render(node, domElement);
    }

    function require(moduleName) {
        return moduleResolver(moduleName);
    }

    function getWrapperFunction(code) {
        try {
            // 1. transform code
            const tcode = babelTransform(code, { presets: ["es2015", "react"] })
                .code;

            // 2. get AST
            const ast = Acorn.parse(tcode, {
                sourceType: "module"
            });

            // 3. find React.createElement expression in the body of program
            const rnode = findReactNode(ast);

            if (rnode) {
                const nodeIndex = ast.body.indexOf(rnode);
                // 4. convert the React.createElement invocation to source and remove the trailing semicolon
                const createElSrc = generateJs(rnode).slice(0, -1);
                // 5. transform React.createElement(...) to render(React.createElement(...)),
                // where render is a callback passed from outside
                const renderCallAst = Acorn.parse(`render(${createElSrc})`)
                    .body[0];

                ast.body[nodeIndex] = renderCallAst;
            }

            // 6. create a new wrapper function with all dependency as parameters
            return new Function("React", "render", "require", generateJs(ast));
        } catch (ex) {
            // in case of exception render the exception message
            render(<pre style={{ color: "red" }}>{ex.message}</pre>);
        }
    }

    return {
        // returns transpiled code in a wrapper function which can be invoked later
        compile(code) {
            return getWrapperFunction(code);
        },

        // compiles and invokes the wrapper function
        run(code) {
            this.compile(code)(React, render, require);
        },

        // just compiles and returns the stringified wrapper function
        getCompiledCode(code) {
            return getWrapperFunction(code).toString();
        }
    };
}
We create a new editor instance by calling the createEditor function. This function accepts two arguments:
- The target DOM element where the result will be rendered.
- A module resolver callback function.
The main workhorse here is the getWrapperFunction. Also, refer to the below image of a generated AST tree from the default example code to help you understand how we’re detecting and modifying the JSX expression in the program body.
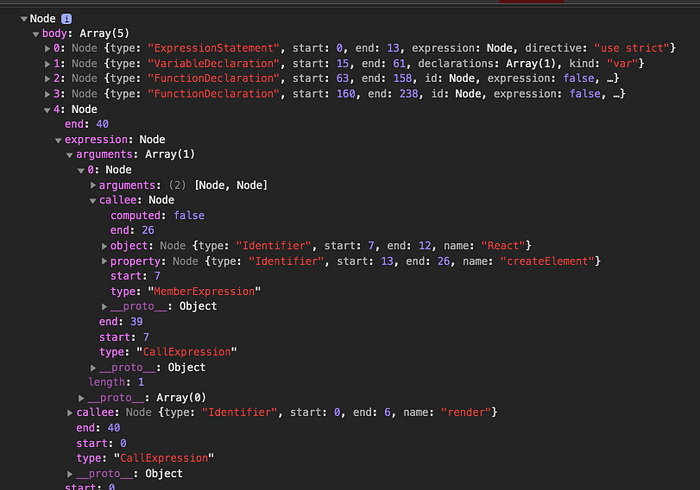
To understand how the isReactNode and findReactNode function works, compare the code with the above AST. The important thing to remember here is that when we call Acorn.parse with an arbitrary code string the parser treats the code string as a complete JavaScript program, hence the body array represents statements at theglobal level. We want to find the React.createElement statement here.
Now let’s look at the example below:
import "./styles.scss";
import React from "react";
import ReactDOM from "react-dom";
import { createEditor } from "./editor";
import debounce from "debounce";

// default code
const code = `import x from 'x';

// edit this example

function Greet() {
  return <span>Hello World!</span>
}

<Greet />
`;


class SandBox extends React.Component {
  state = {
    code
  };

  editor = null;

  el = null;

  componentDidMount() {
    this.editor = createEditor(this.el);
    this.editor.run(code);
  }

  onCodeChange = ({ target: { value } }) => {
    this.setState({ code: value });
    this.run(value);
  };

  run = debounce(() => {
    const { code } = this.state;
    this.editor.run(code);
  }, 500);

  render() {
    const { code } = this.state;
    return (
      <div className="app">
        <div className="split-view">
          <div className="code-editor">
            <textarea value={code} onChange={this.onCodeChange} />
          </div>
          <div className="preview" ref={el => (this.el = el)} />
        </div>
      </div>
    );
  }
}

const rootElement = document.getElementById("root");
ReactDOM.render(<SandBox />, rootElement);
Where Can You Use This?
This was a really fun experiment, I think techniques can be really useful in the following scenarios:
- Component documentation.
- Online IDEs
- As a simple dynamic JSX render
It’s up to you!
Links
Try this live (sandbox in sandbox):
Wrapping Up
That’s about it.
You might have already noticed that I have not yet implemented the module resolver part. It’s really straightforward and easy to implement so I leave that up to the reader.
Thank you for reading!

