Create the Classic Ping-pong Game With Java
A Java and Processing library tutorial

Are you looking for a tutorial explaining how to recreate the classic Ping-pong game? Then, look no further, this article focuses on recreating the game using the Processing library and Java. I have also written another article on how to recreate the classic snake game if you want to create another game.
1. Download and install Processing
To download Processing go to processing.org/download and choose the version matching the preferred platform.
2. What is Processing?
Processing provides a graphical library and an integrated development environment (IDE) and it uses the programming language Java (Wikipedia, 2022a).
3. Game Requirements
The requirements of the game are presented in two different parts. The first part describes the visual requirements related to representing the players, ball, and environment. The second part describes the functional requirements of how the different objects and the application should behave.
3.1 Visual requirements
- The player object should be represented by a rectangle.
- The ball object should be represented by a circle.
- The game should contain two text elements showing each player’s score.
3.1 Functional requirements
- The player object should only be able to move on the y-axis.
- The ball object should be able to move on the x-, and y-axis.
- The ball object should change its direction on the x-axis to the opposite if it overlaps with a player object.
- The ball object should change its direction on the y axis to the opposite if it moves out of the screen on the y-axis.
- The ball object’s position and direction should be reset if it moves out of the screen on the x-axis.
- A player gets a point whenever the ball moves out of the screen on the opposite side.
- The first player should be controlled by the keyboard and the second player by the computer.
4. Game Objects
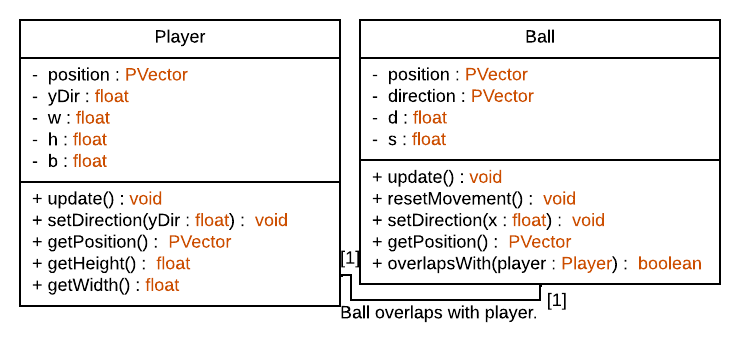
The game will contain two different classes, one to represent a player object, and another to represent the ball object. Figure 1 shows a UML class diagram containing the two classes. For those of you never heard of a UML class diagram, it is simply a diagram with a system’s classes, properties, methods, and relations (Wikipedia, 2022b).
4.1 The player object
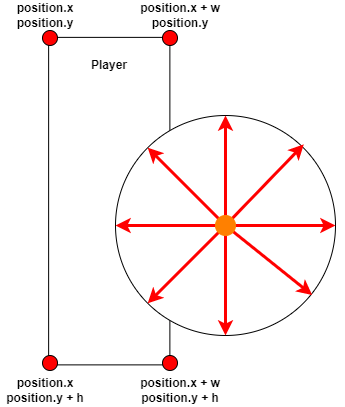
The player class will be used to create objects for both players, it is, therefore, important the position and y-direction are unique for each player, but it can be argued that width, height, and boundary could be static variables since the values are the same on all objects. Figure 2 illustrates the idea behind the positioning of the players and the boundaries of their movement.

4.1.1. Player Properties
The class requires five properties (see figure 1), and each of these properties has the following purpose:
position— APVectorthat defines the player’s x and y position.yDir— Afloatthat defines the direction and speed of the player’s movement.w— Afloatdefining the width of the player’s rectangle.h— Afloatdefining the height of the player’s rectangle.b— Afloatdefining the boundaries of the player’s movement.
The implementation of the properties in the player class can be seen in figure 3.
4.1.2. Player Methods
The class also requires five methods (see figure 1), and each of these properties has the following purpose:
update()— A void method that is used to update the behavior of the player related to movement, boundaries check, and drawing of the visual object.setDirection(yDir)— A setter method that is used to update the player object’s direction on the y-axis.getPosition()— A getter method that returns the player object’s position.getHeight()— A getter method that returns the player object’s height.getWidth()— A getter method that returns the player object’s width.
The Player class also needs a constructor to set the initial values of the position and direction on the y-axis. The constructor’s argument is designed with floats to represent the start position which within the constructor is used to create an instance of a new PVector object for the player’s position.
This will ensure player objects do not refer to the same PVector object in memory which could have been the case if several player objects were given the same PVector object on instantiation.
The getter method for the direction will allow the direction to be set on an object outside the class, and the setter methods for position, height, and width will allow these properties to be read on an object outside the class (see the implementation in figure 4).
The last method needed in the player class is the update() method. Figure 5 shows the implementation of the method.
Its behavior can be described as follows:
- Line 10 — This line will increase the player’s y position if the value of
ydiris positive and decreases the player’s y position if the value ofydiris negative. - Line 14 — The first line checks if the player’s y position is less than the value of
bwhich was used to define the boundaries of the player’s movement. Or in other words, if the player has reached its boundary at the top of the screen. - Line 16 — Reset the player’s y position to value of
bto prevent it from moving any further toward the top of the screen. - Line 19 — A similar check to line 14 but checks if the player has reached the bottom of the screen instead. This check includes the player’s height and the value of
bto ensure the rectangle stops at the correct position (See figure 6 for an explanation). - Line 21 — Reset the player’s y position at the bottom of the screen to prevent it from moving out of the screen on the y-axis.
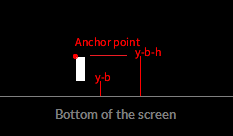
b and h to ensure the rectangle stop when its bottom side reaches the boundary.A final example of the player class can be found at this link.
4.2 The ball object
The ball class is very similar to the player class, but it is allowed to move on both the x- and y-axis. Figure 7 illustrates how the values of the ball’s position and direction change while it moves.

4.1.1. Ball Properties
Figure 1 shows the ball class requires four properties which can be described as follows:
position— APVectorthat defines the ball’s x and y position.direction— APVectorthat defines the direction and speed of the ball’s movement.d— Afloatdefining the diameter of the ball’s circle.s— Afloatdefining the start speed of the ball.
The implementation of the ball’s properties can be seen in figure 8.
4.1.2. Ball Methods
The ball class should also have five methods as the player class which can be described as follows:
update()— A void method updating the movement, boundaries, and visuals of the ball.getPosition()— A getter method that returns the ball’s position.resetMovement()— A void method that reset the ball’s position to the center of the screen and resets its direction to a random value.setDirection(x)—A setter method that sets the x-direction of the ball.overlapsWith(player)— A boolean method returning true if the ball overlaps with the given player.
The implementation of the ball’s constructor and the methods, getPosition(), resetMovement(), setDirection(x), and update() can be seen in figure 9.
4.1.2. Collision Methods
The last method that should be implemented in the ball class is the overlapsWith(player) method. Before I show the implementation I want to give a short description of the mathematical ideas behind the solution.
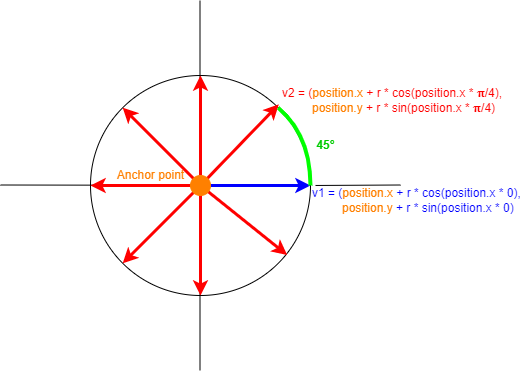
Figure 10 shows the ball drawn within a coordinate system, and the anchor point is positioned at origo. The anchor point is equal to the position property of the ball.
Each vector/arrow in the figure points towards a point relative to the anchor point which should be used in the collision check. The points can be calculated by the formula for converting degrees to radians and the rotation matrix.
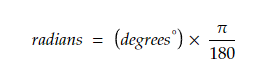
The formula for converting degrees to radians can be defined as (Wikipedia, 2022c):
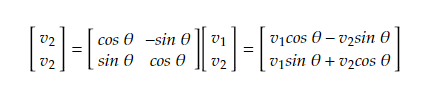
The formula for rotating a vector v, θ radians can be defined as (Wikipedia, 2022d):
The points calculated with the formulas above are used to check if one of them is between the corner points of a player which would mean the ball is overlapping with the player (See figure 11).
Line 24, in figure 12 shows the implementation of the formula used to convert degrees to radians, and line 28–29, in figure 12 shows the implementation of the rotation matrix used to rotate a 2D vector 45 degrees.
Line 33–34, in figure 12 shows the check that returns true if the points are within the player’s corner points.
A final example of the ball class can be found at this link.
5. Setting up Processing control flow
The application needs three Processing methods, the setup() method which is executed once the application starts (Processing.org, 2022a), the draw() method which is executed once every frame until stopped (Processing.org, 2022b), and the keyPressed() method which is executed when a key is pressed (Processing.org, 2022c).
5.1 Global properties
The game requires a couple of global properties used to reference the player objects, the ball object, speed, and player scores (See figure 13).
5.2 Setup
The setup() method is used to initialize player and ball instances and set the screen size (see figure 14).
5.3 Draw
The draw() method is used for the game’s repeating logic. Line 20–33 in figure 15 shows an if- and else if-statement checking if the ball is outside the screen, and if that is the case, one of the players gets one point and the ball’s position and direction are reset. Line 36–29 in figure 14 shows a check that evaluates to true if one of the players overlaps with the ball which inverts the ball’s x-direction. Line 43–58 in figure 14 shows a small implementation of how the computer controls its player object (p2) and line 61–64 shows the implementation of the players’ score text.
5.4 KeyPressed
The last code the game need is for the functionality handling the keyboard events that move the p1 object (See figure 16).
6. Summary
The Ping-pong game in the article is created using the Processing library and Java. It contains two classes, a Player class used to represent player objects and a Ball class used to represent the ball object.
The classes are used together within Processing’s setup() draw(), and keyPressed() methods to set up the continuous behavior and the structure of the game. The first player object can be controlled by the keyboard using s and w, and the second player is controlled by the computer.
An example of the complete game can be found at this link.
Bibliography
En.wikipedia.org. (2022a). Processing (programming language) — Wikipedia. [online] Available at: <https://en.wikipedia.org/wiki/Processing_(programming_language)> [Accessed 30 April 2022].
En.wikipedia.org. (2022b). Class diagram — Wikipedia. [online] Available at: <https://en.wikipedia.org/wiki/Class_diagram> [Accessed 16 May 2022].
En.wikipedia.org. (2022c). Radian — Wikipedia. [online] Available at: <https://en.wikipedia.org/wiki/Radian> [Accessed 17 May 2022].
En.wikipedia.org. (2022d). Rotation matrix — Wikipedia. [online] Available at: <https://en.wikipedia.org/wiki/Rotation_matrix> [Accessed 17 May 2022].
Processing.org. (2022a). setup() [online] Available at: <https://processing.org/reference/setup_.html> [Accessed 30 April 2022].
Processing.org. (2022b). draw() [online] Available at: <https://processing.org/reference/draw_.html> [Accessed 30 April 2022].
Processing.org. (2022c). keyPressed() [online] Available at: <https://processing.org/reference/keyPressed_.html> [Accessed 30 April 2022].

