How to Use DALL-E API With C#.NET
A step-by-step guide to making a text-to-image generator

DALL-E is an AI system that converts a natural language or a text description into realistic images and art. DALL-E is fantastic. After its release, I saw numerous discussions across the internet. From developers to artists to art enthusiasts, most of them agree this technology is indeed at the next level.

Last Friday, November 4, 2022, I received an email from OpenAI announcing the availability of the DALL-E API. I have been waiting for this since last year. Now that the API is available, I am excited to try it out.
I visited the website and looked for the documentation. I found the API docs supporting Node.js, Python, and curl. I am a .NET developer and could not find libraries for .NET, so I decided to share with you how I can use DALL-E API in my NetCore project.
In this demo, you don’t need to make your project in Netcore. I used pure .NET library, so whether you use NET Standard or NetCore, both are supported. Now let’s create a project, shall we? :)
In this demo, I created this project using Visual Studio 2022 Preview.
The project is an ASP.Net Core Web App (MVC).

I’m going to name it DALLEAPIDemo.
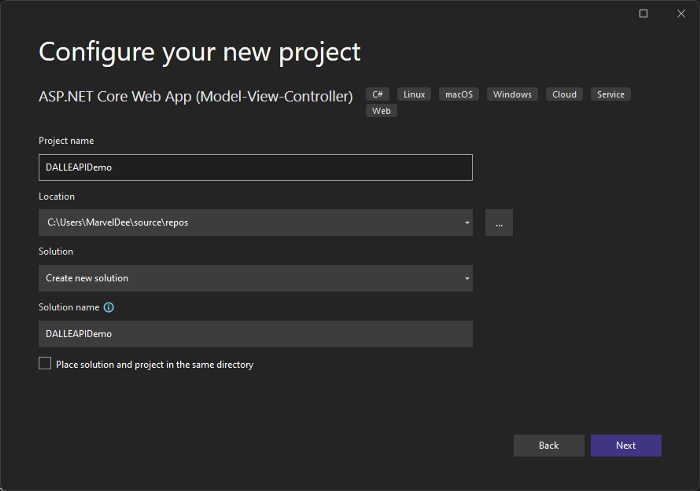
The framework is .NET6.0, then I’ll leave the rest as is. Then click “Create.”

After the project is created. On the left side, “Solution Explorer.”
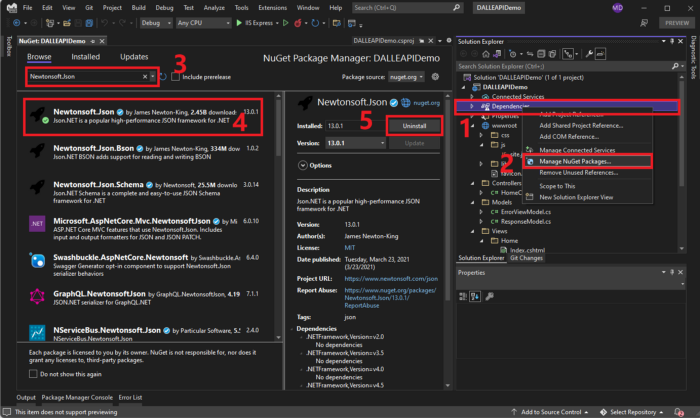
Right-click on Dependencies > Manage Nuget Packages > Browse Tab > Search for Newtonsoft.json > Select the first one as seen in the image below > click the Install button on the rightmost part of the Browse tab.
* Button “Install” is labeled as “Uninstall” in the below image because it is already installed. We will use the Newtonsoft library for serializing and deserializing objects.
OPEN API KEY
Before we can make calls to DALL-E API. First, we need to secure an API key as it is required to include it in our header, so the API will know who is sending the request.
To get an API Key, we need to have an OpenAI account. You can sign up here.
After a successful account creation. Login into your account, click on your profile icon, click on the View API keys on the dropdown, and click on the “+ Create new secret key” button.
Copy and save your API Key temporarily somewhere, e.g., in Notepad. We will be going to use it later.
- Generating images using DALL-E API is not free, but the price is very reasonable. Please refer to the pricing section of the documentation.

Now let’s code.
appsettings.json
Add an OPEN_API_KEY item, then set the value to the API KEY you saved somewhere earlier.
The models
In the Solution Explorer, open the Models folder, create a new item ResponseModel.cs, and create three model classes inside “input” which serves as our input model, “Link” which will be used in ResponseModel, and the ResponseModel, which will be used to map the DALL-E API response.
The controller
Expand the Controllers folder in the Solution Explorer and look for the HomeController.cs.
Create a string variable APIKEY and set its value to empty. In the constructor, inject the IConfiguration interface so we can access elements in the appsettings.json, then set the value of APIKEY.
string APIKEY = string.Empty;
        public HomeController(IConfiguration conf)
        {
            APIKEY = conf.GetSection("OPENAI_API_KEY").Value;
        }
Now, let’s create an HTTP POST action and name it GenerateImage, which accepts the input model as a parameter from the request body.
In the GenerateImage method, let’s create an instance of ResponseModel and name it resp. Then we will create a new instance of HttpClient. Next, we will clear the default headers because we don’t want unnecessary headers for the request. Then, we will add an Authorization header, and from here, we will be going to use the APIKEY.
Then we will call the client.PostAsync method with the apipath and the serialized input model using JsonConvert.SerializeObject as the body and set its contentType to “application/json.”
If the response code is a success, we will read the content and set the value of resp from the deserialized value of the content using the JsonConvert.DeserializeObject class from Newtonsoft.json.
The complete HomeController should look like this:
The view
On your right, Solution Explorer > Views > Home> Open Index.cshtml
The view is very simple. We will add a page header “DALL-E API in .NET.” Then we’ll add a textarea txt for the prompt, an input that accepts a number quantity which is used for the number of images you want to generate, a combobox/select sel for the user to choose the image size, a button btn, and a div display where we display the images.
The JavaScript
On your Solution Explorer, expand the wwwroot folder, the js folder then open site.js.
From here, we will create a button click event listener and instantiate an input object to be used as our request body. Then we will send a post request to HomeController > GenerateImage method with the input object as a parameter.
If the request is a success, we will get the response in JSON format, and then we will loop through the data objects which contain the URL of the images. After that, we will create a div with an img element and set its source from the response URL generated by DALL-E API, and append it to the display div.
The output
Run the app, enter your text, enter how many images you want to generate, choose image size, then hit the Generate button, and voila! Here’s your Text-to-Image generator in .NET with DALL-E API.
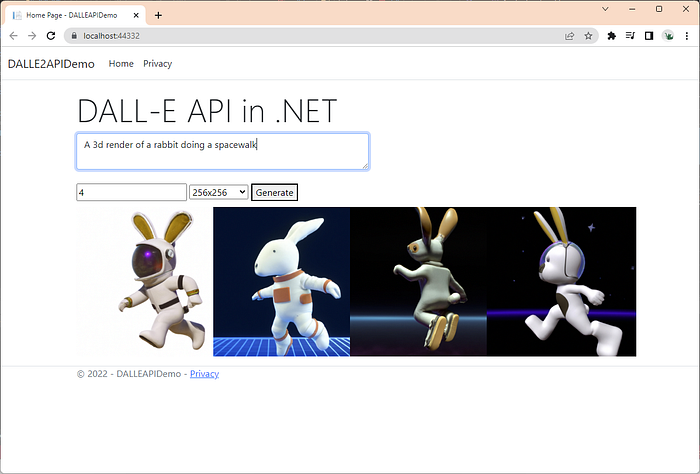
It is fascinating that .NET can also make use of the DALL-E API. With this demo project, we can explore other possibilities to embed DALL-E in various .Net projects such as desktop, mobile, and other .Net apps other than web apps.
If you like technology and coding topics, please enjoy more of my work. It will be my motivation to write more.
Thank you very much.
Happy coding, everyone.

