Create a Custom Web Editor Using TypeScript, React, ANTLR, and Monaco-Editor
Part 2: Implement language services, auto-completion, syntax and semantic validation and auto-formatting

Hello and welcome to part 2 of my article on how to create a custom web editor using Typescript, React, ANTLR, and Monaco-Editor. If haven’t read the first part, here is a link to it.
In this article, I am going to show you how to implement the language service that will take care of the heavy work of parsing the current typed text in the editor. We then use the generated Abstract syntax tree (AST) returned by the parser to detect any syntax or semantic errors, format the typed text or suggests defined TODOS to the user as they start typing (auto-completion, I’m not going to implement this one. I’ll just give a hint on how to do it and the required API).
Basically, this service will expose three functions:
format(code: string): stringvalidate(code: string): Errors[]autoComplete(code: string, currentPosition: Position): string[]
So let’s get started.
Add ANTLER, Generate Lexer and Parser From the Grammar
I’m going to add the ANTLR library and add a script to generate parser and lexer from ourTODOLang.g4 grammar file.
So first things first, add the necessary libraries: antlr4ts and antlr4ts-cli.
antlr4ts is the run-time library for ANTLR in typescript, antlr4ts-cli in the other hand as the name suggests is the CLI which we will use to generate a parser and a lexer for the language.
npm add antlr4tsnpm add -D antlr4ts-cli
Now, add the following file containing TodoLang grammar rules in the root directory:
Now we add a script in the package.json file to generate the parser and the lexer for us by antlr-cli:
"antlr4ts": "antlr4ts ./TodoLangGrammar.g4 -o ./src/ANTLR"The files will be generated in the directory ./src/ANTLR.
Let’s run antlr4ts script and take a look at the generated files:
npm run antlr4ts
As we can see, there is a lexer and a parser. If you check the parser file, you will find that it exported a class TodoLangGrammarParser; this class has a constructor constructor(input: TokenStream) that takes as argument the TokenStreamthat theTodoLangGrammarLexergenerates for a given code.
TodoLangGrammarLexer has a constructor constructor(input: CharStream) which takes the code as a parameter.
The parser contains a method public todoExpressions(): TodoExpressionsContext that returns the context of all TodoExpressions defined in the code. Guess where the TodoExpressions name came from? it’s from the name of the first rule in our grammar rules:
todoExpressions : (addExpression)* (completeExpression)*;TodoExpressionsContext is the root of our AST; each node inside it is another context for another rule. There are Terminals and Node Contexts, terminals hold the final token (maybe an ADD token, TODO token, or “name of the todo” token).
TodoExpressionsContext contains the addExpressions and completeExpressions, which comes from the following three rules:
todoExpressions : (addExpression)* (completeExpression)*; addExpression : ADD TODO STRING;
completeExpression : COMPLETE TODO STRING;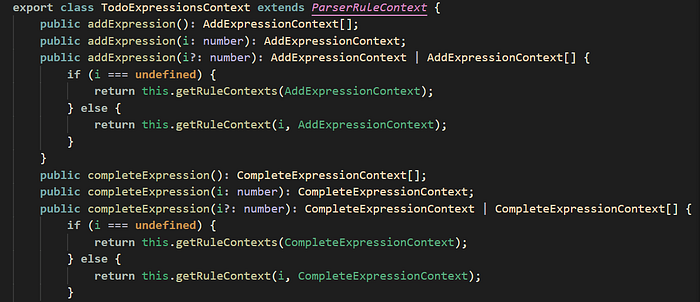
On the other hand, each of the context classes contains the Terminal Nodes, which basically holds the text (pieces or tokens of code like “ADD”, “COMPLETE”, “The string representing the TODO”). The complexity of the AST depends on the rules of your grammar; in our case, it’s very simple.
As we can see in TodoExpressionsContext, it contains ADD, TODOand STRINGterminal nodes, which correspond to these rules:
addExpression : ADD TODO STRING;
The string terminal node holds the text of the Todo we are trying to add.
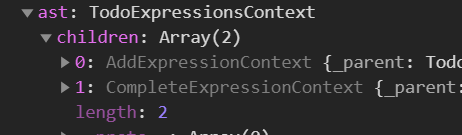
Let’s parse a simple TodoLang code to see how the AST looks.
In the direcotry ./src/language-service create a parser.tsfile with the following content:
All this file does is exports a function parseAndGetASTRoot(code), which takes the TodoLang code and generates the corresponding AST.
Parsing the following TodoLang code:
parseAndGetASTRoot(`ADD TODO "Create an editor"COMPLETE TODO "Create an editor"`)
will result in this AST:
Implementing Lexical and Syntax Validation
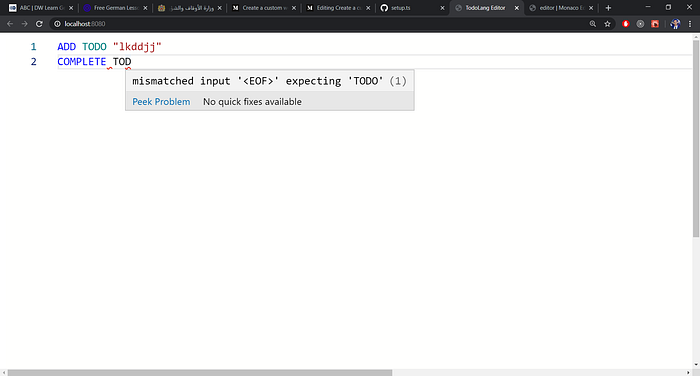
In this section, I’m going to walk you through how to add syntax validation to the editor, ANTLR, which generates lexical and syntax errors for us out of the box. We just need to implement a ANTLRErrorListnerand provide it to the lexer and parser so we can collect the errors as ANTLR parses the code.
Create a classTodoLangErrorListener that implements ANTLRErrorListner in the ./src/language-servicedirectory:
Every time ANTLR encounters an error during code parsing, it will call this listener providing it with information about the error.
We return a list of errors, which holds the position in which the error occurs within our code and a generated error message.
Let’s now add the listener to the lexer and parser in the parser.ts file, change its content to:
Now inside the ./src/language-service directory, create a file LanguageService.ts which exports the following:
We are good to go now and add errors to the editor. For that, first I’m going to create the web worker I talked about in my previous article and add our worker service proxy which will use the language service to do the work.
Creating the web worker:
First let’s create TodoLangWorker, which is the worker that will be proxied by monaco. TodoLangWorker will use the language service methods to execute the editor functionalities, those methods that are executing in a web worker will be proxied by monaco, so calling a method inside the web worker is just a matter of calling the proxied one inside the main thread.
Inside the ./src/todo-lang folder, create a file TodoLangWorker.ts with the following content:
As you can tell, we make an instance of the language service and add a doValidation() method that calls validate on the language service. The other stuff is just for getting the document text from the editor. There are many things that should be added if you want to support multiple file editing.
_ctx: IWorkerContext is the context of the editor, it holds models (open files…
Now let’s create a web worker filetodolang.worker.ts in the ./src/todo-lang directory, with the following content:
We used the built-in worker.initialize to initialize our worker and make necessary method proxies from the TodoLangWorker.
That’s a web worker, so we must tell webpack to bundle its own file. Head right to the webpack config file and add the following:
We named our worker file todoLangWorker.js.
Now we should go the editor setup function and add the following:
This is how monaco will get the URL of the web worker. Notice that if the label of the worker is the ID of TodoLang, we return the same file name that we used to bundle the worker in webpack.
If you build the project now, you could find that there is a file called todoLangWorker.js (or in the dev-tools, you will find in the thread section both workers).
Now let’s create a WorkerManager that manages the creation of the worker and helps us get a client of our proxied worker so we can use it later to make the calls.
We usedcreateWebWorker to create or run the web worker if it isn’t already created. Otherwise, we get and return the proxy client.
We can use workerClientProxy to call the proxied methods.
Let’s create DiagnosticsAdapter class that will adapt the errors returned by the language service to the errors that monaco needs to mark them in the editor.
What I did there is add a onDidChangeContent listener for every change the user makes. We debounce the changes for 500ms and then call the worker to validate the code and add the markers after adapting them.
The API onDidCreateModel is called when the file (model) is created, so at that moment we add the listener for changes.
setModelMarkers tells monaco to add error markers, or simply put, underlines the given errors.
To apply these validations, make sure to call them in the setup function, and notice that we are using WorkerManager to get the proxied worker.
Now everything should work fine. Run the project and start typing some bad TodoLang code; you should see that the errors are being underlined.
Here is the project so far:
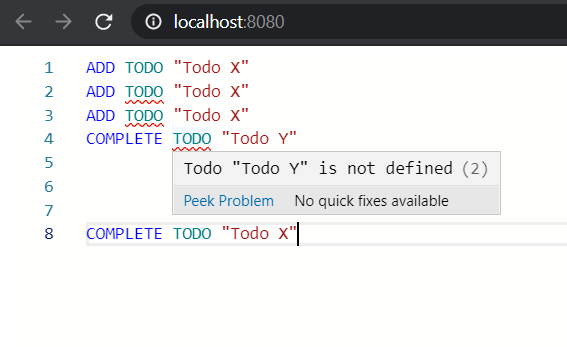
Implementing Semantic Validation
Let’s now add semantic validation to our editor. Remember the two semantic rules I mentioned in the previous article.
- If a TODO is defined using
ADD TODOinstruction, we can’t re-add it. - COMPLETE instruction should not be applied in a TODO that has not been declared using
ADD TODO
To check if a TODO is defined, all we have to do is iterate over the AST to get every ADD expression and push them to a list. We then check the existence of a TODO in the defined TODO list. If it exists it’s a semantic error, so get the position of the error from the context of the ADD expression and push the error to an array. The same goes for the second rule.
Now call this function and concatenate semantic errors with syntax errors in the validate function.
We now have the editor supporting semantic validation.
Implementing Auto-Formatting
For auto-formatting, you need to provide and register the formatting provider for Monaco by calling the API registerDocumentFormattingEditProvider. Check the documentation for more details. Calling and iterating over the AST will give you all the information you need to re-write the code in a pretty format.
Here is the format method in LanguageService. It takes the code and checks if there are errors in the code, and returns a formatted code:
Now let’s add the formatting provider to monaco, and use this service. Here I added format method to the todoLangWorker:
Now let’s create a classTodoLangFomattingProvider that will implement the interface DocumentFormattingEditProvider.
All it does is get the code and format it using the worker, and then provides monaco with the formatted code and the range of the code that we want to replace, in our case all of the code. You can change the code to support partial formatting.
Now go to setup function and register the formatting provider using registerDocumentFormattingEditProvider API.
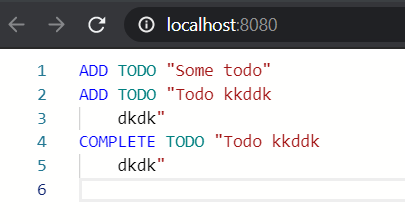
monaco.languages.registerDocumentFormattingEditProvider(languageID, new TodoLangFormattingProvider(worker));If you run the app now, you should see that it supports formatting.
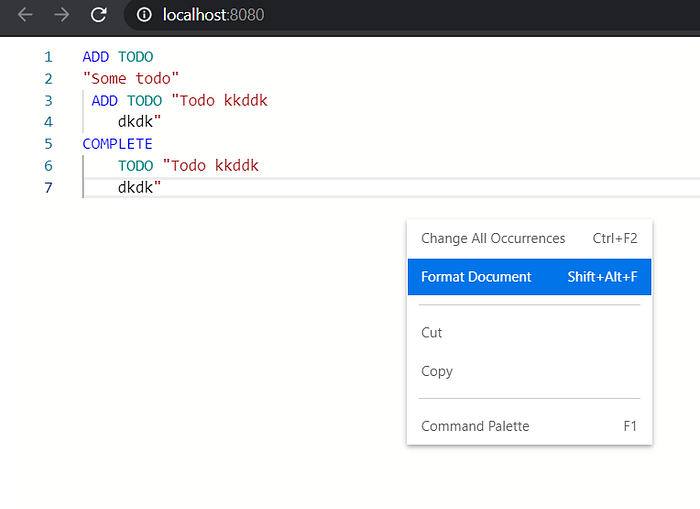
Try clicking on Format document or “Shift + Alt + F”, you should get the following result:
Implementing Auto-Completion
To make auto-completion supports defined TODOs, all you have to do is get all defined TODOs from the AST, and provide them in the completion provider by calling registerCompletionItemProvider in setup. The provider gives you the code and the current position of the cursor, so you can check the context in which the user is typing, if they are typing a TODO in a complete expression, then you can suggest pre-defined TO DOs. Keep in mind that by default Monaco-editor supports auto-completion for pre-defined tokens in your code, you may want to disable that and implement your own to make it more intelligent and contextual.
Here is the project:
Feel free to contact me if you have any questions, suggestions, or feedback.
Thanks a lot for your time.

