Computer Vision in iOS: Determine the Best Facial Expression in Live Photos
iOS implementation of Vision framework’s new face capture quality request
This story was originally published on my Substack, iOSDevie.
Apple brought in a lot of exciting new developments to its Vision framework during WWDC 2019. Not only have they improved face tracking and image classification, but they’ve also introduced interesting new features such as Saliency, built-in animal classification models, and enhanced APIs for working with Core ML classification models. Among the newer releases, the ability to compare face capture quality in a set of images is one of the most promising features that’s come out this year.
The introduction of face capture quality has given Vision’s face technology a major boost. It showcases how much Apple has been investing in the field of computer vision to make photo capturing and processing smarter and easier than ever before.
The face capture quality metric uses a model that’s been trained on a wide range of images( different exposures, lighting, facial expressions, etc). The Vision request analyses the image in one shot and assigns it a metric score. The score depends on facial expressions (negative ones get a lower score), lighting, focus, and blurriness in the image.
Using these metric scores, we can compare different images to find the one in which the face looks the best. This is something that’s going to arrive soon in many custom selfie-based applications.
Face capture quality not only helps in building smarter camera-based applications, as demonstrated in the docs, but it also helps in bringing machine learning intelligence to video processing. The goal of this article is to make Live Photos (more on this later) smarter by leveraging face capture quality in our iOS Applications.
Live Photos was introduced in iOS with the iPhone 6s and is one of the most loved modes of the camera. It redefined the way we look at still images by providing a live motion effect.
Scope
The idea is to find the best frame from a Live Photo that has a human face. We’ll be using the new VNDetectFaceCaptureQualityRequest class in order to run our Vision requests on a number of live photos that were intentionally captured in a bad/blurry state in order to extract the best frame from it.
However, you can also extend the same code and concept to videos as well. Live Photos essentially contain videos, as we shall see next.
Live Photos: Under the Hood

Live Photos are made up of an image and a video strip containing the actions performed during the capture of the image. This brings a sense of being there in the moment while viewing them.
Under the hood, live photos consist of a key photo paired with the video resource asset file. We can change the key photo by selecting any of the video frames from the preview-editing mode in the Photos application.
In order to access the key photo or the video in your code, you’ll need to use the class PHAssetResourceManager, which holds the asset resources. We’ll be using this in our implementation in the next few sections.
Plan of Action
Before we deep dive into the implementation, let’s lay out the blueprint. We’ll be using the following classes and components in the different stages of our application:
- An
ImagePickerControllerfor choosing live photos from the camera or photos library. PHAssetResourceto retrieve the video resource and store it in the temporaryFileManagerdirectory.- Using a
CollectionViewto display the video frames along with face quality metric value from the Vision request. - Finally, we’ll display the frame with the highest face capture quality in a
UIImageView.
The following illustration depicts a high-level overview of how the implementation is connected — from live photo capturing to video extraction to the Vision face capture quality request:

Now that we’ve laid down our action plans, let’s kickstart the implementation by setting up the user interface.
Setting Up the UI
The following code establishes the Buttons and ImageViews in our ViewController.swift file:
If the above code, looks big, it’s because instead of using storyboards, I’ve built the UI programmatically.
Setting Up Our Image Picker
One of the buttons aforementioned is responsible for starting the image picker, while the other completes the Vision request, which we’ll see later.
@objc func onButtonClick(sender: UIButton){let imagePicker = UIImagePickerController()imagePicker.sourceType = .photoLibraryimagePicker.mediaTypes = [kUTTypeImage, kUTTypeLivePhoto] as [String]imagePicker.delegate = selfpresent(imagePicker, animated: true, completion: nil)}
In the above code, we’ve set the ImagePickerController to access live photos from the Photos library. For the ImagePicker to work correctly, ensure that you’ve added the Privacy Usage description for “Photo Usage” in your info.plist file.
Video Extraction and Processing from a Live Photo
Live Photos are of the type PHLivePhoto. The following code is used to handle the Live Photo chosen from the image picker:
In the above code, we’re filtering the image picker results in order to return the Live Photo images by checking if the results returned contain aPHLivePhoto instance in the info dictionary.
Inside the processLivePhoto function, we’ll do the video resource extraction from the Live Photo, save it in a temporary URL in the FileManager, and extract the image frames from the video.
PHAssetResourceManager.default().writeData is responsible for writing the video buffers to the URL. Once the resource is written to the videoUrl, the imagesFromVideos function gets triggered thanks to property observers:
var videoUrl : URL? {
        didSet{
            DispatchQueue.global(qos: .background).async {
                guard let videoURL = self.videoUrl else{ return }
                self.imagesFromVideo(url: videoURL)
            }
        }
}
Extracting Frames from the Video
The following code extracts a certain number of frames (based on the video duration) and puts them in an array:
The generateCGImagesAsynchronously is responsible for extracting multiple frames from a video asynchronously for the NSValue (time) specified.
By using asset.duration and numberOfFrames, we determine the time interval between each frame that’s extracted. Currently, the numberOfFrames is set to 12 to limit the number of Vision requests we’ll perform. This seems fine for Live Photos, which are no longer than 3 seconds, though you could play with this number if you’re doing video processing.
There are a few properties we’ve defined at the start of the above code snippet. setCustomData is used to populate our CollectionView. For that, we need to set up our CollectionView first.
Before we start building our CollectionView, here’s a glimpse of the application at the halfway stage:

Of course, the horizontal collection view that’s seen in the above screen recording is yet to be implemented.
Setting Up CollectionView
We’d skipped the setupCollectionView function while setting up the other UI components at the start. It’s time to implement it.
In the above code, we’ve set up a horizontal collection view and registered a CustomCell class on it, which holds the layout for UICollectionViewCell
Collection View Cell, Data Source, and Delegate Methods
The following code sets up the collection view cell by adding a UIImageView and a Label to it.
The CustomData class holds the data for each cell. It’s the data source for our CollectionView. The following code defines it:
public struct CustomData {var faceQualityValue: String = ""var frameImage: UIImage}
Next, we need to define the delegate methods of our CollectionView:
Now, it’s time to handle the Vision request.
Setting Up the Vision Request
Our Vision handler will take each of the images from the CollectionView and run the VNDetectFaceCaptureQualityRequest on them to get the faceCaptureQuality score metric. We’ll simply display the image with the highest face capture quality in the UIImageView.
The following code runs the Vision request when the Button (the one with the eye icon) is pressed to trigger the selector method:
I ran the above Vision request on a few live selfie photos (intentionally blurry, with weird poses and expressions) to determine the best frame. Here are the results:
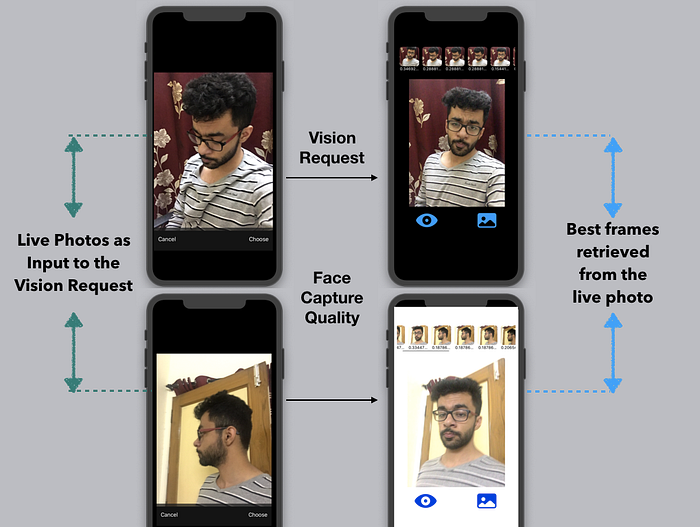
The above results illustrate how Vision helps in automatically determining the best face captured from the given set of images (i.e. video frames). The face capture quality Vision request is pretty quick and accurate for videos with a short duration, as we have with Live Photos.
Conclusion
So we’ve discussed the new changes introduced in Vision’s face technology with iOS 13 and macOS 15 (specifically face capture quality) and created a complete iOS application from scratch that uses this new feature on a Live Photo. The full source code is available in this GitHub repository.
Face capture quality is an exciting feature with a variety of use cases — from photo editing to anomaly detection (find out if the video/live photo has a human face or not).
Only time will tell whether Apple decides to introduce this feature in its built-in Live Photo feature for smart editing. Until then, you can try improvising upon the above application, maybe by storing the best frame as the key frame (which is displayed in the Photos library) of the Live Photo.
That wraps up this piece. I hope you enjoyed reading.

